Thoughts on this used welder?

   / Thoughts on this used welder? #251  
Looking good. It is a feel, it will happen. You Will Feel a good weld and just know it. The is no such thing as gorilla welding, just excuses for lack of care. It is a lot harder to make a pretty weld weak than an ugly weld strong. I use z and upside down u a lot depending on the joint. It sounds funny but practicing with you off hand will help you welding with your dominant hand & it just plain good to know how to weld with both.
Jody
 
   / Thoughts on this used welder?
  • Thread Starter
#254  
Just thought I'd dump this little repair here, since it didn't deserve a whole thread of its own.

2013-02-12_12-39-06_154.jpg

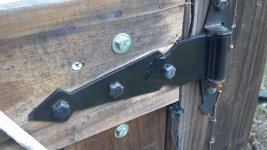
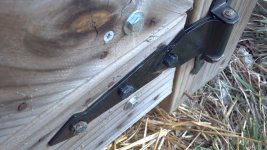
The hinges on my barn door are poorly designed. They bend and separate and break over time. You can see the separation starting in the photo above. One of them had broken completely. I had actually gone to TSC and bought replacements, and was pulling back into the driveway when I realized: hinges are made of metal. And I have a welder. Duh!

2013-02-12_12-38-19_309.jpg

2013-02-12_12-38-48_402.jpg

FIXED! I think they may continue to break, in which case I will weld up the side-seam between the front and back plates, which really ought to do the trick. But I didn't think of that until after I painted them and put them back on the door, so I didn't think it was worth the trouble to go back and do it now.
 
   / Thoughts on this used welder? #255  
Looks good! That's exactly the sort of farm repair I bought my welders for.
(and that weld sure looks prettier than some of mine!)
 
   / Thoughts on this used welder? #256  
Ain't it cool to have a welder.?:cool2:.. From the looks of those hinges I think they were designed for looks not for strength... so if they break again, weld em back! or add some more metal to them..

James K0UA
 
   / Thoughts on this used welder?
  • Thread Starter
#258  
2013-02-16 16.01.20.jpg

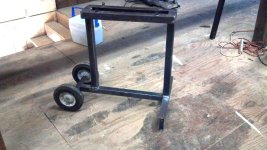
A little cart I rigged up for my Harbor Freight 4x6 bandsaw. 2" x 1/8" square tube and 2" x 1/8" angle iron. After getting it to this state, I decided a lift handle on the front would be helpful, so I'm going to weld a piece of 1" tubing with an end-cap on. Other than that, it's basically done. The angle iron legs are a little more flexy than I expected, but I think they'll be okay. If I had it all to do over again, I might not use angle for them.

On another job, I was cutting 1.5" holes in 3/8" stock with a hole saw. The plugs were the perfect size to make end-caps for the feet, and I eagerly fished them out of the scrap bin.

The main lesson of this job, however, is that fitup is king. I really, really need to go back to the bandsaw and get it that nth degree more in-true. Even relatively small gaps were nightmares with the 3/32" 7018 I started out using. If I had to sum up my experience, it would be that "welding is not just caulking with metal." When I encountered the gap, the first thing I did was point the electrode into the gap, as if the molten metal and heat would somehow magically know where I wanted it to be. No dice. The next thing I did was try to weave back and forth on either side of the gap. No dice. Finally, I went back with 6011 and slowly filled in the gaps and the melted off edges of the tubing where I had burned through. The result was a slag-filled mess, and I'm now in the process of grinding THOSE welds out and trying to go back and do something more quality. On the few joints where fitup was good (more by luck or coincidence than anything else), I did all right.

Welding: it's not just caulking with metal. Got it. You can't just point your electrode at a gap and wish the metal to fill it up.

As for warpage, I did okay. I'm especially proud that I was able to use the trick that I first learned from Jody at WeldingTipsAndTricks.com of setting the upright tube cocked just slightly away from the tack so that the tack pulled it into plumb. I also felt clever when I paid attention to which corner of the (not-perfectly-square) end of the tubing was low and tacked that corner first so that I wouldn't be in a situation where I had to pull against the tack to get the tube plumb as I finished up the tacking. The resulting cart is pretty square, plumb, and level, at least by my standards.

Another achievement that I'm proud of is that I built the top frame using overlapped/notched angle iron instead of miters. Cutting the notches, although in principle simple, is easy to screw up if your measurements are off (ask me how I know), but these pieces fit up snugly and were within about 1/16" of square right from the start. The top frame, I'm unreservedly proud of. (Well, okay, there was a tiny bit of porosity in a few of the welds, but I'm still proud.)

7018 has been my go-to rod thus far because it produces the best results for me, but I can see that it is vastly inferior to 6011 or 6013 when fitup is poor. Given that 6013 is said to have poor penetration, this adds some motivation for me to go back and practice more with 6011. As long as everything I was doing was either practice coupons or simple projects with good, easy fitup (e.g. putting bucket hooks on), 7018 was a rock star. On this cart, as soon as the fitup got less-than-excellent, 7018 fell flat on its face.
 
   / Thoughts on this used welder?
  • Thread Starter
#259  
My current project is a small portable welding table. I don't have permanent shelter near my 220v outlet, so I'm constantly rolling my welder into and out of the basement. I currently weld on a pair of saw horses, but that's hardly ideal. The welding table will provide both a work surface and a cart in one.
2013-03-01 15.54.27.jpg

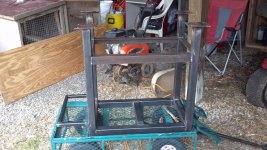
Here's the table in its current state (upside down, of course). I have learned a whole lot about keeping things square and true in this project. I got the legs within 1/4" of square while welding up the top of the table, then used a hydraulic jack to push them into final position while welding in the lower shelf support. I can't even really imagine how somebody would build something like this without the lower supports to keep the legs that last little bit of true.

Of course, after finishing welding the legs on, they were not all the same length. Well, they were all cut to the same length, but they didn't all get welded onto the top at exactly the same height, so with the top level, not all four legs were touching the ground. I worked around this by welding on the two "low" legs' plates first, then leveling the table top and sliding the "high" legs' plates underneath them, then tacking them on such that the orientation between the "high" leg and the ground was maintained. The final result is that there is about 1/16" of wobble, but I concluded that was about as good as I was likely to get and left well enough alone. I plan to take out that last bit of wobble by shimming the caster with washers.

On the bandsaw cart, I came to appreciate the weakness of 7018 and the strength of 6011 in jobs where fitup is poor. 7018 lays a pretty, pretty bead, but when there is a gap, it will blow holes in this 1/8" material no matter how careful I am, especially at the edges. As a result, I have been burning a lot more 6010, and have improved my ability to run that rod by leaps and bounds. Don't get me wrong: my 6010 beads are still so terrible that they're not really even worth critiquing, but they're much less terrible than they used to be! I have been trying to hold myself to standards and to grind out any beads that I wouldn't be willing to show my face with in public. It's very tempting to just say, "it'll hold," and move on, but I remind myself that every weld I grind out is another practice bead I get to run. In many cases, I laid down a bead that I knew was terrible just to get some metal in the gap, before grinding smooth and going back over it again.

All this grinding has been educational, as it reveals the inner structure of the weld, including any slag inclusions or porosity. I have had a few welds with no inclusions, but most of them have at least a little inclusion. Interestingly, there doesn't seem to be much correlation between how good/consistent a bead appears on the outside, and its likelihood of having an inclusion. The ones that didn't have inclusions were pretty ugly on the outside.

One lesson that I'm taking to heart is that if a bead isn't going right, it's better to just knock it off and fix what's wrong. For example, if I start the bead and feel that my wrist is going to get bound up before the end, I should stop, readjust my position, and pick up again. Working with 7018 discourages restarts, and so I had picked up the bad habit of just trying to push through to the end--to the detriment of my welds.
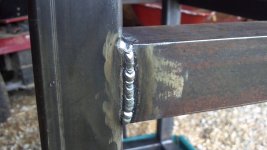
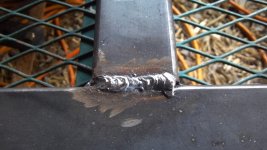
2013-03-01 15.54.49.jpg 2013-03-01 15.55.33.jpg

Above are a couple examples of my welds on this project. As I said, they are hardly even worth critiquing, but they are worlds better than my 6010 used to be. The main thing that I think is wrong with them is that they are cold. Either that, or my travel speed was too slow, but I suspect coldness is the issue. Unfortunately, when I ran hotter, I tended to blow through. Only by turning down the heat could I get the puddle to work slowly enough that I could manipulate it with any consistency.
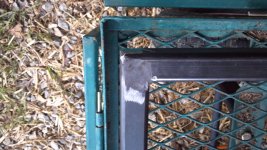
2013-03-01 15.54.38.jpg

Finally, here's the weld in the project that I am most proud of. This is the handle of the cart, so I ground the weld smooth, since it would be coming into frequent contact with people's hands. When I finished, and there was no undercutting or porosity--just a smooth metal surface, as if it had always been that way--I was really thrilled.

EDIT: In case you're wondering, this is all 1/8" thick material, and I'm welding using about 60 amps with 3/32" E6011.
 
   / Thoughts on this used welder? #260  
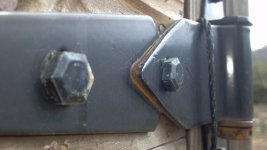
In time you'll figure out with 6010, and 6011 arc length plays a big part! Long arc length gap is a hot flowing puddle. Close arc length is a colder dryer puddle.
You really need to work on wrapping your corners. ;)
 
 
Top