Acceptable Stress in final welds for mild steel

   / Acceptable Stress in final welds for mild steel #1  
K

kousnetz

Guest
I'm MIG welding a portable welding table which will have 1/2 or 5/8" top, legs are 2x3", 1/8" thick, 30" long. Legs are welded to a 1/4" thick subframe of 2" flat stock. I'll also reinforce it with a "shelf" welded with 1/4" thick 2x2 angle iron. Final size will be 3'x4'. Question: I've welded legs to the subframe and 2 of them a very slightly out of plumb... I can bring them to perfect plumb with a bar clamp which pulls them together 5/8" over a 33" span. Is this OK to use the cross bracing welding to hold them plumb or am I putting too much stress on the cross bracing? I'm very new to welding and appreciate any advice. Thanks
 
   / Acceptable Stress in final welds for mild steel #2  
NO. Keeping things plumb, square, and in alignment is a common problem due to the heat of the welding process. spring your legs into plumb weld the bracing and good to go.
Keep in mind heat expands the welded joint thus causing. in this case, the angle iron leg to expand away from the welded side. The deviation can be eliminated (mostly) by tacking the parts together first,checking the alignments and then weld one side of the angle heel to toe and the other side of the angle toe to heel. The opposing forces of the welding heat should result in things ending up pretty square
Be sure to clean the tacks well so they will be swallowed up in your final pass for the strongest joint
 
   / Acceptable Stress in final welds for mild steel #3  
I wouldn't think twice about holding them plumb with the cross bracing.
Or you can break out the torch and do a little heat shrinking before welding in the cross bracing.;)
 

Attachments

  • angle iron.JPG
    angle iron.JPG
    24 KB · Views: 113
  • Angle Iron fast.JPG
    Angle Iron fast.JPG
    14.9 KB · Views: 106
  • Angle Iron slow.JPG
    Angle Iron slow.JPG
    15.9 KB · Views: 92
   / Acceptable Stress in final welds for mild steel
  • Thread Starter
#4  
NO. Keeping things plumb, square, and in alignment is a common problem due to the heat of the welding process. spring your legs into plumb weld the bracing and good to go.
Keep in mind heat expands the welded joint thus causing. in this case, the angle iron leg to expand away from the welded side. The deviation can be eliminated (mostly) by tacking the parts together first,checking the alignments and then weld one side of the angle heel to toe and the other side of the angle toe to heel. The opposing forces of the welding heat should result in things ending up pretty square
Be sure to clean the tacks well so they will be swallowed up in your final pass for the strongest joint

Thank you Budweiser John. To clarify, the legs are actually rectangular 2x3" stock but the "heel to toe" concept holds, which if I understand you means on one leg, I weld the 2" side then the 3" side and on the other leg I do the 3 first then the 2 and this will hopefully cancel the alignment pull from the heat. Do I have this right? (it's the cross bracing which is the angle stock to which I intend to weld an expanded metal "floor" for tool storage and possibly even my welder). Again, many thanks
 
   / Acceptable Stress in final welds for mild steel
  • Thread Starter
#5  
I wouldn't think twice about holding them plumb with the cross bracing.
Or you can break out the torch and do a little heat shrinking before welding in the cross bracing.;)

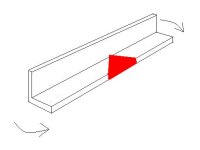
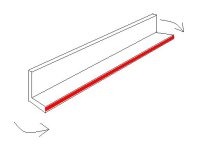
Thank you Shield Arc... I'm so new to welding that the only torch I own is a propane silversmith type torch... I'd need an acetylene torch to heat shrink thick stock, is that right? And the sketches you sent, it's the red colored areas that get the heat and you just heat them until the level bubble hits the middle, (but then as it cooled, wouldn't it return to out of plumb?)Thanks
 
   / Acceptable Stress in final welds for mild steel #6  
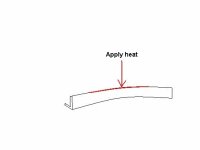
I like to use oxygen & acetylene torch for heat shrinking. Most of the time I just use a cutting tip. For really thin material I'll use a welding tip. For large beams I'll use a rose bud.
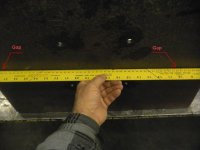
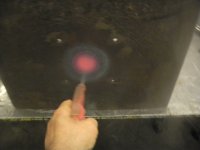
Yes heat the red area. You can let it cool by it's self or spray water on the heated zone to speed things up. No, once you heat something, and it cools it moves, then stays there. The technique is easy, the trick is, how much heat to apply!
 

Attachments

  • Heat shrink 2 gap.jpg
    Heat shrink 2 gap.jpg
    80 KB · Views: 109
  • Heat shrink 3.JPG
    Heat shrink 3.JPG
    237.4 KB · Views: 103
  • Heat shrink spray.JPG
    Heat shrink spray.JPG
    225.8 KB · Views: 107
   / Acceptable Stress in final welds for mild steel
  • Thread Starter
#7  
OK, got it. Thanks again for your expertise
 
   / Acceptable Stress in final welds for mild steel #8  
I like to use oxygen & acetylene torch for heat shrinking. Most of the time I just use a cutting tip. For really thin material I'll use a welding tip. For large beams I'll use a rose bud.
Yes heat the red area. You can let it cool by it's self or spray water on the heated zone to speed things up. No, once you heat something, and it cools it moves, then stays there. The technique is easy, the trick is, how much heat to apply!

Thanks for another great lesson for us newbies!! :) :thumbsup:
 
   / Acceptable Stress in final welds for mild steel #9  
This was very informative !
 
   / Acceptable Stress in final welds for mild steel #10  
I like to use oxygen & acetylene torch for heat shrinking. Most of the time I just use a cutting tip. For really thin material I'll use a welding tip. For large beams I'll use a rose bud.
Yes heat the red area. You can let it cool by it's self or spray water on the heated zone to speed things up. No, once you heat something, and it cools it moves, then stays there. The technique is easy, the trick is, how much heat to apply!

[Budweiser ad voice: Here We Go!]

SA, no offense, but if you're gonna post stuff like this:

"oxygen & acetylene torch" - Best ones? What should I buy if I've never used one before? Should I even have one? (Yea, I know really dumb question).

"welding tip" - OK, this is about welding, but what does it look like????

"cutting tip" - What does that look like?

"rose bud" - OMG - just when you thought it couldn't possibly get any worse!!! What the heck does a bunch of roses have to do with welding???? Wait, are we taking heating or welding, I'm lost.....


"spray water" - thank god, finally something I know about!


Never mind, maybe it's better to start another thread and not derail this one.

Thanks (from the torch-challenged ones)!
 
 
Top