Bobtach Pins & Bushing Rebuild

   / Bobtach Pins & Bushing Rebuild #1  

Hilbilly

Veteran Member
Joined
Dec 21, 2014
Messages
1,217
Location
Barriere, BC
Tractor
Kubota Grand L6060HSTCC
The pins and bushings in my 763 Bobtach were all badly worn and it was almost impossible to do any reasonable grading with it. I took it to a machine shop and was given a verbal estimate of $1800 just to bore out the 2 end pins and the ears. That didn't include any replacement parts just the boring. So a little research on the net and I found some home made methods for boring the ears. I also figured I would try making my own pins and bushings with the small metal lathe and a milling machine I recently purchased. It took considerably longer than expected but the whole thing was a learning experience and well worth the effort. I also discovered that machining is a LOT more complicated than it appears.

I didn't get pics of all the pins and bushings I made (should have but got busy and forgot). In total there were 4 pins and 7 bushings (including 2 temporary tapered alignment bushings).

I even did some heat treating for the first time.

Here are some pics:

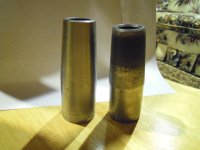
1. Old and new tapered pins.
DSCN2171.JPG

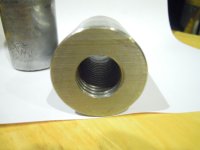
2. Internal threads on new pin.
DSCN2179.JPG

3. Worn pin receiver that is oblong and tapered from front to back. Should be straight.
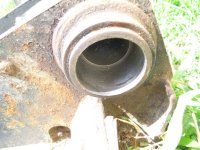
DSCN2181.JPG

4. New bushing tapered to fit wear on receiver and straight in the middle.
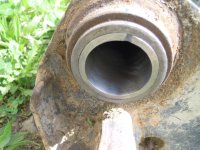
DSCN2183.JPG

5. New pin sitting in new bushing. Nice snug fit.
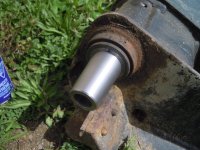
DSCN2184.JPG

6. Getting the boring bar centered in the ears using tapered bushings.
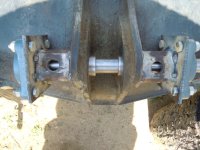
DSCN2211.JPG

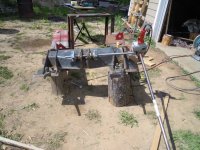
7. All set up and ready to bore.
DSCN2213.JPG

8. Boring bar cutter shown between the ears. This was pulled and pushed into the ears on each side.
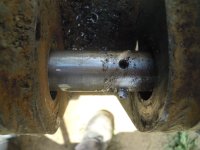
DSCN2214.JPG

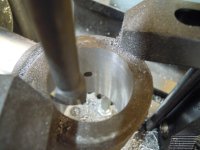
9. Tilt cylinder on mill. Lots of time required to set it up. This bore wasn't even included in the $1800 quote.
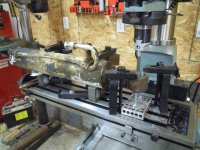
DSCN2231.JPG

10. Finished tilt cylinder bore.
DSCN2230.JPG

I can't believe the difference this made. It's like a totally different machine. There is no slop in the tilt function of the bucket now and before this there was probably 4" to 6" of slop. Turned out better than expected. I'm very happy and I've learned some new skills, which I'm sure will come in handy in the not so distant future.:)
 
   / Bobtach Pins & Bushing Rebuild #2  
Very nice. I guess I should not mention that Bobcat sells weld in replacements for both boom and tilt plate. How much time involved for the pivot refresh?
 
   / Bobtach Pins & Bushing Rebuild
  • Thread Starter
#3  
Oddly enough, after I did all this and was so proud of my efforts, I talked to a friend who has done this many times before and was told there was a MUCH easier way to do it. Probably what you are eluding to. He said there were weld in bushings on each of the "ears" that I could have ground down and knocked out but I didn't see any indications of this when I ground the outside of them, before welding on the bearing plates for my home boring operation. That would have saved me a bunch of time too. It's odd that never came up during my research of this issue or when I went to the machine shop or when I talked to the parts guy at Bobcat (who has been the most helpful parts person ever). The cylinder eye still needed to be bored though as it was also badly worn. Before doing this work I bought a new cylinder bushing from Bobcat and after about 20 hours of use it was all distorted and cracked due to the slop in that connection.

Can't really say how much time I spent doing the pivots but I know it was a lot and that's due to the fact that I have no experience with this sort of thing or machining. When I took it apart, one of the factory pivot bushings fell out. The other one took a lot of effort. I first tried running a weld bead around the inside of the bushing and waiting for it to shrink after cooling but that didn't work because I burned through the bushing in one spot and tacked it to the housing.:ashamed: Next I made a threaded lug to fit in the end of the bushing and welded that to the bushing then made a puller to get it out. That did the trick. I doubt it was a perfect fix because I had no way of ensuring the alignment of the new bushings was true to the plate but with the low hours that I use this machine I'm hoping it will last long enough. If not I'll have to come up with a better way to do this. If it wasn't for the bushing removal problem I'm guessing it took 3 or 4 hours to clean up the holes, take measurements and machine the tapered bushings.

Edit: I just looked at the parts diagram I got from Bobcat and still don't see any weld in bushings on the Bobtach ears. Are you referring to the ones on the sides and bottom of the Bobtach?
 
   / Bobtach Pins & Bushing Rebuild #4  
The boom or ears as you refer have a weld in bushing pt #6717666 available. I have and use a tapered reamer if not too bad. Bobtach plate bushing pt# 6731979. Its hard to tell from the photo but do you have the tapered part of the pin facing the boom? :thumbsup:
 
   / Bobtach Pins & Bushing Rebuild #5  
Interesting refurbishing project.

Are tapered pins common in industrial equipment? Those must be 2" in diameter.

I am about to repair the worn main boom pivot on my backhoe attachment, and there
are sleeve bearing inserts that I can replace. But my pins are only 32mm.
 
   / Bobtach Pins & Bushing Rebuild
  • Thread Starter
#6  
The boom or ears as you refer have a weld in bushing pt #6717666 available. I have and use a tapered reamer if not too bad. Bobtach plate bushing pt# 6731979. Its hard to tell from the photo but do you have the tapered part of the pin facing the boom? :thumbsup:

Looks like I am causing confusion by using the wrong part names. The part I call the "ears" is the flange on either side of the tilt cylinder, where it connects to the Bobtach. In the parts diagram I have, part 6717666 is shown just below the bottom end of the boom arm. I'm guessing that part fits into the boom arm and the 3/4" bolt goes through it and into the pin. I wasn't aware of there being a bushing in there. From the wear signs on the old pins, I think that bushing is fine because the old pins don't show a lot of wear in those areas.

I left part 6731979 in place and replaced the small bushing that sits in the end of it (part 6730997) with a larger tapered OD bushing after cleaning up the end of the larger bushing. Your right, the tapered part of the pin I made is facing out.

I guess time will tell if I did a good enough job. So far, after about 10 hrs of use it is still very tight. The only thing I noticed is that I had to retighten the pin bolts a couple of times. I think I might need a longer handle to get more torque on it. I'm only using a 1/2" drive breaker bar to tighten it. The last time I gave it all I had and it stayed tighter.
 
   / Bobtach Pins & Bushing Rebuild
  • Thread Starter
#7  
Interesting refurbishing project.

Are tapered pins common in industrial equipment? Those must be 2" in diameter.

I am about to repair the worn main boom pivot on my backhoe attachment, and there
are sleeve bearing inserts that I can replace. But my pins are only 32mm.

Not sure if tapered pins are normal, as I don't have any prior experience with this sort of thing.

The tapered pins have an OD of 1.5" along the straight part and the 2 pins for the tilt cylinder are 1.25" OD each.

Have fun with your replacement work. If you catch the wear before it gets into the frame itself, the replacement should be simple.
 
   / Bobtach Pins & Bushing Rebuild #8  
Looks like I am causing confusion by using the wrong part names. The part I call the "ears" is the flange on either side of the tilt cylinder, where it connects to the Bobtach. In the parts diagram I have, part 6717666 is shown just below the bottom end of the boom arm. I'm guessing that part fits into the boom arm and the 3/4" bolt goes through it and into the pin. I wasn't aware of there being a bushing in there. From the wear signs on the old pins, I think that bushing is fine because the old pins don't show a lot of wear in those areas.

I left part 6731979 in place and replaced the small bushing that sits in the end of it (part 6730997) with a larger tapered OD bushing after cleaning up the end of the larger bushing. Your right, the tapered part of the pin I made is facing out.

I guess time will tell if I did a good enough job. So far, after about 10 hrs of use it is still very tight. The only thing I noticed is that I had to retighten the pin bolts a couple of times. I think I might need a longer handle to get more torque on it. I'm only using a 1/2" drive breaker bar to tighten it. The last time I gave it all I had and it stayed tighter.
You did a great job. It should last no problem. You can come work in my shop anytime.
 
   / Bobtach Pins & Bushing Rebuild
  • Thread Starter
#9  
You did a great job. It should last no problem. You can come work in my shop anytime.

Thanks for the complement.

I'm sure if I came to work in your shop I'd be fired the first day for being too slow. But being retired I can take more time to fool around with stuff like this and not have to worry about being fired.:laughing:
 
 
Top