Getting that old pine reddish-honey color RIGHT NOW

   / Getting that old pine reddish-honey color RIGHT NOW #11  
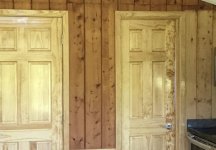
Here is an example of aged T&G southern yellow pine installed in the early 70's that had been given a poor polyurethane coat. Pine just soaked up the clear coat available back then. On the right is an area that was covered until recently. The beautiful pine doors are new but maybe in another 40 years it will all match. No direct sunlight, fireplace, smokers, etc. I'm not a fan of the orange color but love my little cabin.
597EA189-D007-433C-AE15-77034960837F.jpg
 
Last edited:
   / Getting that old pine reddish-honey color RIGHT NOW
  • Thread Starter
#12  
Great feedback. Thank you. Next trip out and about I will pick up some shellac, stain, sealer, etc and do some testing.
 
   / Getting that old pine reddish-honey color RIGHT NOW #13  
Pine is such a near neutral light color - with the right stain you should be able to get just about any final color you want.

A couple pieces of Ponderosa pine trunk from the trees at my place. Both have been left outside, in the weather for 10+ years. I call this - telephone pole grey. View attachment 684511View attachment 684512
 
   / Getting that old pine reddish-honey color RIGHT NOW #14  
I haven't done it on pine, but I find that boiled linseed oil gives many woods that warm aged look. Especially if you can put it in direct sunlight after applying the oil. An oil-based urethane goes over linseed oil no problem once it's dry.

Take a piece of scrap, coat it with linseed oil and set it out in the sun for a couple days and see what it looks like.
 
   / Getting that old pine reddish-honey color RIGHT NOW #15  
Did some remodeling in the basement of our 20 year old house finished in t&g pine interior. Took a sample of existing wood to hardware store. Minwax honey pine stain matched it perfect in one coat. You can hardly tell the new stuff from the old t&g unless you knew. Minwax has multiple shades on a sample brochure.
 
   / Getting that old pine reddish-honey color RIGHT NOW #16  
A little late to the post. We like the ambered look of knotty pine T&G. Our old house had ambered over the years. Don't know when the T&G was put up.

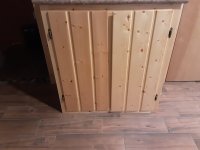
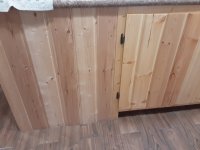
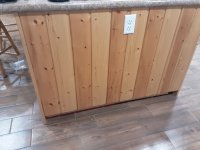
In our new house I am building the cabinets using knotty pine T&G. Look at some of the boards below. These are finished with 3 coats oil based polyeurethane. Some of the unfinished boards were a more red color. The second picture shows a finished door on the right, while the left is a temporary unfinished cabinet space for a future dishwasher.20210424_195811.jpg20210424_195728.jpg20210424_195713.jpg
 
   / Getting that old pine reddish-honey color RIGHT NOW #17  
I'll pass on a trick I used when I did a major renovation some years back.
My client wanted the entire walls to be wood and preferably cedar but due to costs we went with pine, and not exactly first grade either.
Lots of sanding on rough areas was required as well and naturally we needed to seal or varnish the wood.

My 'trick' !
I never vacuumed or dusted those walls.
What I did was to apply a Danish oil* finish with a sponge which in turn wiped away any sawdust as I applied the oil finish.
The Danish oil once dried sealed the pores like a varnish would do.
Also the product was available pre tinted with many choices.
Did a great job and was fast and easy to apply.
I'd every so often wring out the sponge to clear whatever sawdust was accumulated.
The finish was better than brush application as there were no drips streaks or runs that brushing often cause.

A recent visit confirmed the success after some 14 years.
That pine sure blended in with the cedar of the rest of the house.

And did I say fast?
I suggest no brush or roller application could come near the wet sponge technique.

*we used Minwax brand, (label suggests it is a polyurethane based oil)
 
   / Getting that old pine reddish-honey color RIGHT NOW #18  
Add a little alcohol to the danish oil to help penetration.
 
   / Getting that old pine reddish-honey color RIGHT NOW #20  
Try steel wool and vinegar. Soak a couple of steel wool pads in a quart of vinegar overnight or longer; use a glass container, mason jar works well. A little experimenting on scrap wood is necessary to determine if you need multiple coats to achieve the desired shade, but it is very easy to apply, and cheap!
 
 
Top