3PH top-and-tilt setup and use

   / 3PH top-and-tilt setup and use #1  

mpowrd

Bronze Member
Joined
Aug 24, 2005
Messages
88
Location
California
Tractor
Kubota BX24
I need some advise from someone out there experienced with hydraulic top-and-tilt setups.

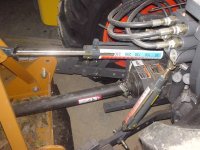
I got a Kubota BX24 last fall with a dealer-installed top-and-tilt kit from Gearmore. Tilt cylinder is on the right side (with the factory threaded link on the left). Right now, with the threaded link almost all the way extended, the box blade is level with the tilt cylider almost all the way compressed.

The service manager at my dealer said that the hydraulic setup is designed to be used mostly in extension, meaning I will be able to tilt the box fairly far to the right (right side down), but not much to the left.

Is this how a top-and-tilt setup should work? Or should I set it up so that with the box level, the hydraulic link is in the middle of its travel?
 
   / 3PH top-and-tilt setup and use #2  
Your tilt cylinder should be half way extended when your 3 point hitch is level, and that should be with the adjustable side link adjusted half way out. Gearmore may not have the correct side link for your model.
 
   / 3PH top-and-tilt setup and use
  • Thread Starter
#3  
MtnViewRanch: Thanks! I thought so. I need to do some measuring and then try to drill another set of holes in the tilt cylinder lower clevis. I think I get closer to the ideal set-up if I do that.
 
   / 3PH top-and-tilt setup and use #4  
If you have problems getting the top-n-tilt to set up properly, let us know. We can help with a shorter hydraulic side link.
 
   / 3PH top-and-tilt setup and use
  • Thread Starter
#5  
MichiganIron: Thanks! I've contacted the service manager at the dealer I got it from (they installed it for tractor delivery) and he's willing to work with me to iron out the bugs.

I think the holes in the clevises on the side cylinder were probably drilled too far away from the cylinder. I'm going to take some measurements on my stock links and see if the existing side cylinder can be easily modified to have a shorter length.

If that fails, I'll keep you in mind.
 
   / 3PH top-and-tilt setup and use #6  
mpowrd said:
The service manager at my dealer said that the hydraulic setup is designed to be used mostly in extension, meaning I will be able to tilt the box fairly far to the right (right side down), but not much to the left.

That comment makes my skin crawl. (You sure he wasn't the sales manager... ) He's either new or blowing you off. If it only tilts in one direction then you only have one direction you can drive the tractor. Frequently that's not an option, like grading along a house with a jog in the wall or a tree near it. Often, you have to back up to the obstruction and grade forward.

I ordered my L4330 with the Kubota/Gearmore T&T, returned them for credit, and replaced them with some aftermarket ones that were better for several reasons. These aftermarket ones have a length adjustment on the sidelink that lets you coarse adjust the overall length for various size tractors. That way you aren't using up the limited cylinder stroke. Instead of the eyelet being directly welded to the cylinder's rod, it's part of an "eyebolt" that threads into a threaded cylinder rod. see picture.

What ever modifications need to be done, make sure the dealer does them so you have some recourse if you're still not satisfied.

John
 

Attachments

  • DSC00787.JPG
    DSC00787.JPG
    61.5 KB · Views: 547
   / 3PH top-and-tilt setup and use #7  
jmc said:
That comment makes my skin crawl. (You sure he wasn't the sales manager... ) He's either new or blowing you off. If it only tilts in one direction then you only have one direction you can drive the tractor. Frequently that's not an option, like grading along a house with a jog in the wall or a tree near it. Often, you have to back up to the obstruction and grade forward.

I ordered my L4330 with the Kubota/Gearmore T&T, returned them for credit, and replaced them with some aftermarket ones that were better for several reasons. These aftermarket ones have a length adjustment on the sidelink that lets you coarse adjust the overall length for various size tractors. That way you aren't using up the limited cylinder stroke. Instead of the eyelet being directly welded to the cylinder's rod, it's part of an "eyebolt" that threads into a threaded cylinder rod. see picture.

What ever modifications need to be done, make sure the dealer does them so you have some recourse if you're still not satisfied.

John

jmc thank you so much for that picture! I've been trying to envision a system for measuring the position of cylinders and your pics gave my brain that last nudge it needed. Thank you!
j
 
   / 3PH top-and-tilt setup and use
  • Thread Starter
#8  
jmc: I had exactly the same thought when I asked "What about if I need to tilt the left side of the box down?" and he replied "Just turn around an go the other way.". Excuse me! This is the Santa Cruz Mountains we're talking about, not a bloody soccer field! My property has geographic features than often dictate travelling in one direction only.

I'm attaching a couple of pics of the adjustable and hydraulic links. You can see the attachment point on the top of the side cylinder is substantially further from the cylinder body than on the factory adjustable link. I think it could be about an inch closer. Also, there is room to move the lower attachment point upward by at least an inch. Should be able to get the hydraulic link about 2 inches shorter with just a little drilling and welding.

I took some measurements today at lunch and I think there is enough clearance that if the cylinders attachment holes in the clevises welded to the cylinder are relocated (maybe with some welding to re-enforce the remaining metal), I can get the mid-point of the cylinder travel pretty close to the standard fixed length link, then by using the factory adjustable link I can fine tune the level position. Then I would have pretty close to equal travel in both directions.

For sure I'm going to take the service manager up on this offer to "make it right" so any mistakes in drilling or welding and subsequent problems are on his back.

I'm grateful this forum has so many knowledgable people on it so that I was able to verify my assumptions and get great advise so quickly.
 

Attachments

  • rear links.jpg
    rear links.jpg
    136.9 KB · Views: 451
  • side link cylinder.jpg
    side link cylinder.jpg
    133.8 KB · Views: 516
   / 3PH top-and-tilt setup and use #9  
mpowrd said:
I took some measurements today at lunch and I think there is enough clearance that if the cylinders attachment holes in the clevises welded to the cylinder are relocated (maybe with some welding to re-enforce the remaining metal), I can get the mid-point of the cylinder travel pretty close to the standard fixed length link, then by using the factory adjustable link I can fine tune the level position. Then I would have pretty close to equal travel in both directions.

In looking at your pictures, I noticed the bottom fork on your hydraulic sidelink is almost bottomed out against the lower lift arm due to the angle as the lift arm goes to its lowest position. However, the upper fork going to the link ball could be redrilled to make the whole sidelink at least 1" shorter without causing any interference at any angle. That would be an easy fix and probably the first one I would try.
 
   / 3PH top-and-tilt setup and use #10  
Be careful with moving the hole in the clevis too far up the side. The reason for the gap between the top of the clevis and the hole is to allow the lift arm clearance for moving up and down. If the hole is too high in the clevis, the clevis will bottom out on the lift arm as the angle changes.

Take your three point through a full up and down cycle and see how much clearance you need before re-drilling the holes.
 

Tractor & Equipment Auctions

Gravely Pro-Turn 152 Zero Turn Mower (A50860)
Gravely Pro-Turn...
1972 Ford F600 Grain Truck (A51039)
1972 Ford F600...
UNUSED Four-Layer Black Metal Storage Shelf (A50860)
UNUSED Four-Layer...
Hitch-Mounted Spare Tire Carrier (A48083)
Hitch-Mounted...
Komatsu PC138 (A50490)
Hay Fork (A50860)
Hay Fork (A50860)
 
Top