A complete dozer hydraulic rebuild

   / A complete dozer hydraulic rebuild #1  

MadReferee

Elite Member, Rest in Peace
Joined
Apr 28, 2003
Messages
3,741
Location
New Hampshire
Tractor
Kubota B2710, IH TD6-62 dozer with Drott 4n1 bucket loader
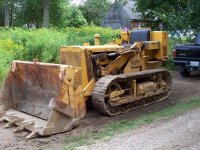
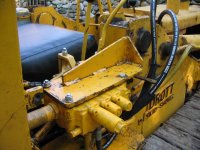
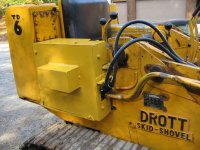
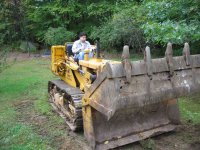
In the fall of 2005 I purchased a 1963 International TD6-62 crawler with a Drott Skid Shovel loader and 4-n-1 bucket. After using it hard for a few hours the hydraulics started to act up by going into bypass under load and overall just getting weaker. With winter approaching I felt it was time to get everything fixed. My friend who owns a local hydraulic repair shop offered to do the work for a reduced price if he could do it in his "spare" time. Little did I know that his "spare" time would take almost 9 months for the work to be done, but the final bill was reasonable considering all the hours he spent and the parts he used.

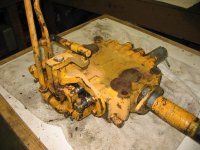
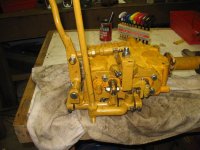
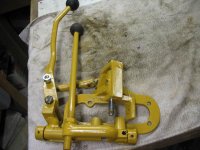
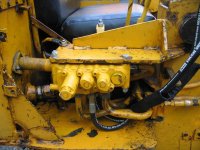
So before winter set in I removed the hydraulic pump and 3-spool control valve and linkage. After careful examination we found that there were 4 main problems:
  1. relief valve problems both with the main relief and possibly some of the work port reliefs (low pressure settings)
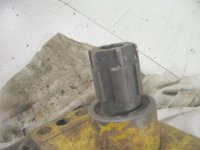
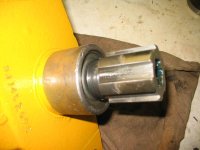
  2. Badly worn/damaged PTO to pump spline adapter
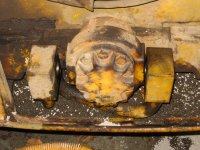
  3. Weak pump
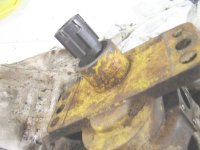
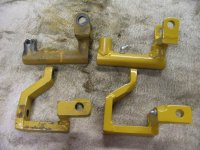
  4. Control linkage broken and not properly repaired
 

Attachments

  • dozer as purchased.jpg
    dozer as purchased.jpg
    94.8 KB · Views: 4,179
   / A complete dozer hydraulic rebuild
  • Thread Starter
#2  
The spool valve was really worn with several problems. The main relief had what my hydraulic expert called a "burn thru" whereby the fluid had actually carved out part of the valve and casting so that fluid would bypass. Old age he called it. This required re-machining the valve and the casting and some hand lapping. He also found the load check for the lift spool to be worn. More hand lapping to create a tight fit. The lift spool's detents for float and raise were recut and new balls installed. The settings for the main relief valve and 3 work port reliefs valves were set to the Drott manual specs for my serial number. They were originally set about 33% too low.
 

Attachments

  • valve and linkage before.jpg
    valve and linkage before.jpg
    81.9 KB · Views: 1,138
  • valve and linkage after.jpg
    valve and linkage after.jpg
    65 KB · Views: 978
   / A complete dozer hydraulic rebuild
  • Thread Starter
#3  
The PTO shaft to pump spline adapter was almost completely worn and showed signs of spinning on the PTO shaft. The spline was built up using a spray weld technique and re-machined back to its original specs.

From what I understand, these couplings are not hardened and designed to "give" which is why you see the notching. The splines in the PTO shaft are harder than the coupling splines because I guess there is a lot of snap torque every time the engine bogs down and picks up again. Eventually the coupling splines will either wear out or round off enough to cause the PTO shaft to spin without turning the pump. Komatsu still has the couplings in stock, new at $354 each. It's much more cost effective to have a good machinist repair a well worn one.

Spray welding is a process whereby powdered metal is sprayed onto a heated surfce to build it up. It is used extensively in the automotive engine industry to repair valve seats, etc., and several other applications like scoring repairs on shafts, etc. You can get many different types (hardness) of metal to spray. It works real well for cast iron and other metals where normal welding will not. My friend's shop uses spray welding to repair scored hydraulic pump shafts, pistons, etc.
 

Attachments

  • spline before.jpg
    spline before.jpg
    39.9 KB · Views: 892
  • spline after.jpg
    spline after.jpg
    47.3 KB · Views: 817
   / A complete dozer hydraulic rebuild
  • Thread Starter
#4  
The Commercial series D pump was rebuilt using new bearings and seals. Luckily none of the pump gears were bad as these parts are no longer available.
 

Attachments

  • pump in dozer.jpg
    pump in dozer.jpg
    97 KB · Views: 1,038
  • pump and spline adapter.jpg
    pump and spline adapter.jpg
    79.9 KB · Views: 1,019
   / A complete dozer hydraulic rebuild
  • Thread Starter
#5  
The control linkage, which is made from poor quality (by todays standards) cast steel, had several cracks and components that were broken and repaired using the Rube Goldberg method. I made new parts out of solid bar steel using my lathe and milling machine.
 

Attachments

  • linkage before.jpg
    linkage before.jpg
    80.6 KB · Views: 624
  • linkage after.jpg
    linkage after.jpg
    70.3 KB · Views: 615
  • new linkage parts.jpg
    new linkage parts.jpg
    70.1 KB · Views: 605
   / A complete dozer hydraulic rebuild
  • Thread Starter
#6  
Everything is now reassembled and installed into the dozer. While I was at it I fabricated a new cover for the spool valve. The original cover was lost somewhere during the last 40 or so years so I fabbed this one using a photo from an original TD6-Drott marketing brochure and an original Drott parts manual.

It's basically 3 sections of 1/8" plate plasma cut and welded together. The original was 2 pieces but I made mine 3 pieces for ease of assembly.
 

Attachments

  • spool valve installed 1.jpg
    spool valve installed 1.jpg
    75.2 KB · Views: 855
  • spool valve installed 2.jpg
    spool valve installed 2.jpg
    77.9 KB · Views: 796
  • covers before painting.jpg
    covers before painting.jpg
    52.3 KB · Views: 576
  • cover installed.jpg
    cover installed.jpg
    73.5 KB · Views: 827
   / A complete dozer hydraulic rebuild
  • Thread Starter
#7  
One more thing. After sitting for almost 10 months the old girl started right up on about the second turn of the starter.

I initially cranked the starter for about 10 seconds to get some oil pressure in the system then activated the glow plugs for the normal 45 or so seconds and hit the starter button. With no hesitation it fired like it was never idle at all.
 

Attachments

  • my son dozing.jpg
    my son dozing.jpg
    95.8 KB · Views: 1,153
   / A complete dozer hydraulic rebuild
  • Thread Starter
#9  
hazmat said:
Lookin good. Now we need some action shots before this winter sets in.:D
The picture above of my son pushing logs out of the way was taken last week just after everything was put back together but before the cover and new hoses were added. I't kinda tough to take pics of yourself while getting real work done.:D :D
 
   / A complete dozer hydraulic rebuild #10  
MadReferee said:
It's kinda tough to take pics of yourself while getting real work done.:D :D


Very nice job on the rebuild!!!

I know what you mean about not being able to get pics. I often find myself in some pretty interesting situations and wish somebody would take a picture of me in those situations. Luckily I have a wife now who enjoys doing just that when she's around.

I'd love to see that 4 in 1 bucket moving some logs around!!!!!!

Eddie
 
 
Top