Edit: Looks like RadioMan already gave you this advice while I was typing.Your top link holder is on upside down. It is jamming on the weld that you use to hold the top link when it is not in use. Flip the holder so it is on the correct way and it should extend on the other end. Don't forget to adjust both end of the toplink so you have a even amount of moment out of each end.
You are using an out of date browser. It may not display this or other websites correctly.
You should upgrade or use an alternative browser.
You should upgrade or use an alternative browser.
Top link length adjustment is way too limited
- Thread starter check
- Start date
- Views: 10723
/ Top link length adjustment is way too limited
#11
OP
check
Elite Member
- Joined
- Sep 26, 2008
- Messages
- 4,012
- Tractor
- 2009 Kubota BX25
Edit: Looks like RadioMan already gave you this advice while I was typing.Your top link holder is on upside down. It is jamming on the weld that you use to hold the top link when it is not in use. Flip the holder so it is on the correct way and it should extend on the other end. Don't forget to adjust both end of the toplink so you have a even amount of moment out of each end.
Thanks so much, guys. What a great help! :thumbsup: I am headed up this morning and will keep you posted on the fix.
James
Chilly807
Elite Member
It might be upside down, but I don't think it's end-for-end. Normally the locknut is on the outer end so you can easily get a wrench on it. There should be an equal amount of thread showing on both ends though.
Sean
Sean
CHDinCT
Veteran Member
Edit: Looks like RadioMan already gave you this advice while I was typing.Your top link holder is on upside down. It is jamming on the weld that you use to hold the top link when it is not in use. Flip the holder so it is on the correct way and it should extend on the other end. Don't forget to adjust both end of the toplink so you have a even amount of moment out of each end.
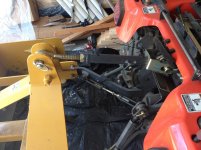
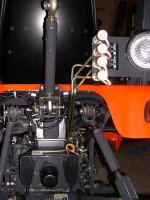
Maybe I'm crazy, but I mount my top link holder (what you have the arrow pointed to in your picture) the other way around on my BX. I don't use it like you have when the top link is in service. Pretty sure the bracket is used to hold the top link in a vertical position when not in use. There's a slot on the bottom end of the bracket that slips into a welded pin (going from memory - tractor is not in front of me now) and holds the top link up. When you want to use the top link, pull the holder up, then let it rotate down and out of the way on the top link pin. To me it looks like side forces would bend/break your TL holder they way you have it now. Here's a pic of my old TL in the stored position before I moved to a hydraulic top link.
Attachments
rbarker
Platinum Member
Maybe I'm crazy, but I mount my top link holder (what you have the arrow pointed to in your picture) the other way around on my BX. I don't use it like you have when the top link is in service. Pretty sure the bracket is used to hold the top link in a vertical position when not in use. There's a slot on the bottom end of the bracket that slips into a welded pin (going from memory - tractor is not in front of me now) and holds the top link up. When you want to use the top link, pull the holder up, then let it rotate down and out of the way on the top link pin. To me it looks like side forces would bend/break your TL holder they way you have it now. Here's a pic of my old TL in the stored position before I moved to a hydraulic top link.
The way you show this is the way mine is set up as well. I'm pretty sure that's how it was designed to work. As far as you being crazy....we'll have to take your word for that!
") LOL
LOLSent from my iPad using TractorByNet
OP
check
Elite Member
- Joined
- Sep 26, 2008
- Messages
- 4,012
- Tractor
- 2009 Kubota BX25
Thanks so much, guys. What a great help! :thumbsup: I am headed up this morning and will keep you posted on the fix.
James
Got it. It was almost seized up, but I did manage to loosen the threads on the longer end so I could thread them in and shorten the whole thing enough to let the front of the box blade dig in. And Radiman, I did reverse the bracket and the top link. (Had to straighten out the bracket, because it was indeed pretty bent up from me trying to force things while it was binding on the top link weld.
So, the box blade is happily digging in now, and helping me to make a road and also to smooth over some pot holes on the neighbors' cottage access road.
Thanks again guys - TBN is great!
James
(Will post pics soon.)
OP
check
Elite Member
- Joined
- Sep 26, 2008
- Messages
- 4,012
- Tractor
- 2009 Kubota BX25
It might be upside down, but I don't think it's end-for-end. Normally the locknut is on the outer end so you can easily get a wrench on it. There should be an equal amount of thread showing on both ends though.
Sean
Sean, I think you are right about the end-for-end issue. I think Will reverse it again.
James
OP
check
Elite Member
- Joined
- Sep 26, 2008
- Messages
- 4,012
- Tractor
- 2009 Kubota BX25
The little plugs you are looking at are there so you can knock out a rollpin. That is what keeps you from unscrewing all the way. Also there should be a grease fitting in the middle of the top link. You do not adjust my screwing on one end at a time. Adjustment is made by ends hooked up and you turn the center.
LeeJohn, what is a rollpin. Also, there are 4 of these nipples, each threaded in, but no grease nipple, so I just squirted some grease into these holes. Isn't that how you grease it?
James
k0ua
Epic Contributor
LeeJohn, what is a rollpin. Also, there are 4 of these nipples, each threaded in, but no grease nipple, so I just squirted some grease into these holes. Isn't that how you grease it?
James
this is a rollpin. Instead of a solid pin, a rollpin is a springy piece of steel that is taperered a bit on the ends to be able to force it into the hole and the spring pressure helps hold the pin in place. You take a rollpin punch to punch them out. notice the little protuberance on the end of the punch that keeps it centered in the hollow of the rollpin. You do not need to grease inside, just run the threads out a bit and spray on some lube and run the ends back in. it will carry the lube to the threads just fine.
GRAINGER APPROVED VENDOR Roll Pin, 1/4 In Dia by 1 In - Parts - 5WLG3|5WLG3 - Grainger Industrial Supply
PROTO Punch, Roll Pin, 1/8 In - Hand Held Punches - 1Q760|J49018 - Grainger Industrial Supply
James K0UA
