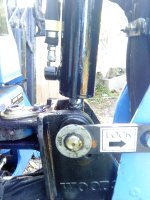
Welding recommendations for this part ...

   / Welding recommendations for this part ... #21  
Too much stress on the part for a weld. This is one of those time to buy new.
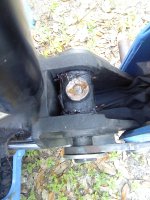
how do you think they make those parts? They weld them.
 
   / Welding recommendations for this part ... #22  
I agree with those that said to try welding it. Like they said, if it breaks again then maybe you can buy a replacement... Also as mentioned, that weld can not go through the cylinder seals. So any grinding out needs to be below that point.

The way I would probably tackle this is:
If there is enough texture in the break to be able to line it back up how it broke I'd put it together and tack weld it. 8 tacks ought to be good. That will get your alignment back on the piece. From there grind or cut out sections to weld a little at a time. Start with shallower smaller sections and do the opposite side after a 1st side. You need to start smallish and then work to deeper welds so it doesn't warp itself out of alignment. You will likely want to grind/cut out your initial shallow welds and redo them deeper once you have enough weld to hold it. Let it cool enough to touch by hand in between pairs of welds. You don't want it so hot that every weld you make pulls the tip in the new weld direction.

Good luck and let us know how it turns out.
 
   / Welding recommendations for this part ...
  • Thread Starter
#23  
I was able to get one more picture that shows the break a little better - still from the phone so not the best picture
Pic_0507_034.jpg
We have a friend coming over later to look at it. He will let us know if it is something he can weld with our welder or if we need to take it elsewhere. He has welded for 50+ years and used to own his own shop.
 
   / Welding recommendations for this part ...
  • Thread Starter
#24  
Got it welded! :thumbsup::)

Our friend had no problems with it. When he put the parts together they way they broke, it lined itself right up because there were a couple small "protrusions" that fit in the corresponding depression just like plugging it into a socket.

He then tacked it in place and did as was suggested with grinding the beveled space in between the two pieces. He welded from inside to out then cut the tacks and ground that area and finished the deep welds. When he had it sufficiently built up he did a continuous bead around the entire rod.

I took a picture of the cylinder back on the tractor. It works just like new. :cool:
36.jpg
 
   / Welding recommendations for this part ... #25  
Congrats on getting it back together.

I have to admit though, I was in the "just buy a new one" camp until I saw the last picture. That painted a WHOLE different picture from what I was envisioning in my mind.

Since it was the ORIGIONAL weld that broke, welding is no problem at all.

But as others have said, if it was the rod itself that broke, welding would not have been a good option. Those rods are induction hardened and chrome plated and can never be welded to as good as a NEW one peice rod.

I do have to ask another question though...

You said it was the bucket rod cylinder that broke right????

Do you do a lot of lifting and pushing yourself along?? Was that what was going on when it broke???

Because just normal digging, that cylinder and weld is under compression. And it looks to me that in order to break that weld, it had to be under tension. Not saying you are doing anything wrong. Just wondering how it broke is all.
 
   / Welding recommendations for this part ...
  • Thread Starter
#26  
This is the cylinder that lifts the boom not a bucket cylinder.

On this particular BH the bottom of the boom is connected to the frame/support by a large pin that uses a bolt to hold it in place. There is one of these on each side instead of a solid rod extending all the way through. The bolt on one of them had backed out and the pin fill out. The entire boom assembly probably had some extra stress on it while I was digging through some roots with full "up" pressure when it snapped.

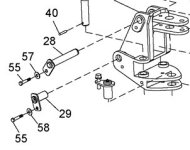
Here is a digram of the part that is missing (part #29) I have a new one on the way.
BH Boom.jpg
 
   / Welding recommendations for this part ... #27  
Well since your screen name means "success" in Klinglon, I guess you had some Qapla! :)

James K0UA
 
   / Welding recommendations for this part ... #28  
Got it welded! :thumbsup::)

Our friend had no problems with it. When he put the parts together they way they broke, it lined itself right up because there were a couple small "protrusions" that fit in the corresponding depression just like plugging it into a socket.

He then tacked it in place and did as was suggested with grinding the beveled space in between the two pieces. He welded from inside to out then cut the tacks and ground that area and finished the deep welds. When he had it sufficiently built up he did a continuous bead around the entire rod.

I took a picture of the cylinder back on the tractor. It works just like new. :cool:
View attachment 264470

Glad my suggestion worked for ya. Looks great! You'll have to let us know how it holds up.
 
   / Welding recommendations for this part ... #29  
Got it welded! :thumbsup::)

Our friend had no problems with it. When he put the parts together they way they broke, it lined itself right up because there were a couple small "protrusions" that fit in the corresponding depression just like plugging it into a socket.

He then tacked it in place and did as was suggested with grinding the beveled space in between the two pieces. He welded from inside to out then cut the tacks and ground that area and finished the deep welds. When he had it sufficiently built up he did a continuous bead around the entire rod.

I took a picture of the cylinder back on the tractor. It works just like new. :cool:
View attachment 264470

Pretty cool! Nice to hear your friend was able to get it fixed and thanks for sharing what was done in such nice detail. I'm assuming he stick welded it?
 
   / Welding recommendations for this part ... #30  
Because just normal digging, that cylinder and weld is under compression. And it looks to me that in order to break that weld, it had to be under tension. Not saying you are doing anything wrong. Just wondering how it broke is all.
as explained it wasn't the case here, but....
even just cycling compressive loads can cause cracks. I noticed a crack int eh big metal shear in the the school welding shop. that one doesn't even return. It has a spring to do that.
 
 
Top