Building a stick frame house in the woods in 90 days

   / Building a stick frame house in the woods in 90 days #1,321  
And Stu, yeah there is some "warpage", there is a metal frame on the backside of the gates, but the pressure treated wood has a mind of it's own once in awhile. You should have seen some of the pieces that I replaced a few weeks after the fence went up and it had a chance to totally dry in the sun...they looked like spaghetti. :laughing:

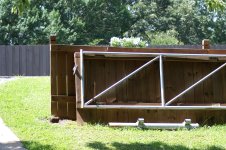
Got a pic of the metal frame you built? I understand that PT warps, bucks and twists all too well, plus it is very heavy. I am thinking that is the reason that a lot of folks opt for gates made out of steel and paint them black for the wrought iron look. I just wonder what it takes to make one that looks like it is wooden, is not heavy as heck, and lasts.
-Stu
 
   / Building a stick frame house in the woods in 90 days #1,322  
Good god, I didn't build the fence, I had it installed. :laughing: I can't find any pics of the frame on my photobucket, I'll take one tomorrow if I remember.
 
   / Building a stick frame house in the woods in 90 days #1,323  
Stu, here's a shot of the backside of one of the gates. This is from last year when my brother backed into it. :laughing:

PICT0005.jpg
 
   / Building a stick frame house in the woods in 90 days #1,324  
mjncad, that looks really good! Where did you get those clamps/straps you used to tie the drains to the foundation?

The clamps are stainless steel, and I got them from FarmTek - Hydroponic Fodder Systems, Farming & Growing Supplies, Hoop Barns, Poultry & Livestock Equipment, High Tunnels, Greenhouses & More or possibly Quality Farm & Industrial Supplies and Clothing | QC Supply

In any case I don't see them on their web sites; but found them in their paper catalogs many years ago.

If you don't glue the rectangular to round transition piece to the top of your soil pipe it is very easy to unscrew the downspout screws from the hangers and remove the downspout for a more direct access to the elbow in the ground below it without any visible Y stub sticking out from, or against the wall at ground level. Ron

I didn't glue my round to rectangular adapters either for the reasons you mention; but I wanted the clean-outs for convenience, and downspout removal is a secondary method if need be.

I blame Martha Stewart for all the paint color crap. :laughing:

I like your thinking; but this paint naming nonsense began long before Martha became a household name. Depending on the size of the company, they either have in-house geniuses who do nothing but come up with goofy names to market paint colors, or they hire consultants specializing in such matters.

A buddy of mine told me about an acquaintance who worked for a carpet company and they made an olive drab colored carpet and they named it "Olive Drab" or "Drab Olive." In any case it didn't sell, so they took it off the market for a few months to a year, renamed it something appealing and sold off all the inventory of that ugly crap that had lying around.

It's all about marketing.


Jay:

I see you are having the same issue with your wooden entry gates as do most people - they warp like crazy over time. Even Peter has this problem at his own property (not the one being discussed here). The only solution I can think of is to have steel or aluminum entry gates on steel posts all wrapped in a wood facade. Does anybody have any better suggestions?
-Stu

My vinyl gates are doing the same thing, and I keep saying I need to build a metal frame for the out of sight backside.
 
   / Building a stick frame house in the woods in 90 days
  • Thread Starter
#1,325  
Here are some pics from yesterday, which was

Day 88

The T&G for the ceiling arrived, as did the trim and front door

day88-1.jpg


day88-2.jpg


day88-3.jpg


Got a serious nick on the front. Hopefully that can be patched up.

day88-4.jpg


Front door "specs". This is not exactly the solid hardwood door we had in mind, but I think it will look pretty good once stained, and should be very low maintenance after that.

day88-5.jpg


Closet doors in master bedroom

day88-6.jpg


Closet doors in entry hallway. Not sure why that one leaf is so different than the other. I guess it adds "character", but might think about flipping it around or something.

day88-7.jpg


One of the doors. The door panels themselves will be replaced with solid core ones. Builder ordered hollow cores by mistake.

day88-8.jpg


Of course it was pouring down rain starting yesterday afternoon. Very heavy at times.

day88-9.jpg


They did manage to get the propane tank buried before it started raining. Hopefully it won't become a floater!

day88-10.jpg


Rain, rain and more rain...

day88-11.jpg


A crew is coming this morning to start cutting down the rest of the pines, and they (different crew) will also start on the trim, and hang the front door. Tomorrow the electricians will be back to hook up the well pump and work on misc other electrical tasks.
 
   / Building a stick frame house in the woods in 90 days #1,326  
I didn't glue my round to rectangular adapters either for the reasons you mention; but I wanted the clean-outs for convenience, and downspout removal is a secondary method if need be.
.

A little caution on the threaded plug in your Y. Only make it finger tight.
I have a threaded cap like that on the riser for my dual leach field turn valve. In time the UV and weather will make it stick and it also becomes brittle.
I got mine too tight once and had to use a big monkey wrench to get it loose. Instead the riser pipe broke, so instead of a 5 minute valve turn job it
became a dig and replace the entire tube assembly job.
Ron
 
   / Building a stick frame house in the woods in 90 days #1,327  
A crew is coming this morning to start cutting down the rest of the pines, and they (different crew) will also start on the trim, and hang the front door.

Good thing you said different crew. Otherwise, I would have said get the carpenters to cut the trees down and let the tree guys do trim work:cool2:
 
   / Building a stick frame house in the woods in 90 days #1,328  
Peter:

As far as patching the front door goes. That appears to be on the outside. While some people will probably think I am crazy, I strongly recommend the use of light weight body filler - yes the generic term is Bondo. I used it on my screened-in porch to cover up quarter size holes where the porch attaches to the house with large lag bolts. It worked perfectly and still looks good some 15 years later. The beauty of body filler is that it will not shrink, expand, or crack. In addition, since it is a mix with resin, it dries for sanding in 1/2 hour or less. If you opt for the light weight filler, it is easy to sand. I have never worked with the full strength stuff but imagine it would be very hard to sand.
-Stu
 
   / Building a stick frame house in the woods in 90 days #1,329  
This is cute. What did they do; forget to seal the end caps?

How did the front gutter handle all the rain at the valley?

This would be a good day for you to inspect the basement, especially the window they shortened and put the window well around.
Did they just fill that with dirt against the tar paper that has flake board behind it?
Ron
 
Last edited:
   / Building a stick frame house in the woods in 90 days #1,330  
The closet doors should be replaced with solid core too. Those hollow ones sound like a gun went off every time you slide them shut against the frame. It looks like your contractor tries to sneak in cheap materials hoping you won't catch it before they have gone too far. I thought your specs called for "stain grade" baseboard?

The orange wall in the front bedroom shows all the mud tape and patching through the paint in your flash picture. Are they giving it another coat of paint?
Not trying to be critical, just want you to get your money's worth.
Ron
 
 
Top