MiserableOldFart
Platinum Member
- Joined
- Jun 27, 2006
- Messages
- 543
- Location
- Delaware County Catskills NY
- Tractor
- NH Workmaster 40, Kubota GR2120
Ok, I'm not complaining here about the failure of a small part. Small parts fail. A pin of some kind (I never saw it all together and the part that broke off is gone) in the "shuttle" control broke and at 338 hours on the tractor, my 12A loader was non functional. Stuff happens, and I kept my cool and carefully removed the shroud and boot to see what was going on.
(I removed the link I had here because it didn't work. Will add photo when I get a chance.)
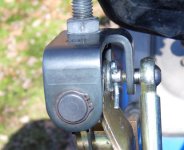
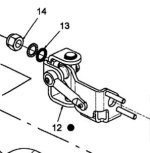
The pin (in the picture at that web site of the joystick control mechanism - the right side of the horizontal a little over the number 12. It is separate from the bolt that holds that ball joint to the side facing out by about a half inch or so, maybe a little less.) apparently broke off. It's the part that acts as the fulcrum for the up/down motion of the whole loader (height, not angle.) It could have been no big deal if it were just a pin, but for some probably valid engineering reasons I do not understand, it was welded at the "head" part, so the entire assembly would need to be replaced. No big deal, thought I, naive and unversed in the world of CNH parts.. It's about a half pound of metal, fairly intricate, but nothing more complex than you would find in several places, say, on your $99 computer case or a bicycle. It looked a little tricky to remove and replace, but I thought I could handle it ok. It's #12 in the picture. #12, with the exception of the bolted on "ball joint" that is visible is one piece with no sub parts for sale. So I looked up the price of the part, and found it to be between $300 and $400. Now, I had changed my filters and oils in the spring and when it cost me roughly $150 I didn't go ballistic or cry or anything, and I didn't whine when it cost me $13 to replace a rubber cover on a tiny foot pedal, but this was really a little bit much. There is also a "kit" available for about $500 which, I assume includes the part in question and the doodads that hook into it. I don't know but it would appear that's what it is, but there isn't a lot of info with it.
Naturally I set out to try to find a way to repair the thing without shelling out all that cash. I thought maybe that the "head" that is on the side of the "pin" (I'm calling it that but it probably has another name.) would tap out, but it is welded. That left two choices: either cut/grind it off or drill it. I opted for the latter, figuring if it comes to that, the former choice would still be a viable alternative. So as to prevent the chance of any metal shavings from getting into anything, I had to remove the part, which entailed some patient work, keeping calm in the face of tiny e clips and such, and carefully noting (took pictures just in case) where everything was supposed to go.. Spoke to the dealer whom I had emailed several times over the weekend in a panic because of the snow, and he seemed to think my ideas were at least worth a shot before shelling out several hundred bucks for a replacement.
Unfortunately, because of lack of clearance, my idea of a bolt and nut didn't work out too well because the only nut that will fit is a jam nut, and I really needed a lock nut to keep the thing together while leaving it loose enough to operate. I tried some thread lock and when all is together everything works smoothly but I have no delusions that the nut wills stay there for any length of time. Therefore I looked up online and found some pins in the proper diameter (5/16" is as close as I could determine, though it may actually be a metric very close to that - there seems to be a splendid mix of metric and SAE involved here.) and I'm hoping a pin will be able to withstand the forces both up and down (should be no problem) and side to side (which might be.) There is also the possibility of using the bolt/jam nut with either permanent loctite or a spot weld to lock it. Those are my ideas if the pin doesn't hold.
I'd appreciate hearing from anyone with a similar experience who might have been able to successfully address this.
To tell the truth, given the complexity of this shuttle mechanism, and the expense entailed in replacing it, I'd almost prefer a two lever loader with two simple fulcrums.. One lever is handy, but not THAT handy..
The link doesn't work and I removed it, so tomorrow, I'll take a picture of what's going on..
(I removed the link I had here because it didn't work. Will add photo when I get a chance.)
The pin (in the picture at that web site of the joystick control mechanism - the right side of the horizontal a little over the number 12. It is separate from the bolt that holds that ball joint to the side facing out by about a half inch or so, maybe a little less.) apparently broke off. It's the part that acts as the fulcrum for the up/down motion of the whole loader (height, not angle.) It could have been no big deal if it were just a pin, but for some probably valid engineering reasons I do not understand, it was welded at the "head" part, so the entire assembly would need to be replaced. No big deal, thought I, naive and unversed in the world of CNH parts.. It's about a half pound of metal, fairly intricate, but nothing more complex than you would find in several places, say, on your $99 computer case or a bicycle. It looked a little tricky to remove and replace, but I thought I could handle it ok. It's #12 in the picture. #12, with the exception of the bolted on "ball joint" that is visible is one piece with no sub parts for sale. So I looked up the price of the part, and found it to be between $300 and $400. Now, I had changed my filters and oils in the spring and when it cost me roughly $150 I didn't go ballistic or cry or anything, and I didn't whine when it cost me $13 to replace a rubber cover on a tiny foot pedal, but this was really a little bit much. There is also a "kit" available for about $500 which, I assume includes the part in question and the doodads that hook into it. I don't know but it would appear that's what it is, but there isn't a lot of info with it.
Naturally I set out to try to find a way to repair the thing without shelling out all that cash. I thought maybe that the "head" that is on the side of the "pin" (I'm calling it that but it probably has another name.) would tap out, but it is welded. That left two choices: either cut/grind it off or drill it. I opted for the latter, figuring if it comes to that, the former choice would still be a viable alternative. So as to prevent the chance of any metal shavings from getting into anything, I had to remove the part, which entailed some patient work, keeping calm in the face of tiny e clips and such, and carefully noting (took pictures just in case) where everything was supposed to go.. Spoke to the dealer whom I had emailed several times over the weekend in a panic because of the snow, and he seemed to think my ideas were at least worth a shot before shelling out several hundred bucks for a replacement.
Unfortunately, because of lack of clearance, my idea of a bolt and nut didn't work out too well because the only nut that will fit is a jam nut, and I really needed a lock nut to keep the thing together while leaving it loose enough to operate. I tried some thread lock and when all is together everything works smoothly but I have no delusions that the nut wills stay there for any length of time. Therefore I looked up online and found some pins in the proper diameter (5/16" is as close as I could determine, though it may actually be a metric very close to that - there seems to be a splendid mix of metric and SAE involved here.) and I'm hoping a pin will be able to withstand the forces both up and down (should be no problem) and side to side (which might be.) There is also the possibility of using the bolt/jam nut with either permanent loctite or a spot weld to lock it. Those are my ideas if the pin doesn't hold.
I'd appreciate hearing from anyone with a similar experience who might have been able to successfully address this.
To tell the truth, given the complexity of this shuttle mechanism, and the expense entailed in replacing it, I'd almost prefer a two lever loader with two simple fulcrums.. One lever is handy, but not THAT handy..
The link doesn't work and I removed it, so tomorrow, I'll take a picture of what's going on..
Last edited: