jimmysisson
Veteran Member
- Joined
- Jul 11, 2005
- Messages
- 2,344
- Location
- W.Mass
- Tractor
- 1993 NH 2120 (the best), 1974 MF 135 (sold, but solid), 1947 Farmall A (bought, sold, bought back, sold again), 1956 MH50 lbt (sold, in 1980, darn it)
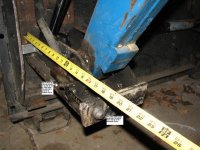
Looks like when your lock handles are down the spring engages the flat of the lever to hold it from rising. That should work unless something like a branch hits it. A washer between the spring and the lever might preserve the spring longer so it doesn't snag on the lever angles.
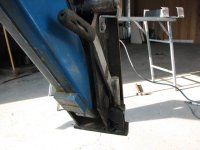
The spring gave me an idea, though. On my Ford 2120/7109 loader, the pins are spring loaded extended, so you can engage the top of the QA on the implement, curl the dump cylinders, and the pins snap into locked position. You have to manually disengage the pins, but at least you only have to get off the tractor once during an attachment changeover.
In the pic, the lock pin has a small roll pin resting against the bottom guide. When you have, say, a bucket on the QA, you lift and rotate the big lock pin out with the handle, then the roll pin rests against a boss on the bucket. Then when you curl the attachment back and the pins snap down into the QA, it dislodges the roll pin from the boss and the pin snaps all the way down.
Hard to explain, but easy to use. Might there be a way for you to make those lock pins spring loaded?
Jest thinkin (often dangerous).
Jim


 Hard to paint this time of year as it takes forever to really dry hard.