Back blade build started

   / Back blade build started #11  
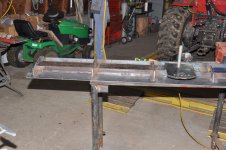
That's going to be one seriously heavy duty blade.. nice having the tools to work with, I have some envy issues over the plasma cutter.

What thickness did you go with for the mouldboard? I've got one that's 5/16" and it's not enough to dig well with my Kubota. Too much chatter on hard surfaces like a compacted gravel driveway. 3/8" would be better, and 1/2" wouldn't be out of the question. I see you're using the hydraulic cylinder for offset, are there plans to make the blade angle hydraulic as well?

I had a few issues when I built my power angle for the blade. It probably should have a crossover relief between the two sides of the cylinder, but that hasn't happened yet and probably won't at this stage. I haven't blown anything apart yet, it gets used mostly for snow.

Nice build!

Sean
 
   / Back blade build started
  • Thread Starter
#12  
I am using 1/4" for the Mould board welded to a 4" channel with some ribs to reinforce it.
I think that this will be strong enough or it will break and I will have to change it. I have found with my other blade that the chattering goes away with more weight or by changing the cutting angle via the top link.
The hydraulic offset is primarily for moving snow off the driveway to the downhill side for those winters where we get lots of snow. I am not going add hydraulic angle at this time but one never knows about the future. I only have two extra hydraulic valves at this time that I use for tilt and toplink.

Today it warmed up enough to work in the shop. The mouldboard and cutting edge were cut to length and some details welded up. The layout for the cutting edge bolts is done and the drill press moved to allow the holes to be drilled.
Cam
 
   / Back blade build started #13  
Brother - that is one fine looking blade. I don't remember ever seeing one that heavy duty and I concur with all - weight is a major factor in the successful operation of a rear blade. Cam, do you have an estimate of the final weight of the entire unit???
 
   / Back blade build started
  • Thread Starter
#14  
I would guess about 500 to 600 lbs. I can just lift each of the 4 component pieces although every bracket and brace adds up. If it chatters like the blade for my small tractor, I will strap a large rock on or some other ballast.
Cam
 
   / Back blade build started #15  
Yes, I have a square cast block of concrete - 400lb - that I can easily set on any of my "earth disturbing" implements. This really cuts down on the chatter and gets on with the program.
 
   / Back blade build started
  • Thread Starter
#16  
Back blade build pictures

Some pictures of the Back blade on the tractor. Still work to do. The mouldboard and cutting edge are vice gripped on I order to see where to mount the mouldboard ( and to take some pictures for all of you).
Cam

Pictures to follow.

Putting it all together I have found several things that may need modification or correction. The plate that I used for the "sector" pulled a little when I welded it and should be corrected. It is a little light for what I am asking of it so it may need some bracing on the bottom side to stop the flexing that is happening.
I was going to paint everything but now will wait until the testing and modifying is done.

Cam
 

Attachments

  • DSC_4421.jpg
    DSC_4421.jpg
    1,010.6 KB · Views: 299
  • DSC_4424.jpg
    DSC_4424.jpg
    1,019.3 KB · Views: 217
  • DSC_4425.jpg
    DSC_4425.jpg
    1,005.9 KB · Views: 270
Last edited:
   / Back blade build started #17  
Sweet. The back blade is elegant. You will get much enjoyment from it. I would like to finish my but there is snow on the ground and cold and I have no room to work inside so it will have to wait until spring.
 
   / Back blade build started #18  
Nice work. I like to do project like that my self if I have the time.
 
   / Back blade build started
  • Thread Starter
#19  
We had 4 1/2 inches of snow yesterday so finishing the back blade to the testing point was on the agenda for this morning. Last night I trimmed the rib ends to length and started tacking the ribs and mounts to the mouldboard. I finished this to a point this morning ( ran out of gas for the mig). I used some rod to weld a few more things and then I was ready for final assembly. I will have to revisit the mouldboard after getting more gas.

Testing went well, not much chatter from the blade, nothing broke or seemed to be flexing. I set a fairly shallow angel for the blade and found that the snow did not roll off the end as well as I expected. I will try more angle.
Once I get some more gas and finish up welding, it will be off to paint and hydraulic hoses for the offset cylinder.
Cam
 

Attachments

  • DSC_4427.jpg
    DSC_4427.jpg
    719.4 KB · Views: 198
  • DSC_4428.jpg
    DSC_4428.jpg
    777.1 KB · Views: 157
  • DSC_4429.jpg
    DSC_4429.jpg
    1,015 KB · Views: 175
  • DSC_4430.jpg
    DSC_4430.jpg
    979.9 KB · Views: 144
  • DSC_4431.jpg
    DSC_4431.jpg
    1,016.6 KB · Views: 207
   / Back blade build started #20  
Awesome looking blade. Some of your problem with the snow not rolling right maybe because the blade is not painted. The first blade I built I had the same problems. Coat of good metal paint made a world of difference.
 
 
Top