Pre cast bilco doors/ stairs are very difficult to waterproof, the bottom of the cement casting usually sits on top of the footing which makes it very difficult to install the footing drain properly. The 50ft footing runoff pipe if installed properly, enough pitch and no low spots, shouldn't be a problem as long as it hasn't been crushed, compromised with tree roots or animal debris. If it is possible to excavate down to the footing next to the bilco would probably be the best spot.
You are using an out of date browser. It may not display this or other websites correctly.
You should upgrade or use an alternative browser.
You should upgrade or use an alternative browser.
Basement Sub-Floor Using Sleepers - Need Some Pointers
- Thread starter CHDinCT
- Start date
/ Basement Sub-Floor Using Sleepers - Need Some Pointers
#31
OP
CHDinCT
Veteran Member
Pre cast bilco doors/ stairs are very difficult to waterproof, the bottom of the cement casting usually sits on top of the footing which makes it very difficult to install the footing drain properly. The 50ft footing runoff pipe if installed properly, enough pitch and no low spots, shouldn't be a problem as long as it hasn't been crushed, compromised with tree roots or animal debris. If it is possible to excavate down to the footing next to the bilco would probably be the best spot.
Hard to explain but depending on how the drain was run it would require 50 feet to the house, then all the way around the perimeter, unless they put a drain pipe under my attached garage. I do know the drain pipe flows with a lot of water after a heavy rain. It might be worth excavating in the Spring around the bilco door as much as I can to see what the situation is there. Have always had some issues there. They did not backfill around the doors very well and I've filled it in as it sunk, but it seems to be stable now for 5+ years or so.
s219
Super Member
- Joined
- Dec 7, 2011
- Messages
- 8,608
- Location
- Virginia USA
- Tractor
- Kubota L3200, Deere X380, Kubota RTV-X
If that PT wood is real wet, you might want to strap it while it dries out. I just completed several projects in a row with PT, and was real careful to get it nailed down quickly, or strap it down if it had to sit for a while. In the past, I would lose a lot of lumber to warping if it sat around loose while it dried out. That stuff is a PITA to deal with. Would suck if your nice flat floor framing got all wobbly.
When building our home, our builder worked with the kiln dried treated wood (KDAT) and it was awesome. So much more stable and reliable.
When building our home, our builder worked with the kiln dried treated wood (KDAT) and it was awesome. So much more stable and reliable.
I would recommend further investigation in the spring. Normally the footing drain goes around the perimeter and under the garage, against the house foundation. The work you're doing looks great and my suggestion is only to help with the humidity level.
boggen
Elite Member
- Joined
- Feb 22, 2011
- Messages
- 3,824
- Location
- Trivoli, IL
- Tractor
- SSTT (Sideways Snake Tain Tractor) and STB (sideways train box) tractor, dirt harvester
just catching your thread...
i would say pond liner or rather epdm roofing liner (for flat roofs) it can be had fairly cheap there is different styles of rubber/plastic out there some cheaper than others pvc, for example.. lay it down, and cut it / fold it so it comes up the walls a 1" or so. maybe a bit more until ya get your walls in. and then put down a floating tong and grove flooring. no need for any sort of shims or like, it goes down and lays right to the curvature of the concrete. and that is how it is. no need to put nails / bolts / screws down into the concrete and through the liner.
any sort of "paint on liners / water proofing" stuff for concrete *big frown* prep work prep work prep work. and again prep work. if ya goof any place, it will peel, bubble away. since your water / moisture is coming from the bottom and up through the concrete... any sort of hydraulic pressure / water pressure, is going to be push up on the paint on stuff. and i just do not see the stuff holding up long term.
6mil plastic :/ does not last, to easy with even slightest of vibrations to tear it / put a hole in it.
if you want to use tile, then just act like it was a customized DIY shower / tub. and use a little bit of tile mud, and set your tiles down into it. and forget the plastic/rubber being placed down.
if ya going to install radiant heating, easiest way IMHO (in my opionin) get yourself some hardboard insulation say 3/4" to 1" thick. using 1/2" pex piping. lay the insulation down on the floor if ya need to score it across the top/bottom so it lays a bit tighter to the floor, use some metal/foil insulation tape over the seams. and then take a router. and grove the hard board insulation out, for were you want to put the pex piping. then place your floating floor (tile or tongue and grove floor on top).
================
but before any of above...i might encourage, cutting up the floor. and installing a french drain like doing, around the perimeter of the basement (along the outside walls) and running to the sump. it is costly, but it will drain water from the soil below the floor. this is rather costly doing, but ya need to deal with that moisture issue first. give it a few years, and that moisture = mold. just trying to cover it up, may never work.
double checking.... the 2 sheds here. will sweet. more of a high temperatures / cool temperatures of morning / night time. toss a fan down and it goes away ((more of water condensing on the floor, more than anything)). certain areas are worse than others. due to how the air movement goes through the sheds (pole barns not heated or cooled). it does no real good running a de-humdifier, if the air current is dead. in multi areas of the basement. central A/C and/or central heating. with correct duct placement for blowing air / return air. can make a large difference. but if the water is coming up through the concrete.... i would say more expensive route and see about getting some drainage under the floor.
if ya go with putting in drainage, you might see if you can find one of them powered 2 wheel tractors. kinda like a walk behind tiller. but you can attach different stuff to it. including a lawn cart for example. lay down some plywood on the stairs for a ramp. with some sticker traction tape. and vroom, vroom, vroom.... it would help getting the concrete out for were the drainage pipe would go. the dirt that would need to be removed, getting rock back down there, and then concrete down there to finish things out.
if you get a big enough concrete saw to cut almost all the way if not all the way through the concrete slab/floor, and make cuts, so you end up with say 12" x 6" chunks, you could use either a prybar and sledge, or an electrical jack hammer to split the chunks. were ya cut. biggest issue is getting cuts between floor you want to keep and the area were drainage would go. these cuts, ya keep jack hammer / sledge away from. so ya do not damage rest of floor. the cuts between the 12"x6" chunks, are more of a wedge/sledge hammer thing once you get things started. so you can give a slight tap "hopefully" and chunks fall out of place to be picked up, before moving on to the next chunk. ""hopefully not to much rebar to deal with""
jix
Platinum Member
- Joined
- Sep 16, 2014
- Messages
- 611
- Location
- Fredericton, New Brunswick. CANADA
- Tractor
- 2015 Kioti CK2510HST/CAB?loader/bush hog,front blower
There is a certain cure which avoids every pitfall that you have considered, but it is probably quite expensive.
The cure involves the entire removal of the old concrete floor, installing perimeter drain tile in a trench to a pumped sump, then covering the old earth level with 3" fine compacted crush, then a good vapour barrier plastic (12 mil), tape-sealed along the seams and then a re-pour of a new concrete floor incorporating a hydraulic sealer and chopped fibre in the mix. This is not a DIY job. You need a good reputable cement finisher to do this kind of work. The new concrete floor would be at least 4" thick, delivered by a ready-mix truck and placed with a concrete pump through a window. That is the "make it right cure" BTW. Then 2" high density foam and place whatever flooring you might like over that, leaving a quarter inch gap at the perimeter. $35.00 per sq foot would cover the cost of the fix unless you went with expensive hardwood (not recommended) AND No Fasteners through the membrane.
You could do it more cheaply, but it would be unsatisfactory over time. IMO
OP
CHDinCT
Veteran Member
If that PT wood is real wet, you might want to strap it while it dries out. I just completed several projects in a row with PT, and was real careful to get it nailed down quickly, or strap it down if it had to sit for a while. In the past, I would lose a lot of lumber to warping if it sat around loose while it dried out. That stuff is a PITA to deal with. Would suck if your nice flat floor framing got all wobbly.
When building our home, our builder worked with the kiln dried treated wood (KDAT) and it was awesome. So much more stable and reliable.
Actually, I went the other direction on curing and so far so good. I spaced out all the boards on some saw horses (quarter in gap in between), then put spacers between each row going up vertically. My thought was to let it dry evenly on all sides. Last I checked, they were pretty dry and still straight. I'm sure I'll have a few benders and will either cut them up where I need short pieces, or have to Tapcon them down once the subfloor is in.
OP
CHDinCT
Veteran Member
just catching your thread...
i would say pond liner or rather epdm roofing liner (for flat roofs) it can be had fairly cheap there is different styles of rubber/plastic out there some cheaper than others pvc, for example.. lay it down, and cut it / fold it so it comes up the walls a 1" or so. maybe a bit more until ya get your walls in. and then put down a floating tong and grove flooring. no need for any sort of shims or like, it goes down and lays right to the curvature of the concrete. and that is how it is. no need to put nails / bolts / screws down into the concrete and through the liner.
any sort of "paint on liners / water proofing" stuff for concrete *big frown* prep work prep work prep work. and again prep work. if ya goof any place, it will peel, bubble away. since your water / moisture is coming from the bottom and up through the concrete... any sort of hydraulic pressure / water pressure, is going to be push up on the paint on stuff. and i just do not see the stuff holding up long term.
6mil plastic :/ does not last, to easy with even slightest of vibrations to tear it / put a hole in it.
if you want to use tile, then just act like it was a customized DIY shower / tub. and use a little bit of tile mud, and set your tiles down into it. and forget the plastic/rubber being placed down.
if ya going to install radiant heating, easiest way IMHO (in my opionin) get yourself some hardboard insulation say 3/4" to 1" thick. using 1/2" pex piping. lay the insulation down on the floor if ya need to score it across the top/bottom so it lays a bit tighter to the floor, use some metal/foil insulation tape over the seams. and then take a router. and grove the hard board insulation out, for were you want to put the pex piping. then place your floating floor (tile or tongue and grove floor on top).
================
but before any of above...i might encourage, cutting up the floor. and installing a french drain like doing, around the perimeter of the basement (along the outside walls) and running to the sump. it is costly, but it will drain water from the soil below the floor. this is rather costly doing, but ya need to deal with that moisture issue first. give it a few years, and that moisture = mold. just trying to cover it up, may never work.
double checking.... the 2 sheds here. will sweet. more of a high temperatures / cool temperatures of morning / night time. toss a fan down and it goes away ((more of water condensing on the floor, more than anything)). certain areas are worse than others. due to how the air movement goes through the sheds (pole barns not heated or cooled). it does no real good running a de-humdifier, if the air current is dead. in multi areas of the basement. central A/C and/or central heating. with correct duct placement for blowing air / return air. can make a large difference. but if the water is coming up through the concrete.... i would say more expensive route and see about getting some drainage under the floor.
if ya go with putting in drainage, you might see if you can find one of them powered 2 wheel tractors. kinda like a walk behind tiller. but you can attach different stuff to it. including a lawn cart for example. lay down some plywood on the stairs for a ramp. with some sticker traction tape. and vroom, vroom, vroom.... it would help getting the concrete out for were the drainage pipe would go. the dirt that would need to be removed, getting rock back down there, and then concrete down there to finish things out.
if you get a big enough concrete saw to cut almost all the way if not all the way through the concrete slab/floor, and make cuts, so you end up with say 12" x 6" chunks, you could use either a prybar and sledge, or an electrical jack hammer to split the chunks. were ya cut. biggest issue is getting cuts between floor you want to keep and the area were drainage would go. these cuts, ya keep jack hammer / sledge away from. so ya do not damage rest of floor. the cuts between the 12"x6" chunks, are more of a wedge/sledge hammer thing once you get things started. so you can give a slight tap "hopefully" and chunks fall out of place to be picked up, before moving on to the next chunk. ""hopefully not to much rebar to deal with""
Wow, lot of thoughts in your post. Just so you know, I'm not going to use 6 mil plastic - changed my mind. Going with Platon membrane which is dimpled and will provide an air space for any moisture to evaporate out where my industrial strength dehumidifier will take care of it. Not going to put any heat down there yet as I'm only doing the floor at this point. If/when I finish it, I would probably just put a propane stove or pellet stove down there. I already have propane so it would just require running a supply line and maybe a vent unless I go ventless, but those worry me some. But again, that's not for now.
As for drainage, I already have exterior footing drains which pull out most of the water that gets to the bottom of the foundation. I might have some blockage in one corner that's causing excessive moisture and I'll deal with that from the outside next Spring. I have a small backhoe and could dig down to the drain pipe by my Bilco doors, them maybe have someone scope it to see what's what.
By the way, spoke with one of my neighbors that finished his basement 20 years ago with plastic sheeting and PT sleepers. Says he had similar moisture issues as me. Says he's had no problems so far with mold, etc., but I guess unless up pull up the subflooring, you don't really know what's going on down there.
OP
CHDinCT
Veteran Member
There is a certain cure which avoids every pitfall that you have considered, but it is probably quite expensive.
The cure involves the entire removal of the old concrete floor, installing perimeter drain tile in a trench to a pumped sump, then covering the old earth level with 3" fine compacted crush, then a good vapour barrier plastic (12 mil), tape-sealed along the seams and then a re-pour of a new concrete floor incorporating a hydraulic sealer and chopped fibre in the mix. This is not a DIY job. You need a good reputable cement finisher to do this kind of work. The new concrete floor would be at least 4" thick, delivered by a ready-mix truck and placed with a concrete pump through a window. That is the "make it right cure" BTW. Then 2" high density foam and place whatever flooring you might like over that, leaving a quarter inch gap at the perimeter. $35.00 per sq foot would cover the cost of the fix unless you went with expensive hardwood (not recommended) AND No Fasteners through the membrane.
You could do it more cheaply, but it would be unsatisfactory over time. IMO
Not going to happen, but if I ever built new again, I'd make sure there was insulation and a vapor barrier under the slab. Building techniques are (almost) always improving. Too late for this 25-year-old house.
OP
CHDinCT
Veteran Member
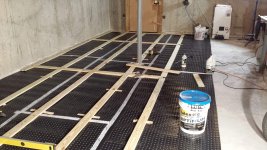
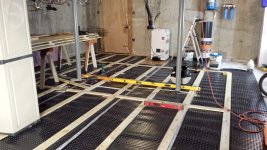
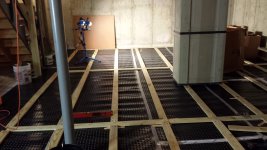
Quick update. Got the Platon earlier this week and started over with that as the underlayment vs plastic. Like most things, it wasn't as easy to put down as the instructions and on-line video showed. Biggest issue is that when you roll it out over 30 feet (in my case), it doesn't roll out straight. Has a slight curve to it so mating one row to the next isn't easy. I had to cut each 30' lenght once or twice and seem it to re-align the mating surfaces. Even then, it doesn't roll out totally flat. And boy, does the black plastic make it seem a lot darker down there versus the gray concrete, but that's temporary until I get the rigid foam and subfloor down.
My other issue is that I don't have room to move everything out of the way so I'm having to work one side, then move boxes, etc., to work the other side. Anyway, I'm feeling much better about using the dimpled Platon vs putting plastic right on the slab.
My other issue is that I don't have room to move everything out of the way so I'm having to work one side, then move boxes, etc., to work the other side. Anyway, I'm feeling much better about using the dimpled Platon vs putting plastic right on the slab.