Building a Steel Barn

   / Building a Steel Barn #21  
Your all-terrain forklift (Skytrak) is the perfect tool for that job, RASPY.
That is going to be one stout steel building...very nice!
 
   / Building a Steel Barn
  • Thread Starter
#22  
rmasonjr,

I'm still unclear on what you are doing. Bear with me.

On my steel posts that sit on concrete, I have bolts sticking up out of the concrete. Then the posts set on the bolts with jacking nuts under and lock nuts over the post foot.

I measured from the bottom of one post with a tape measure and took a reading with a transit. Then I measured all the rest and adjusted them to match. It turned out to be a bit tricky to get the lowest one high enough to begin with and the lowest one was my starting one.

Next adjust them to verticle without changing their height.

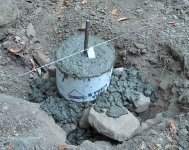
If you have some without bolts pre-set, as I did, you can set them on blocking and shims. Then mark the concrete footing, move the post a bit and drill in an anchor bolt. For these, use 3/4" or the size of your choice, threaded rod in grade 8. Drill a larger hole, I used 1", to allow for imperfect drilling. Cut pieces to length and epoxy them into the drilled holes with the jacking nuts and lock nut installed as you go. Try to get 6" penetration minimum and use Simpson bolt setting epoxy as it's approved for this use and will break the concrete before pulling out. Or you can use bolt setting, expanding mortar that sets in munutes. If you use this method screw on an extra nut that will be buried in the final slab. Be careful to keep the posts in alignment, both verticle and in line with the other posts. Run some strings and use some tie straps, clamps, stakes, 2 X 4s, etc as needed. Pry against other posts, the tractor bucket or a stake to stabalize till the mortar or epoxy sets.

If you choose to use this method you'll end up with the whole building sitting there on bolts that will get grouted in or poured in with the final slab.

It's very important to check your transit or laser level for accuracy!! Do this by taking readings in opposite directions to verify consistency before you commit. Before I got a good transit I had to take two readings on every post from opposite directions and average the difference to get a good number. this was very frustrating and time consuming. It also required a chart be made and updated as I went along.

I was able to get all my posts to within about 1/8 inch. They could have been closer but for pre-cast bolt problems.

I don't subscribe to the "within an inch or two is fine" theory. Do the best you can all the way up to avoid big problems later. With the jacking bolt method you can visually sight up along the trusses and end wall beams. You can see how straight they are and adjust as needed.

Be sure you have a good work platform! I made one from an entrance gate that is made of 2" square tubing. It has a gate that opens in and is about 6' X 3'. A very secure place to take up purlins, wrench on bolts and have lots of tools handy without fear of falling.

basically, I'll be digging the hole, filling with concrete, then sliding the steel leg into the mix so that concrete is inside and outside the post.
 
   / Building a Steel Barn #23  
rmasonjr,

I'm still confused, sorry.

If you pour the concrete first, and then slip the steel post into the mix, how do you get it straight, verticle and at the right depth? How do you hold it there until the concrete sets and you can let go? How do you do more than one at a time?
 
   / Building a Steel Barn #24  
rmasonjr,

I'm still confused, sorry.

If you pour the concrete first, and then slip the steel post into the mix, how do you get it straight, verticle and at the right depth? How do you hold it there until the concrete sets and you can let go? How do you do more than one at a time?

Nothing but a thing. That's how we do it.

We set the four corners using string and boards and then set the in between by eye. We set height and line by eye. How do you check out your work after using a string? You look down the line. We just skip the string step.

For height we can either set them wild or we can mark the corner posts for height against the string line. Once the corners are set then we mark them for an easy sight line, say five foot off the grade. We pull the measurement off the top of the posts down. We then mark the in between posts that measurement. Then it's a simple matter of setting the posts for line and then lifting or pushing down the post in the concrete for height.

We mix our concrete stiff but not dry and it will hold a post just fine if the wind isn't howling.

I have a Hilti auto leveling laser. It's the finest thing since sliced raisin bread and fresh butter.
 
   / Building a Steel Barn #25  
basically, I'll be digging the hole, filling with concrete, then sliding the steel leg into the mix so that concrete is inside and outside the post.

Do the legs have a plate at the bottom? Maybe a picture or two would help.

I built my steel barn out of used poultry house trusses (5 of them) resulting in a 40x40 structure. Each 20-foot span half-truss had an 7-foot steel leg already attached. Each leg had a 4x4 plate at the bottom with two holes for bolts to pass through. I augured 1-foot diameter, 2-foot deep holes as a footing for each truss, then made a 6"x6"x6" box (out of 2x6 lumber) to sit on top of the hole to act as a concrete form. Carefully lined all the boxes up with string. I poured concrete into the box opening, filling up the footing hole and the box. I then placed 3/4" j-bolts into the wet concrete, and used a plywood template of the truss leg bottom plate I'd previously made to center and line up the bolts.

After the footings cured, I knocked off the forms and my brother, son, and I erected the trusses with a front-end loader and landed them atop the footings. Added washers and nuts at the footing, then bolts at the truss top to join with its opposite member.
 
   / Building a Steel Barn #26  
There is no right or wrong way to do this, but some ways are easier than
others.

If you wet-set the columns, then mark them for height, they have to
be field-cut for final length. That process is fine for wooden posts, as
you might do for a fence or post-and-beam building.

For steel, the final cuts are harder to do in the field. What I do is pour
a footer or concrete tube column in the ground, then set the steel
columns on the hardened footer. Then I place a reference mark on the
steel column using my laser. I then remove the steel column and cut
horizontally with my bandsaw. Replace the column over the rebar stub
and pour some concrete inside it to anchor it.

In the photo, this foundation is for a building that will use schedule 80
steel pipe for columns. I have also done it that way with 4x4 steel
tubing 14 feet long for my deck. The down side for my method is you have
to set the columns twice. My columns are inline and matched in height
by +/- about 1/16".
 

Attachments

  • support_3.jpg
    support_3.jpg
    120.2 KB · Views: 104
   / Building a Steel Barn
  • Thread Starter
#27  
rmasonjr,

I'm still confused, sorry.

If you pour the concrete first, and then slip the steel post into the mix, how do you get it straight, verticle and at the right depth? How do you hold it there until the concrete sets and you can let go? How do you do more than one at a time?

I'll be setting one post at a time. I'll make a 'general' mark at the 2.5' line, then use studs on the diagonal to hold it vertical and level. Once that post sets (couple of days), do the next post the same way, but making sure the correct distance is achieved.

Setting the posts is the easy part. Once they are set and the concrete is done, I have to get the tops leveled.
 
   / Building a Steel Barn #28  
One of the things I love on this board is seeing other ways I would never consider.

If I had steel posts.

I would weld some 4 bolt pads or similar on the bottom of the common length post.

I would set a sono tube up with J bolts set at the proper level height on all the "footings"

I would then bolt my posts onto the poured and set footings.

I would not spend any time in the air cutting. I would do my leveling about 6" above grade.
 
 
Top