Carpenter advice.....historic rafter "tails"

   / Carpenter advice.....historic rafter "tails" #1  

Boeing

Platinum Member
Joined
Sep 14, 2010
Messages
617
Location
Botetourt, Va
Tractor
kubota L3010
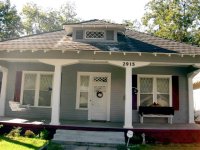
Fellas, my daughter bought a really cute bungalow house a few years ago. It was built in 1906...Columbus, Ga. It is declared "Historic" and is need of some repair.
I'm almost historic myself but I'll admit that this house is about 40 years older than me.:laughing:
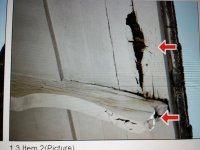
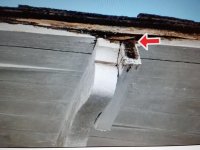
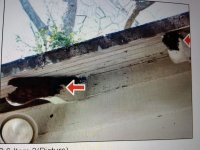
The roof has an overhang about 18" all around with exposed rafters open to a shaped end. 15 or so are rotted and need replacing. Some of the roof decking visible on this overhang is also rotted. I've been a "handyman" but I'm not a roofer nor a carpenter. Suggestions? I saw and photoed where one of the rafter ends had a "sister" board nailed alongside. I' don't think that what we need since this is visible AND historic. I do have a "jigsaw" and could shape 2X6's but HOW TO ATTACH THEM?????
Any advice would be appreciated.:confused2:
 

Attachments

  • decking.jpg
    decking.jpg
    84.9 KB · Views: 473
  • sisterboard rafter.jpg
    sisterboard rafter.jpg
    89.6 KB · Views: 659
  • shop rafter tail.jpg
    shop rafter tail.jpg
    156.7 KB · Views: 443
  • HalloweenHouse Oct. '07.jpg
    HalloweenHouse Oct. '07.jpg
    139 KB · Views: 482
   / Carpenter advice.....historic rafter "tails" #3  
Yah you will be removing roofing and decking, making new tails that will probably go in twice as far as they overhang and then reroofing. The issue is caused by water creeping back up under the roofing. This is typically fixed with a good drip edge.

Good luck- this is a big job for a part time handyman!
 
   / Carpenter advice.....historic rafter "tails" #4  
You really need to tear out the rotten boards. My experience is rot grows quickly and nailing another board beside it is a bandaid for a broke arm.
 
   / Carpenter advice.....historic rafter "tails" #5  
Carpenter advice.....historic rafter "tails"

RNeumann pretty well has it covered. Only think i can think to add is that it would be a good idea to set up some saw horses to lay the new boards on and paint the new 2x6 curly end boards on ALL the sides BEFORE you install them. Might as well paint the new decking boards also. Touch them up with a final coat after their installed. I have done this more than a few times and the prepainting saves a tremendous amount of effort.

You might need to remove the roof decking a bit further to make splicing the new rafter tails into the existing rafters. Keep in mind the new rafter tails need to go past the exterior wall about 3 feet so they do not sag later. Some times the rafter tails your seeing have been added on years after the building was built. Once you tear some decking off you can see what you have and how far to tear off.

Lots of thinks to go wrong if you just nail short 18 inch boards on or just tuck them under a few inches more.
 
   / Carpenter advice.....historic rafter "tails" #6  
First you have to remove some roof boards to see what needs replacement.
Use wood preservative on the replacement parts.
 
   / Carpenter advice.....historic rafter "tails" #8  
Are those roofing tabs lapped sideways? Funny look to 'em in the first and last pics ....
 
   / Carpenter advice.....historic rafter "tails" #9  
Yah you will be removing roofing and decking, making new tails that will probably go in twice as far as they overhang and then reroofing. The issue is caused by water creeping back up under the roofing. This is typically fixed with a good drip edge.

Good luck- this is a big job for a part time handyman!

Agree. And my guess would be those rafter/tails are thicker than "modern" 2x6's?

Maybe find some old lumber at salvage company which would be better material and thickness match, fiberglass as Peter315 linked, etc. Any independent lumber yards around to consult? Just some thoughts before running down to local big box lumber yard, especially with historic designation and possible restrictions in place.

It's too bad that the house was purchased a few years ago without note of roof structure condition. That rot and damage has been going on for awhile and it looks like a new roof and paint was used to cover extent of problem. That's unfortunate as when that roof was put on the deck damage and tails were "overlooked" rather than repaired when opportunity presented itself...
 
   / Carpenter advice.....historic rafter "tails" #10  
You’ve got a fair sized project there which will probably expand into a new roof after the structural repairs are completed. It appears as if the rafter tails are milled from a non standard lumber dimension ( pretty common in historic buildings) so shop around for a good mill shop to duplicate the rafter profile on stock that is at least the length of the overhang times four. IE, if the OH is 18” the total stock should be 72”. You can now remove the roof overhang and cut off the damaged existing tails flush with the exterior wall surface and sister the new decorative rafter ends to the side(s) of the existing rafters (assuming attic access or removing more roof sheeting) the spacing of the new tails will be off by the thickness of the rafter at the beginning and end of the horizontal run but it would take a very keen eye to notice the difference. Not a project I would in wet weather.
B. John
 
 
Top