Clutch Repair Kama 554

   / Clutch Repair Kama 554 #1  

3RRL

Super Member
Joined
Oct 20, 2005
Messages
6,825
Location
Foothills of the Giant Sequoia's, California
Tractor
55HP 4WD KAMA 554 and 4 x 4 Jinma 284
Right after I re-set the valve lash on my 2005 Kama 554 I started doing some FEL work in order to get to a pile of logs that I wanted to gather for firewood. Wouldn't you know it, I pressed the clutch pedal in and felt it give way and the tractor kept going. I had to yank it out of gear to stop.

I have 580 hours on the clock now but as you know, on my model the hours are related to engine rpm. I rarely run my engine at rated rpm (2400rpm) but more at 1700 to 1800rpm because that's normally plenty of horse power and the peak torque on my engine is made around 1600rpm or so. That means I really have more like a thousand working hours on the tractor. Maybe more considering the dash didn't work for at least 50 hours when I first got the tractor.
I called Chip at Artrac today and he confirmed how the clock runs on my machine.
I also asked him what to do and he told me how to go about checking it out.
This is gonna be major for me, since I work alone.

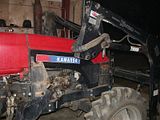
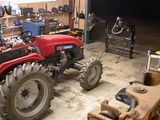
The first thing I did was remove the bucket off the loader arms, and then removed the loader from the tractor. This is a Koyker 195 FEL. Once I got the tractor into the shop, I didn't want to get stuck having to move the loader and bucket if I had to. I figure I can move the FEL arms by themselves if I had to ... for more room to work in there.


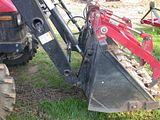
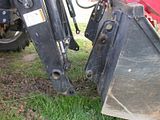
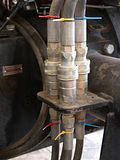
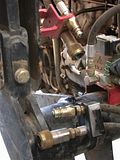
Then I moved the tractor into the barn to remove the loader. I had never had it off before, and realized it would have been easier to do with the bucket on ... but I managed. First was to install the "storage legs" and next was to remove the large pins. Then you pop the loader off using the lift cylinders and finally disconnect the hoses.

 
   / Clutch Repair Kama 554
  • Thread Starter
#2  
Once you get the FEL off, you can then remove the tower on the right side of the tractor to expose the inspection window for the clutch. In order to adjust the clutch, you would have to do this anyway. I had never done this nor adjusted the clutch since I purchased the tractor 3-1/2 years ago, so I recommend you consider at least checking the clutch, to be sure it's adjusted correctly.


Upon looking inside there, I was shocked to see that the clutch "fingers" or release levers (3 of them) were worn completely off. So the clutch pedal and throw out bearing were pushing against nothing, which is why the tractor kept going when the fingers finally let go...the clutch never disengaged. I tried to get some close ups of the inside through that inspection cover.
Below, you can see the adjusting bolt and lock washer and spring in the first photo. The second one shows scoring on the OD of the throw out bearing. Both the second and third photos show the worn off fingers. They are in between the clutch and throw out bearing if you look closely.


Of course that is not good news so I called Chip again and he confirmed that I have to split the tractor to fix it.
The actual clutch(s) might be OK since it was not slipping. But he said to check it and the spring washers (Bellville type) and also check to see if there was a bluish coloration on the pressure plate(s), especially the main drive plate but the PTO one also. He gave me prices for individual parts and also for a complete clutch pack which includes all the components and the throw out bearing. I'll call him after I get the tractor split. But first I had to mark every single connection before removing them for the split.
That is all hydraulic lines including power steering, all electrical, fuel lines, misc lines and cables etc....everything that needs to be disconnected so the tractor will split. He also recommended to "wedge" the front axle so the engine doesn't tip to the side after it's split at the bell housing.
Anyway, no use crying over spilt milk, so I'll get on with it tomorrow.
Rob-

 
   / Clutch Repair Kama 554 #3  
In your third photos (and others) the throw out bearing is visible. I wouldn't expect to normally see it there. In the same photo, note the black plastic cover - about the size of a 50 cent piece - under the little red sign that says "grease here". That's where the TOB should be. That suggests that the TOB has moved forward on its seat. The seat is a sliding sleeve over the drive shaft. The clutch pedal moves the clutch fork which pushes the sliding sleeve toward the clutch fingers. When you release the clutch, the TOB retracts from the fingers with the sleeve.

It appears that your TOB has jumped forward off it's seat, and may be jammed sideways farther forward on the sleeve. Far enough forward and it's in contact with the fingers, which can easily explain why they're worn flat. That happened to my TS354C, when some brush jammed the external clutch linkage. It wasn't visible from the operator seat, but it served to push the TOB into the fingers without the operator realizing it. Sorta like an invisible foot, riding the clutch pedal.

Anyway - long story short - best ask Chip for the TOB bearing seat while you're at it. Yours is most likely scored. And since the clutchpack should be removed to inspect the main drive pressure plate, you may as well replace the pilot bearing while you're at it.

//greg//
 
   / Clutch Repair Kama 554
  • Thread Starter
#4  
Yup, I will call Chip after I get the the tractor split and asses the whole thing.
Not looking forward to doing it, but I need to get after it.
One thing about the throw out bearing is I was able to slide it to the left, towards that "grease here" hole with a screw driver. When I had my wife depress the clutch pedal it moved towards the clutch and slid back very slowly.
Might have happened just like you said. I hope Chip sees these photos and comments on what I need to do. Perhaps he can asses everything I will need? When I get it split, I'll post more photos so all the parts are clear.
 
   / Clutch Repair Kama 554 #5  
Crap -
Sorry to see that happen Rob, what a big time bummer. Having to split a tractor is one of my worst nightmares. Got any theories as to how that happened? If I were to guess most likely there was no gap between the throwout bearing and fork fingers causing the bearing to constantly contact the fingers which seizes up the bearing then wears out the fingers. Constantly riding the clutch will do the same thing. So it's not a design or material flaw but more related to adjustment and operator habits.

I see your waisting no time starting to split it. At least the working conditions are more civilized inside the new shop making it more bearable. I wish I could be there to help.
I wonder it be a good idea if we all inspect the gap between the throwout bearing and fingers on their tractors before something like this happens to us? Equally important is the gap be exactly equal between all three fingers.

Knowing you, you will get it split, repaired and back together in record time. With that many hours, perhaps it worth replacing the clutch disk as long as it's split? Once properly repaired and adjusted, with conservative use, a clutch should last many decades and thousands of hours. My old ford tractor has at least 4000 hours and 55 years of service on the original clutch so I know it's possible to get a generation out of one.
Take lots of pictures and be careful my friend!

Larry
 
   / Clutch Repair Kama 554 #6  
It nice to see you're working inside! Nice shop, I've no doubt you'll have it done in no time.
 
   / Clutch Repair Kama 554 #7  
Sorry to hear of your clutch problem. What a way to ruin the day's plans (several days!). I can appreciate your trepidation on doing the split. I had to split my D2 out in the bush and it wasn't fun tractoring!

You'll be dealing with a lot of weight. I'd have plenty of solid cribbing and blocking on hand and make sure everything is securely blocked before venturing below. I trust solid blocks and cribbing more than jack stands and axle stands when dealing with so much weight above my puny body.

I have not split a wheeled tractor but I imagine once it is unbolted the two units slide apart. Will you be able to set one half, probably the front, on rollers and roll it forward? Maybe one or two stout piano dollys would work and you could block between them and the tractor half. I'd have given up my you know what to have had a concrete surface to work on. I recall I had to set mine on skids and come-a-long to a tree, and lever apart with crowbars first then my 8ft drill rod. Pry an inch (or half!), tension the come-a-long, pry and inch, and so on.

Pulling it back together was even tougher. With your concrete surface you have the opportunity to place some alignment marks on the floor before you separate the halves (or as soon as it separates). Maybe plumb bob down in a couple of places and take a measurement up from the floor. Then, when you are reassembling you can ensure your vertical and horizontal alignments are close.
 
   / Clutch Repair Kama 554 #8  
One thing about the throw out bearing is I was able to slide it to the left, towards that "grease here" hole with a screw driver. When I had my wife depress the clutch pedal it moved towards the clutch and slid back very slowly.
I thought of that too, but it was too late to edit it into my previous post. That sliding sleeve - which is also the TOB seat - is attached to the clutch fork with two spring steel clips. Its speed and direction should correlate directly with the movement of the clutch pedal. Assuming the engine is running while the pedal is being released, I'm guessing centrifugal force is spinning the sleeve toward the rear. If the whole sleeve - bearing and all - is free, the bearing seat may not actually be scored. In my case, the bearing itself actually moved forward on the seat - scoring it badly in the process.

Presumably you've already looked in your parts breakdown to get a mental picture of this. That way you'll know what to expect after splitting the tractor. When you get to that part, let me know and I'll offer some lessons learned - both for safety for for ease of reassembly.


//greg//
 
   / Clutch Repair Kama 554 #9  
Sorry to hear about your troubles but like that others said I am sure you will do first class job getting it back up and running. Just think you own two tractors so you have twice the chances most of us have to deal with these types of chores.

I guess the good thing is you own two tractors so your other chores will not get out of hand while the kama is down.

Chris
 
   / Clutch Repair Kama 554 #10  
Rob, had you ever applied grease at thatpoint on the clutch housing hidden behind the loader arm? Thats got me wondering if my 7520 has a grease fitting hiding in there somewhere.:eek:
I know when you get in far enuf to assess it fully you will figure out a way to prevent it ever happening again. Satisfaction...:)
larry
 
 
Top