ampsucker
Platinum Member
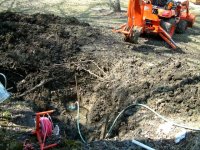
well, i am finally tackling a slow, underground water main leak i have had in the yard for over a year. i used the BX to dig up the area after i had left the water turned off for three days. so far i have found at least two leaks and am still scanning for a third.
i made a rookie mistake by allowing a little muddy gravel to find it's way into the pipe while i had it cut apart repairing one leak. i have now been rewarded by having to replace two toilet fill valves and clean out two under the sink shut off valves all clogged with gravel!
anyway, one of the next steps will be to reinstall a frost free hydrant. i have done several of these, all in different ways, and wanted to get some ideas of how others have done this.
my usual approach is to incorporate the shut off valve close to the hydrant and then build up some type of empty tube that allows me to access the shut off valve for maintenance.
in the past i have used:
*landscaping timbers to build a square box in the ground large enough to enclose the shut off valve and the hydrant, then built a wooden lid to hold the top of the hydrant secure so it wouldn't stress the plumbing in the ground. eventually the timbers rotted but it took a long time.
*treated deck boards to build a box. expect 10-20 years of service.
*chimney tile as a box w/ wooden lid fitted to top of tile to secure hydrant
*synthetic deck boards to build a box (most expensive option but expect longer than 20 years service)
etc.
all are usually filled with loose insulation (not good if it gets wet which it always does) or my new favorite solution, screwing 1.5 - 2" thick blueboard foam sheets to the inside walls to insulate.
if starting from scratch, my usual approach now is to use galvanized 3/4 pipe for the T and at least a two foot "nipple" of metal pipe on each end going away from the frost free hydrant before switching back to PVC or whatever i am connecting to under ground. this gives the hydrant more strength and resists cracking of the PVC that can happen if the hydrant gets yanked around, hit with tractor, etc.
these have all been functional allowing access to the below ground plumbing for basic shut off and repair services and making digging easier if required to replace pipe or patch holes.
i think for this next project i am looking for something fancier. it will be close to our back porch which gets a lot of use during BBQ, family summer outings, etc. i was thinking of incorporating a sink or some type of cooking platform to the hydrant so we can clean veggies, rinse off, get drinking water, etc. maybe a nice cobblestone or paver platform around it with a drain to catch excess water?
so, anybody with experience or ideas, share your pics or descriptions of frost free hydrants you have done. i'm always looking for ways to improve my method and would really like some creative input from TBNers who have done something like this.
any ideas on how to get easy access to the plumbing and for maintenance of the hydrant and parts below it would be great, too!
thanks in advance! i'll try to post up pics of the project tomorrow.
amp