Diverter valve installation for 3x20 tractors

   / Diverter valve installation for 3x20 tractors #21  
Can you list out in which order the steps are the most logical?
 
   / Diverter valve installation for 3x20 tractors
  • Thread Starter
#22  
BloomingtonMike said:
Thamkyou very much for the install write up!!

I am interested in the PDF.
unix888@verizon.net

I would also like the power beyond install.

How many hours did the install recommend? How llong did it really take? What was the investment in the power beyond and diverter kit?

I'll zip the pdf as soon as I can get a free hour or so. Based on my memory, the APPROXIMATE cost was as follows:

Diverter kit: $1167
Top 'n Tilt kit: $868
Power Beyond kit: $232
Cruise control kit: $80
John Deere canopy and installation kit: $400

All are approximate but I believe I've quoted them in the ballpark. After having installed all of the above, I can truthfully say that the prices are very reasonable for what you are getting. The engineering and quality of the parts do have extra value and while you might save a few bucks doing it some other way, the final cost difference might not be as much as you might expect. Finally, don't forget that everything fits, you also get an installation manual, you also get every part you need from start to finish and you'll probably save a bunch of time compared to doing a custom fabrication. For me time is money.

As for Time: I believe I was quoted 8 hours from Deere on the installation. They quoted me something like $800 on the installation. I took the $800 and purchased the canopy, power beyond kit and cruise control kit. I believe actual time (from experienced deere technician) could be as short as 3.5 hours. In all, I took about 10 hours but a lot of that was reading the manual, bagging, taking notes, taking pictures, checking off installation steps, correcting mistakes that you wouldn't make second time around, painting the scratches on lines from install, you get the picture.

The cruise control kit took all of 10 minutes extra and the power beyond kit probably took me an hour and a half. The deere technician could probably do it in 1 hour or less. Definitely an easy install.
 
   / Diverter valve installation for 3x20 tractors
  • Thread Starter
#23  
BloomingtonMike said:
Can you list out in which order the steps are the most logical?

I know it's a long post so it's easy to miss some of the stuff that I pointed out where I had to redo some steps due to the improper order. But my biggest beefs are the following:

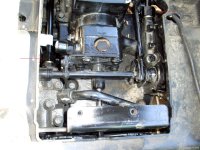
(1) One of the first steps of the installation is to install the adapters into the diverter valve prior to installation. My recommendation: Don't install them first. Instead, install them as needed otherwise they get in the way when you install the lines because they protrude from the valve and there is very little clearance room from line to line. In all, you will install 14 lines into that diverter block. I found that when I was done, I had to remove and reinstall most of the adapters installed earlier.

(2) Install the wiring harness ground EARLY in the installation process, maybe even first. The reason is that the manual doesn't ask you to install the harness until all the mechanical installation process is completed. By that time, the specified grounding location is completely blocked and it WILL become IMPOSSIBLE to then use that location. No way will anyone in their right mind undo 80% of the job to use that location which means you will have to modifiy the harness to utilize an alternate non-standard grounding location. While it is not a difficult job, the question is why should you have to if the sequencing was correct?

(3) You will be asked to connect and tighten 2 flexible lines (which route over the transmission) to be connected on the other end later. If you follow the instruction to the tee, then you connect additional hard lines from diverter valve to the SCV. Unfortunately, at this point, you will find that unless the stars are perfectly aligned and serious luck (the lotto kind of luck) is by your side, the fittings on the other end will not be oriented properly and it is impossible to swivel/rotate them into the proper position without loosening the fittings on the other end. Again, with the diverter-to-SCV hard lines already connected you CAN NOT simply loosen those fittings. You will first need to get the diverter-to-SCV lines out of the way and it will not be a simple as loosening them, you'll likely need to REMOVE them. That did not make me very happy. So, my recommendation is to (1) loosely install the two flexible lines onto the diverter valve, (2) route those lines over the transmission per instructions, (3) remove mid-pto diverter plugs as per instructions, (4) install adapters into the ports where plugs were removed, (5) install flexible lines onto the adapters per instructions and tighten them to specifications, (6) go back to and tighten the flexible line connections at diverter valve, then finally (7) install and tighten to specifications the 4 hard lines from diverter valve to dual SCV. This sequence will ensure that you avoid the problems that I experienced.

I believe those are the 3 steps I would definitely advise doing differently.
 
Last edited:
   / Diverter valve installation for 3x20 tractors #24  
Superduper,

One last question! Does it make sense for me to plumb in the power beyond while I am doing the 3rd SCV? Just wondering what needs to be torn apart to do the PB kit and if it would same me some grief to do both at the same time. Again, thanks for all your great info!

Mike
 
   / Diverter valve installation for 3x20 tractors
  • Thread Starter
#25  
MikeyB said:
Superduper,

One last question! Does it make sense for me to plumb in the power beyond while I am doing the 3rd SCV? Just wondering what needs to be torn apart to do the PB kit and if it would same me some grief to do both at the same time. Again, thanks for all your great info!

Mike

In my opinion, the 3rd SCV and power beyond are two seperate installations entirely and do not overlap. Therefore, install it if you want but doing it at the same time as the 3rd SCV won't make it any easier.

Wait, I take that back. During the Power Beyond installation, you will remove a bypass line that loops fluid from one port to another. You've already got all your tools out and already in the wrenching mode mindset. I am the worlds biggest procrastinator (had the kits forever before actually doing the install) and if you're anything like me, this is the perfect time. The installation involves removing the seat assemby as you will need to access the area under the seat. The attached image is of the opening with the seat removed. If you look very carefully at the image, you will see two very thin red arrows. These point to the two fittings of the line which needs to be removed. These are very large (I forget the exact size, 24, 27, 30? ) and there is very little room to swing that large wrench around. Needless to say, the availability of offset or other clearance enhancing wrenches are limited and expensive. I improved the clearance by loosening the plastic shroud (that you see around the opening) although I did try to remove it entirely to the extent of cutting off the vinyl boots on the end of the levers (there was no other way to remove the boots, I tried and spent way too much time on that). In the end, I just worked around the loosened shroud and got the line off. The rest of the installation is to replace that line with new ones. In other words, instead of fluid looping around from one port to the other, it now takes a detour through some quick-disconnect couplers and through a new flexible hose-loop that remains connected all the time, then back to the other port. Going duck hunting beginning of next week so I'll see if I can't get the power beyond installation posted by this weekend.
 

Attachments

  • Picture 058.jpg
    Picture 058.jpg
    152.7 KB · Views: 404
   / Diverter valve installation for 3x20 tractors #26  
Excellent thread!! This type of post is what makes this site so valuable.

KB
 
   / Diverter valve installation for 3x20 tractors #27  
I sure do appreciate your taking the time to do this. This is one of those things that I think alot of guys wish for but can't scrape up the $ for the full top n tilt setup. Count me into that list. It sure is nice to not have to get off the seat to adjust the 3pt stuff. Looks like about a $2100 setup.

My dream tractor will have it. :)
 
   / Diverter valve installation for 3x20 tractors #28  
Superduper,

Great write-up! I did this same install about 2 months ago and ran into several of the same issues that you did. I had the added conflict of the backhoe subframe bracket that I had to remove in order to put on the rear lines. I agree with what you said about the sequencing and have found that a complete reading of the instructions prior to beginning helped me to avoid some of these issues. I attached the two flexible lines onto the mid-pto ports first, then I attached them to the diverter valve and then mounted the diverter under the deck. I was also amused by the ground location and the fact that it was not usable. I found another spot without extending the wire but I can't remember where exactly. If anyone cares I could take a picture.

I also made some changes to the wire harness. I didn't like the location of the switch and had an open spot on the console. So, I extended the wires for the switch and mounted it in the console with all of the other switches.

The other change I made was to the rear bracket. As others on TBN have done I used the spare hole on the left side of the bracket. I added another one to the left of the spare one and routed my third scv front lines over to quick connects mounted in those holes. This allowed me to secure my third scv lines permanently out of the way. I was having problems with the lines getting pinched when I put the backhoe off and on. Now I just use a couple of short lines to "jump" between my third scv rear output lines over to the front lines mounted on the left when I need the third function up front.

Again, great write-up. I was thinking of doing the same when I did mine but didn't have the time.
 
   / Diverter valve installation for 3x20 tractors
  • Thread Starter
#29  
Hi jba3520 and thanks for the comments,

If you've ever built one of the Japanese (Tamiya, Kyosho, etc) model R/C kits, then you'll probably agree that the instructions are extremely detailed and accurate. I am talking about a MODEL car (or boat, truck, tank, whatever). And if you don't admit to having built one, that's OK too. We ARE all grown ups, right.

Perhaps I am spoiled but I expect that when instructions are provided, they are accurate. Otherwise why give them? Perhaps a blow-up diagram will suffice? I imagine that the ground location issue will affect everyone installing the kit except those that are doing the installation more than once. I am glad you found it amusing -- I did not. I also considered using an alternate location for the relay but decided against it because extending one wire is one thing, extending a harness is another. Experience tells me that electrical bundles that have been modified (especially ones likely to encounter weather exposure) are prone to corrosion. I was satisfied that bending the mounting tab gave satisfactory clearance. As for the ground, there are other areas within reach that would probably have worked, at least at first. To avoid potential future grounding issues with corrosion, I wanted to avoid grounding on sheetmetal brackets, moving parts, etc. (areas that could loosen up or develop corrosion over time). Instead, I chose to use a location I believe would have been of equal quality as the factory one, directly on the cast members with good clamping force. Since tractors have no frame, I felt that in the long run, this would have been the more reliable solution as I hate suprises.

One thing I forgot to mention, perhaps you had the same issue? The far right hole used for the diverter quick connect coupler was almost a joke. There was zero room for any wrench to tighten that coupler onto the line. I ended up wedging the coupler against the bracket and rotating the bracket to tighten coupler onto the line (which was backed up with wrench to keep from twisting). It's not very tight, as least not as tight as I would like but the O-ring apparently is working because it is not leaking. However, if it does leak in the future, I will have to use a grinder and grind off the radius at that corner to give me sufficient clearance to tighten that coupler with a wrench. If you can remember with your installation, did you do this a different way?
 
   / Diverter valve installation for 3x20 tractors #30  
I just bought a 955 with a backhoe and it doesnt do anything the front bucket does fine am I supposed to do something else too get the hoe too work thanks
 
 
Top