DIY Cab - Finally decided it was time

   / DIY Cab - Finally decided it was time #21  
Very nicely done. Looks better than the original cab and it is removable too.
Again, Nicely done!:thumbsup:
 
   / DIY Cab - Finally decided it was time #22  
Is there a connection from the bottom of the cab to the tractor frame?
 
   / DIY Cab - Finally decided it was time #23  
Nice work!
I also built one long time back but like to see other folks ideas.
Mine is kinda boxy looking and sometimes I get the urge to re-design it for a 'cooler look'.

I lately discovered a fantastic method of sealing the gaps; check out the seals used in public storage buildings. They are like strips of 3" bristled paint brushes and come in lengths of up to 6 ft and angled slightly. Keeps out rain, snow and wind and will not scratch the paint finishes.
Hands down over foams and felts!
 
   / DIY Cab - Finally decided it was time #25  
Cigar Face said:
Lookin god. Better hurry up though. Big snow will be here soon. I was out in the snow today. Only downside is you have to open door to let farts out
Maybe instead of opening the door just have a vent you can open to exhaust any excess gasses . Cigar face, do you open your door to let the farts out? How would you even come up with that thought. You must be a forward thinking guy! Impressive.
 
   / DIY Cab - Finally decided it was time
  • Thread Starter
#26  
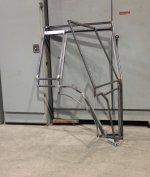
Had another productive day and got one door swinging (picture below). The goal is to paint on Friday. To answer a few questions that came up:

1. Yes it is made in sections. I posted a couple pics a day or so ago showing the connector plates I made up. They're installed with a weld on one side and bolts on the other.

2. The large pieces are the back / top together. Then there is the front section and two side sections.

3. When looking at the right side of the tractor the back/top section is made like an L rotated 90ー to the right. It attaches to the tractor via exiesting holes. The "lollipop" blinker holes were in just the right spot. It's also bolted through the (10mm?) welded-on nuts at the folding point of the ROPS.

3. The front bolts to the steel put there for the joystick on the right and a new matching (opposite hand) steel mount.

4. The cab fastens to the tractor at the six points described above. The lowest point of attachment is the joystick steel. The cab is quite sturdy even in its unfinished state. Today I was climbing the 1x1 steel tube on the right side to bolt up a connector on the far side. It was very solid and I'm no featherweight at 283#.

5. I'll check out those "brooms". At present nothing touches the painted body except a couple thick rubber washers where the lollipops were. I thought some rubber roofing would be good for blocking off the areas on either side of the hood.

19 small.jpg
 
   / DIY Cab - Finally decided it was time #27  
Cause it smelled like methane for a while and it was snowing hard. Didn't want to let the snow in the cab and the heat out. I opted to sniff the fart but made me light headed.
 
   / DIY Cab - Finally decided it was time #28  
Yes, that's the product except the version I used has 2.5 inch bristles.
I used it above my engine curved cowl below the windshield cross member where the space varies between 1 to 2.5 ins.
I also fitted 2 strips facing each other and pass the hydraulic hoses and heater lines.

I'd be willing to bet that some cab manufacturers will adopt this in future.

 
   / DIY Cab - Finally decided it was time #29  
Cigar Face said:
Cause it smelled like methane for a while and it was snowing hard. Didn't want to let the snow in the cab and the heat out. I opted to sniff the fart but made me light headed.

That's disgusting! But funny!
 
   / DIY Cab - Finally decided it was time #30  
Cause it smelled like methane for a while and it was snowing hard. Didn't want to let the snow in the cab and the heat out. I opted to sniff the fart but made me light headed.

You could have lit the fart with your cigar lighter for a few extra BTU's of heat.
 
 
Top