Electrical question - temporary fix - DIY ?

   / Electrical question - temporary fix - DIY ? #11  
Replace the subpanel! First off, you would need another 2 pole breaker to split the doubled up load on the lower right breaker. That only leaves you one double pole breaker slot left to put anything else inthe panel.

The panel corrosion is pretty bad. besides replacing the outlet box, you should put a cover over the whole thing to keep the moisture off.

lastly, that is a pretty old panel only has 3 connection/inputs(2 hots and a ground). You may have difficulty finding proper breakers to fit it. More modern panels have 4 inputs, 2 hot wires, ground and neutral(ground and neutral are tied together in the panel).

You have a good situation with a cutoff switch right there, to completely isolate the panel. This would not be too difficult to do.

To echo Egon, do you have a volt meter, to test and make sure things are de-energized before you work on them?

As others have said, educate yourself, and when in doubt, get someone else in there who is familliar with this kind of work. It is not difficult, but the cost of a mistake can be pretty high.

good luck.
 
   / Electrical question - temporary fix - DIY ? #12  
Ok I will try.... The reason some breakers are thin and some wide. The thin ones are 110v the wide are 220v

Your well pump (bottom left breaker) is using 220v 20A
Your Florecent (top left breaker) is using 110v 20A

For your RV to work I need to know if it is a 30A or 50A RV I will assume 30A and if you have only one AC you can run the RV on 30A but you might need a "Dog Bone Adapter".

You need one of these: GE 30 Amp Temporary RV Power Outlet - U013P at The Home Depot

You will need a 30A 110v breaker that will fit your panel. Take that 20A (upper right) one that feeds the plug off and bring it with you to make sure you get the correct one.

You will need a short length (3 or 4 feet or however long to get to where you want to mount the RV Outlet) of 10-2 wire (3 wires White, Black and Green or Bare)

Mount and Follow the wiring plans that come with the RV Power Outlet.

Carefully Run your wire into the panel.

You will add the 30 amp breaker run the white and green (or bare) wire to the bus bar ( flat bar with all the screws).

run the black wire to the breaker.

You should get one of these: GB Electrical 3250669 Ground Fault Indicator Outlet Tester

you probably have a 30a Male to 20A Female adapter like this: Save at RV Partscenter - RV Parts and Supply

Plug the tester into the adapter. Plug the adapter into your new 30a RV outlet.

Turn on breaker. If it tests ok then you are ok to plug in the RV

NOTE: All these things are sold at Home Depot I just couldn't find them on there website.

Let me know if you have any questions.
 
   / Electrical question - temporary fix - DIY ? #13  
The "thin" breakers (breakers 1 and 2 in the picture below) are single pole (120v) breakers (one "hot" wire) and the "thick" breakers (breakers 9/11 ad 10/12 in the picture below) are double pole (220v) breakers (2 "hot" wires)
I understand that's specifically true in the OP's panel - however, double-pole breakers (and single-pole ones too :D) can come in both "wide" and "thin" versions.

So what's the difference, other than just width ?

Ok I will try.... The reason some breakers are thin and some wide. The thin ones are 110v the wide are 220v
Not always true:

Federal Pacific Breakers @ Home Depot
 
Last edited:
   / Electrical question - temporary fix - DIY ? #14  
To the OP: does your trailer plug in work at other locations??:)
 
   / Electrical question - temporary fix - DIY ? #15  
I think the idea of replacing the current sub-panel, and then covering everything to protect it is a very good idea - for a number of reasons (safety not the least among them)

First off, the cost of a load center with a bunch of breakers is relatively cheap. I think I only spent around $100 for the Square D 200A panel in our polebarn, with 100A load centers about half that. That money will buy ya the panel and some breakers:

Square D Homeline 100 amp 20-Space 20-Circuit Main Breaker Load Center Value Pack

Square D Homeline 200 amp 30-Space 40-Circuit Main Breaker Load Center Value Pack

The OP has a new building which he has not yet run power to. Don't know for sure, but he may not have a load center for that yet. If he could purchase a replacement panel for the pole with the intention of later pulling it off and using it inside, he could avoid spending $$$ on something that will only have a short-term use.

What the feasibility is of doing this, in terms of it being "kosher" from code standpoint, I don't know ..... however given the OP's current situation, now would probably be a good time for him to learn how to wire things.
 
   / Electrical question - temporary fix - DIY ?
  • Thread Starter
#16  
Ok first of all you need to find out how many amps your trailers is first then go to lowes and get that size breaker you want to run 10awg wire then get the same plug that goes to your trailer and your all set. I am glad to help
The trailer appears to be a 30. I took more photo's today - I will post a new reply with the pics. And thank you for the reply!!

Plugs are configured based on the voltage and amperage rating of the circuit. You shouldn't have any trouble wiring up a simple circuit to provide your service, but you do need to understand what your requirements are to get wiring and breakers to match so it's safe. I bet you have a friend somewhere who knows something about it.

Start with this page to determine exactly what plug and service you are dealing with on the trailer:

NEMA Configurations
I am pretty sure I am going to give it a try. I will have at least one person inspect before hand or help during the project. And thank you for the link!!

I'm going to suggest that you get a pro to look at this. I see serious issues with corrosion and the outlet is not GFI protected. Electrical Safety is important in my books and it doesn't take much to make you dead!

Sorry if I seem short but life is
I will have someone inspect or assist. We will definitely use a GFI. And thank you for the candor!!

It can be a DIY situation - provided you educate yourself properly, and fully understand the potential hazard, and then use proper care - messing around side that box could get you dead, if you don't know what you are doing.

Having said that, I'm no electrician ...... but I was inside the 200A panel for our house yesterday, installing a new 50A breaker ..... ahhh .... without the power cut :confused2:


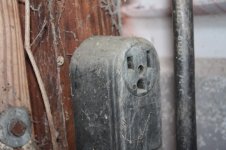
Like I said: I'm no electrician, but I'll take a stab: the item in the middle appears to be main disconnect switch for the item on the right. It (the item in the middle) may well be fused inside the box. I have a similar one (rated at 200A) that is fused, that I need to install to feed the electrical service in our polebarn.

The main disconnect switch would be necessary, from a safety standpoint, since the item on the right does not have it's own main disconnect switch to kill power to itself - a particularly important and useful feature, if one plans on being inside the item on the right, working on it :D


Either could be applicable I suppose, from a generic/slang perspective.

To be accurate and descriptive, I'd call it a circuit breaker panel :D

It may technically be a sub-panel ... dunno ....


You should make the effort to find out what it feeds - and then at least label it. This is for safety reasons - maybe not your safety, but perhaps someone elses .....


Thin breaker versus a wide one .... I'm not really sure the reason for the difference (other than saving space and allowing more circuits in a panel ?) .... I believe that the larger one's have higher rating in some respects than the thinner ones, although I may be mistaken.


As long as you understand the particular hazard it poses .....


Seems reasonable ...


Right.

While you are about all of this, here's a couple more fairly simple things you ought to do asap (IMHO):

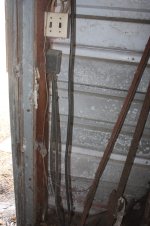
1. Spend a couple of bucks and at least get a proper weather-proof cover (one that isn't broken) for that 120v outlet on the bottom of the box. Coupla bucks.

As mentioned, ideally, you should throw a GFCI outlet and cover on it .... in an actual weatherproof box .... (I assume that it does rain down there :D)

2. Your power feed cable to your well appears to be run thru a set-screw connector for metal conduit. This is not correct - there is no way to secure the cable and provide strain-relief with the connector being used, and as a result, the cable has actually fallen down out of the box to the point where the outer insulation jacket is below the set-screw connector, allowing the inside wires to rub against the (metal) connector, as well as placing a strain on the wires at the point where they connect to the circuit breaker..

At a minimum replace the set-screw connector with one of these (less than a $1), sliding the cable up into the circuit breaker panel so that the clamp grips the outer insulation jacket, and there is no strain on the wires at the breaker:

Twin Screw Clamp Connector


Easy enough to do ... remove the unused set-screw conduit connector and use the hole to wire in another box and outlet.

Obviously any time you are working inside that circuit breaker panel, you should have the power to it shut off via the main disconnect switch. (Do as I say, not as I do :p)


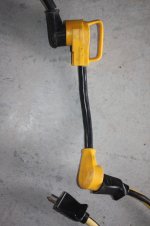
Dunno - you tell me - what kind of plug/receptacle is on your travel trailer ?

It could be you have a 30A shore power receptacle on the trailer, and then a proper 30A rated cable, and perhaps an adapter to convert it to either a standard 15A (or 20A) household plug ?

Or you could have a cobbled together cable with a 30A plug on one end (at the trailer) and standard 15A (or 20A) household plug on the other end .....

As KennyG suggests, take a look at the NEMA plug-receptacle configurations he linked and then let us know exactly what you have (pics would be good) on the trailer ..... and on both ends of the cable. And let us know exactly what gauge wire is in the cable.


Correct - as well as a new circuit breaker.

You will need to size the wire for the load - then you need to size the breaker for the wire. The purpose of the breaker is to protect the wire.


Sorry to hear it :(


You can do it - assuming you are a person of reasonable intelligence and willing to exercise proper care.


Glad to be of service :thumbsup:
I agree 100%. I really appreciate the detailed response. Awesome!! Thank you very much for everything including the links!!

The wood screw laying on the left hand feed terminal has the potential for severe arcing!:eek:
Good catch!! Thank you for your eagle eye!!

To add to the other couple of items that aren't kosher, it looks like the ground for the well service has been cut off and left sticking up in the air...not good. Without that ground hooked up as it is supposed to be, any/all metal cases of any electric equipment or anything connected to them metallically could have a high voltage potential to earth at the well site and yet everything could operate ok. Also, the 50 A breaker seems to have two services ran to it...that's not good either. An overload on one of those circuits could be low enough amperage that the breaker sees it as a load and doesn't trip but at the same time the conductor could be overloaded to the point that it could start a fire.

To tell the truth, even though this could easily be a DIY project, I think you should get a qualified electrician to come have a look-see and bring it all up to code for safety reasons alone.
Yes sir. I do agree. I believe it would be best if I have some additional guidance. Thank you!!

The "thin" breakers (breakers 1 and 2 in the picture below) are single pole (120v) breakers (one "hot" wire) and the "thick" breakers (breakers 9/11 ad 10/12 in the picture below) are double pole (220v) breakers (2 "hot" wires)

The wire labeled "wire 1" in the picture below needs three things:
1. Disconnect it and clean up the ends (I would cut off 1/2" from the wire and restrip the ends)
2. Reconnect the green (ground) wire to the same bar as the others
3. Replace the connector where it goes through the side of the box with one like: Shop Gampak 1/2" BX - MC - Flex Connector at Lowes.com as the current connector is intended for solid conduit, not a flexible wire

I would replace the entire outlet/box for Outlet1 with this kit: Lowes.com Error 500 - We are having a problem with our server.

To add a plug for your rv you will need the following:
1. A matching plug to the one you have on the RV cord
2. A short (2'?) piece of 10 gauge 2 conductor wire
3. A 30 amp single pole (110v) breaker (looks like a Square D QO to me) like: Shop Square D QO 30-Amp Single Pole Circuit Breaker at Lowes.com
4. A electrical box like: Lowes.com Error 500 - We are having a problem with our server.
5. A in use cover like: Lowes.com Error 500 - We are having a problem with our server.
It would be wired just like your current outlet is wired, but with heavier wire and a cover over it

View attachment 216534


Aaron Z
I wish I was that good on a computer!! I truly appreciate the detailed response. Awesome!! Thank you very much everything including the links!!

I'm gonna take a stab too..
first, I see your subpanel has alot of rust, good way for problems to happen soon. here in northeast, that rust will cause flickering of power. I am going to take a haphazard guess that houston is drier therefore it won't happen soon.

aczlan has outlined a general idea what you need.

Right now, I understand about your job layoff, but since your cutoff switch is in middle, it makes it easy to replace your whole subpanel.

I'd get a replacement subpanel, get a covered outlet, gfci plug for it. The 220 wire on left has chafing on the white wire and sheathing is too short. should be thru the clamp. Your red wire is sitting there ready for shocking on left. put a cap on it. Put a slanted board across the whole top to keep rain away from th whole panel. When you go to hardware store, get an 30 amp single pole breaker to install the panel for the camper. Use a GFCI protected plug for camper since its a outdoor use.

Your plug under subpanel is probably tripping due to corrosion. Like I said before replace that box with a better outdoor box and gfci protected plug.


I see a few more issues , but I see its been there for who knows how long. I am willing to bet that if a certified electrician was there, he would say there are a number of things to replace, just for longitivity and safety within todays standards.
It is amazing how so many people, including yourself, offer assistance with no strings attached. Thank you for all the assistance. I am very grateful. Thank you!!

Not an electrician and you have gotten lots of advice.

My question is; do you own a meter and can you use it properly:)?
Not yet. But I will before the weekend... :D Thank you!!

Replace the subpanel! First off, you would need another 2 pole breaker to split the doubled up load on the lower right breaker. That only leaves you one double pole breaker slot left to put anything else inthe panel.

The panel corrosion is pretty bad. besides replacing the outlet box, you should put a cover over the whole thing to keep the moisture off.

lastly, that is a pretty old panel only has 3 connection/inputs(2 hots and a ground). You may have difficulty finding proper breakers to fit it. More modern panels have 4 inputs, 2 hot wires, ground and neutral(ground and neutral are tied together in the panel).

You have a good situation with a cutoff switch right there, to completely isolate the panel. This would not be too difficult to do.

To echo Egon, do you have a volt meter, to test and make sure things are de-energized before you work on them?

As others have said, educate yourself, and when in doubt, get someone else in there who is familliar with this kind of work. It is not difficult, but the cost of a mistake can be pretty high.

good luck.
I am running out of ways to thank each person individually. :cool:

I appreciate the well thought reply. I'm gonna ask a question on the next post - might have to do the whole panel now vs later. Thank you again for the reply.

Ok I will try.... The reason some breakers are thin and some wide. The thin ones are 110v the wide are 220v

Your well pump (bottom left breaker) is using 220v 20A
Your Florecent (top left breaker) is using 110v 20A

For your RV to work I need to know if it is a 30A or 50A RV I will assume 30A and if you have only one AC you can run the RV on 30A but you might need a "Dog Bone Adapter".

You need one of these: GE 30 Amp Temporary RV Power Outlet - U013P at The Home Depot

You will need a 30A 110v breaker that will fit your panel. Take that 20A (upper right) one that feeds the plug off and bring it with you to make sure you get the correct one.

You will need a short length (3 or 4 feet or however long to get to where you want to mount the RV Outlet) of 10-2 wire (3 wires White, Black and Green or Bare)

Mount and Follow the wiring plans that come with the RV Power Outlet.

Carefully Run your wire into the panel.

You will add the 30 amp breaker run the white and green (or bare) wire to the bus bar ( flat bar with all the screws).

run the black wire to the breaker.

You should get one of these: GB Electrical 3250669 Ground Fault Indicator Outlet Tester

you probably have a 30a Male to 20A Female adapter like this: Save at RV Partscenter - RV Parts and Supply

Plug the tester into the adapter. Plug the adapter into your new 30a RV outlet.

Turn on breaker. If it tests ok then you are ok to plug in the RV

NOTE: All these things are sold at Home Depot I just couldn't find them on there website.

Let me know if you have any questions.
100% my mistake for not being more accurate. We have an adapter - see pics on next reply. We just want an outlet with a regular recepticle that will carry the 30a. Thank you for the assistance and for the links too!!

To the OP: does your trailer plug in work at other locations??:)
Yes. It works at our house and everything but the a/c works off a E2000i Honda portable generator...

I think the idea of replacing the current sub-panel, and then covering everything to protect it is a very good idea - for a number of reasons (safety not the least among them)

First off, the cost of a load center with a bunch of breakers is relatively cheap. I think I only spent around $100 for the Square D 200A panel in our polebarn, with 100A load centers about half that. That money will buy ya the panel and some breakers:

Square D Homeline 100 amp 20-Space 20-Circuit Main Breaker Load Center Value Pack

Square D Homeline 200 amp 30-Space 40-Circuit Main Breaker Load Center Value Pack

The OP has a new building which he has not yet run power to. Don't know for sure, but he may not have a load center for that yet. If he could purchase a replacement panel for the pole with the intention of later pulling it off and using it inside, he could avoid spending $$$ on something that will only have a short-term use.

What the feasibility is of doing this, in terms of it being "kosher" from code standpoint, I don't know ..... however given the OP's current situation, now would probably be a good time for him to learn how to wire things.

Thank you for the reply and all of the assistance!! The question of the day... do a small percentage now or wait to do everything correctly later on... I'm leaning towards doing most of it now. You will see on the new pics why it might be necessary. I will post photo's and pose another question of two. Thank you!!

It will take a minute or two to upload the new pics... :)
 
   / Electrical question - temporary fix - DIY ?
  • Thread Starter
#17  
Here is a pic of: #1.) The trailer (the camera focused on the plug rather than the decal). I am 99% sure it said 110V and 30A "30 ampere" supply. I will triple check before I proceed. #2.) The dog bone and wires disconnected. #3.) The dog bone and wires as we use them in regular receptacles.
 

Attachments

  • 002.jpg
    002.jpg
    383.5 KB · Views: 211
  • 003.jpg
    003.jpg
    541.3 KB · Views: 200
  • 004.jpg
    004.jpg
    763.3 KB · Views: 169
   / Electrical question - temporary fix - DIY ? #18  
Well i am an electrical contractor, and if i was called to this job i would not do anything to that panel unless you replaced the section to the right with a good, non-rusted weatherproof section. It would cost under $100 in all parts at home depot. Also as other have said, all outlets need to be GFCI protected, again thats cheap as a gfi outlet runs about $12 and a cover about $7. If something is to be left plugged in get an in-use cover which covers outlet WHILE something is plugged in $10.00.

The meter section (left side) and the main knife disconnect (center) should be OK to leave inplace.....but i don't know what their conditions are without interior pics. All grounds can be repaired with the new panel installation. For me this entire project would take about 1-1/2 hours to complete. If you haven't done it before, and feel confident you can do it, PLEASE purchase a meter to verify power is dead when main is disconnected, as i have seen some of these old things so badly rusted that just throwing the lever DOESN'T kill the circuit.

If you are unsure about your ability to do this, call an electrician. A job like this is a $250-300 (plus permit if needed in your area) job, not worth getting killed over $300.

Id love to tell you to just add a 30 amp , 110 circuit to this box, but i cant. the thing is just too badly rusted and in disrepair. i couldn't in good conscious tell you to use it as it stands.
 
   / Electrical question - temporary fix - DIY ?
  • Thread Starter
#19  
Here are pics of: #1.) From the new metal building to the water well and power supply. It was 90 regular walking steps to the water well and 10 more walking steps to the power supply - I'll use a tape measure next time :). #2.) From the water well to power supply. 3.) From the power supply looking back at old barn and also new metal building.
 

Attachments

  • 005.jpg
    005.jpg
    1,022 KB · Views: 138
  • 007.jpg
    007.jpg
    1.1 MB · Views: 164
  • 008.jpg
    008.jpg
    1 MB · Views: 141
   / Electrical question - temporary fix - DIY ?
  • Thread Starter
#20  
Here are pics from inside the old barn: #1) I believe the two wires from the power supply that hook to the 50A go to this outlet... #2.) Here it is from a few feet away. I believe the other 20A goes to this switch.
 

Attachments

  • 009.jpg
    009.jpg
    563.4 KB · Views: 166
  • 010.jpg
    010.jpg
    851 KB · Views: 166
 
Top