fel removal with fel question

   / fel removal with fel question
  • Thread Starter
#11  
Thank you so much for doing this for me! I have printed them out and will include them in my workshop manual.
 
   / fel removal with fel question #12  
I modified the two pins that you have to take out, with handles like the big pins. much easyer to take out and replace, in the winter when the snowblower is on and off.
 

Attachments

  • 267469-kubota mod.jpg
    267469-kubota mod.jpg
    36.5 KB · Views: 115
   / fel removal with fel question
  • Thread Starter
#13  
</font><font color="blue" class="small">( I modified the two pins that you have to take out, with handles like the big pins. much easyer to take out and replace, in the winter when the snowblower is on and off. )</font>

Thanks, that's a good idea. I just put the loader back on today and had a b*tch of a time getting it on. I can't seem to get the weight off the loader enough for those stupid pins to push in without persuasion (read: hammer). Now they're in but I can't fasten them because the holes in the end don't line up with the holes in the shoulder on the support arm and there's no way in hell to get them to turn until they do line up. I feel horribly stupid that I had so much trouble but it took me over an hour of fooling around with it to get it to go. /forums/images/graemlins/frown.gif /forums/images/graemlins/frown.gif /forums/images/graemlins/frown.gif Now I'm not convinced that I can even get it back off again.

Is there a trick to this? Raise the loader up until you can unlock and swivel the supports, drop the loader down on the feet. Curl the bucket until the weight is off the main pins on either side and remove the left side pin. So far so good but now the two right side pins must come out and they don't want to. You can't undo the right side boom cylinder pin until you get the top pin out and pick the loader up enough to disengage it from the left side. So I assume that the next step is to get the top pin out. Last time I drove it out with a pin punch and a 16oz ball peen hammer. We know that can't be right! /forums/images/graemlins/blush.gif

ANY help you can offer at this point would be most graciously received as I had planned on removing and reinstalling the loader on a regular basis while I landscape the back yard, and I don't really want to mow with the loader attached.
 
   / fel removal with fel question #14  
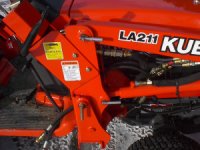
Ummm, there is a better way to do this. Someone quite a while ago (I think it was Rogue) posted a project that eliminated this issue by fastening the control valve directly to the mounting pedestal for the FEL frame. He added some quick connects, and presto, the control valve stayed with the tractor, yet it allowed the FEL to be removed with that One pin on either side, just like the normal FEL removal. Those frame pins are a pain in the rear to remove and reinstall. Look up the mod and do it, I sure as heck would.... /forums/images/graemlins/cool.gif
 
   / fel removal with fel question #15  
putting handles on those pins did it for me. You can get ahold of them and tell when the load is off them, and line them back up to put the lock pins back in. to make it easyer to install them I ground a little tapper on them to aid in starting them back in the holes. I also found that a level floor helps alot to. before I put handles on them I was not happy with the setup. now It is three pins instead of two. after takeing it on a off a few times you get better at it. It's like someone said practice makes perfect. /forums/images/graemlins/wink.gif
 
   / fel removal with fel question
  • Thread Starter
#16  
I think this <font color="blue"> BX Loader Valve Modification by Woodstock </font> will help you. However, there used to be pictures and they did not come up in the post this time. May be that my computer is acting up again. There are a couple of other ideas there too.
 
   / fel removal with fel question
  • Thread Starter
#17  
</font><font color="blue" class="small">( putting handles on those pins did it for me. )</font>

I went to the dealer yesterday and bought an extra set of pins so I can experiment with them. My father has a small machine shop so he might be able to give me a hand making the mods to the pin.

I am looking at the mods described in the thread below as a better solution, though.
 
   / fel removal with fel question
  • Thread Starter
#18  
</font><font color="blue" class="small">( I think this <font color="blue"> BX Loader Valve Modification by Woodstock </font> will help you. However, there used to be pictures and they did not come up in the post this time. )</font>

YES!! This thread is a great help. Check further down in the thread, as someone reposted the pictures. If you can't find them let me know because I downloaded them and could post them if need be. I intend to send them to my dealer and see what he says.
 
   / fel removal with fel question #19  
I just got a BX23 with BH & FEL, and have to wait another couple of weeks for the 2750 snow blower. I have been reading this thread to understand what the process of changing from FEL to blower will involve. It seems that Kubota has changed the BX23 from the BX22 and similar so that the 4-position valve always stays on the tractor when the FEL is removed (photo attached). In other words, it seems like Kubota has taken the ideas from this forum and included them in the latest version.

Can anyone who is familiar with the BX series confirm this?

Thanks
 

Attachments

  • 371458-BX23-valve-mount.JPG
    371458-BX23-valve-mount.JPG
    95.7 KB · Views: 110
   / fel removal with fel question #20  
You are correct..... Kubota finally got it right and figured out that the loader control should stay with the tractor when the loader is removed because it is used with other attachments. They also have discontinued the old 3 way valve and the 4 way is standard with the BX-23. Who said that an old dog couldn't learn new tricks.... Let us know how you like the blower.. and don't forget your ski mask for when the snow starts blowing back at you... /forums/images/graemlins/blush.gif /forums/images/graemlins/grin.gif
 
 
Top