You are using an out of date browser. It may not display this or other websites correctly.
You should upgrade or use an alternative browser.
You should upgrade or use an alternative browser.
Home wiring (non-electrical)
- Thread starter shade2u2
- Start date
/ Home wiring (non-electrical)
#21
MossRoad
Super Moderator
- Joined
- Aug 31, 2001
- Messages
- 60,225
- Location
- South Bend, Indiana (near)
- Tractor
- Power Trac PT425 2001 Model Year
I agree with you. In the case of a new house, pre-planning makes all the difference. I know that I want sound in my home theatre, in my dining room, out on my deck by the pool, in the laundry room?, etc... so I'd run speaker wires right to the planned locations of the speakers with the RCA(banana) jacks. I couldn't think of a good reason to use CAT5 either, but it is kind of interesting to see that it could be done.
Here's a small cost breakdown for those that are interested. At work, we run two voice and two data to each office/cubicle. Let's say you want to wire 12 offices/cubicles.
48 jacks X $5.00 ================== $240.00.
Patch panel to accomodate 48 jacks === $200.00.
48 cable runs @ 100'/run = 4800' wire == $300.00.
Your looking at $740.00 already. Compare that to a new home that you want to run two voice and two data to each wall location. Most rooms get 2 wall locations(or more) except the home office, garage. etc.
4 bedrooms = 16 jacks
livingroom === 4 jacks
family room == 4 jacks
kitchen ===== 4 jacks
home office == 8 jacks
basement === 4 jacks
garage ===== 2 jacks
patio/pool====1 jack
outbuilding=== 1 jack
There's 44 jacks. You can see how it will add up quickly. And this is only data and voice. For whole house video, you will need to run 2 RG6 cables to each location. I guess everyone just needs to decide for themselves how much they want to spend on pre-wiring a house now, VS. fishing wires through walls later when you decide to add a location, and see if the price outweighs the frustration.
Absolutely! The "pain" point is different for everyone!
From a "futureproof" perspective, since the wire is the hardest thing to install after the sheetrock goes up, if someone has budget issues in the beginning, they could still make their cable runs and leave it all in the wall. (thereby avoiding outlet/faceplate/installation costs until it is needed)
When they decide to add a new cable/phone/video/network connection to XYZ room, they can use a drywall saw, pop in an electrical box, terminate, and BOOM! they got their new link without near the pain. (still some pain, but less fiberglass in burried in your skin! /w3tcompact/icons/smile.gif)
Something you might consider doing is making a videotape of all your cable/wire runs in the framed house before the sheetrock goes up so you know exactly where things are. I've found this VERY helpful, not just for wire runs, but other things as well - e.g. stud locations, pipe locations, etc.
Like you said, it all depends on what you really want, what you will really use, and how much pain (e.g. $$$ vs. effort) you want to put in. /w3tcompact/icons/smile.gif
PaulT
Gold Member
I recently added some thoughts to a house discussion in the projects group that has turned to house structured wiring. Check out <A target="_blank" HREF=http://www.tractorbynet.com/cgi-bin/compact/showthreaded.pl?Cat=&Board=projects&Number=112917&Search=true&Forum=All_Forums&Words=pault&Match=Username&Searchpage=0&Limit=50&Old=2weeks&Main=88561>this link</A>, then read the rest of the posts for some more info.
The specific answer regarding 110 punch down blocks can be found on <A target="_blank" HREF=http://www.levitonvoicedata.com/coppercomponents/wallmount110.asp>this page</A> in the leviton online catalog. They are plastic blocks with (usually) aluminum "slots" that are 4 across, allowing one pair of wires to be "punched down" on each side (1 wire + & - on the left, and 1 wire + & - on the right). These connections can be "bridged" together with little metal clips, allowing a great deal of flexibility before, during and after the installation of the wiring system. Phone wires are almost always wired this way, and some data wires used to be, until the advent of higher speed networks came along. It still is cost effective to use this for phone wires. "Punching down" wires on these blocks is quick and easy, if you have a punch down tool that also cuts the wire to the correct length at the same time. Once you have the sheath removed, you can just hook each individual wire around the aluminum slots, pull tight, and punch the tool down over each wire/termination as quickly as your arm can move the tool. I can punch 50 pairs down in just a few minutes, and so can you!
The specific answer regarding 110 punch down blocks can be found on <A target="_blank" HREF=http://www.levitonvoicedata.com/coppercomponents/wallmount110.asp>this page</A> in the leviton online catalog. They are plastic blocks with (usually) aluminum "slots" that are 4 across, allowing one pair of wires to be "punched down" on each side (1 wire + & - on the left, and 1 wire + & - on the right). These connections can be "bridged" together with little metal clips, allowing a great deal of flexibility before, during and after the installation of the wiring system. Phone wires are almost always wired this way, and some data wires used to be, until the advent of higher speed networks came along. It still is cost effective to use this for phone wires. "Punching down" wires on these blocks is quick and easy, if you have a punch down tool that also cuts the wire to the correct length at the same time. Once you have the sheath removed, you can just hook each individual wire around the aluminum slots, pull tight, and punch the tool down over each wire/termination as quickly as your arm can move the tool. I can punch 50 pairs down in just a few minutes, and so can you!
TerryinMD
Veteran Member
Or you can look into using patch panels which effectly do the same thing with the added value of having your RJ45 connectors already for use. Six of one or half-dozen of the other. /w3tcompact/icons/wink.gif
The best way for me to sum this up is to look into the technologies available and choose the best that fits your budget. A little homework and planning upfront save a lot of time, energy, and money later on. Be frugal. smile]
Terry
The best way for me to sum this up is to look into the technologies available and choose the best that fits your budget. A little homework and planning upfront save a lot of time, energy, and money later on. Be frugal. smile]
Terry
PaulT
Gold Member
I wouldn't recommend terminating the phone lines in modular jacks, or in a patch panel, like you would with data cables. Speaking in terms of phone lines, each data cable is essentially a separate "line". This means that each wire needs to be separate from all of the others. You also would like the flexibilty of being able to reconfigure the use of the lines easily. All of this adds up to using a patch panel and patch cables that can easily be switched.
Phone lines are different in the way they work. Since most houses have one, or maybe two phone lines, but wish to have access to those phone lines throughout the house, you only NEED to have one or two separate wire pairs - one wire pair for each line. These wires could travel in series, or daisy chain, starting at where they come in from the phone company and going from one jack to the next. Someone already pointed out the problem with this design - one break in either wire (+ or -), and at best every phone from that point on stops working. At worst (and more likely), they all stop working. A better solution is the "home run" where each wire pair is dedicated to a specific jack and runs from there to the "home" location where the phone line comes in from the outside.
Now you have a bunch of wires that all need to be connected to a SINGLE phone line (or two bunches of wires that need to be connected to 2 phone lines). Also, it is very unlikely that you would ever wish to reconfigure this, once you installed a jack in every room. For this situation, professionals use the 110 punch down block because it is easy to do, they are plentiful, they are cheap and they are easy to troubleshoot if one line goes bad.
Once the "home run" wires are all punched down on the left side pairs, you can run a single wire to connect every terminal on the other side together, then use the "bridge" clips I mentioned. Now every individual wire is connected to the single phone line. This is a case where a picture is worth a thousand words, but the digital camera is busted, so maybe I'll get one later (borrow my brother's camera)
RobS
Super Member
Paul, I would love to see some pics of what you are talking about. I think I can visualize it, but like you said a picture is worth a lot of words. Is the 110 punchdown hardware and tool available at a home center or is it more of an electical supply house item? Get that cameral fixed /w3tcompact/icons/smile.gif
MossRoad
Super Moderator
- Joined
- Aug 31, 2001
- Messages
- 60,225
- Location
- South Bend, Indiana (near)
- Tractor
- Power Trac PT425 2001 Model Year
Here's my punch down block. We have two lines. Notice that there are 50 rows of four stabs each. On most blocks, the left two stabs are connected and the right two stabs are connected. On this particular block, all 4 stabs are connected in each row. At the very top on the left notice that the first wire is red, the second green, the third black, the fourth yellow. Then notice that the wires loop through and alternate in color all the way down the block on the left side. What this does is make the first two rows line one, the second two rows line two, the third two rows line one again, the fourth two rows line two again and so on all the way to the bottom. This gives me the potential for 25 lines. I have mine set up for 11 possible locations for line one and 11 possible locations for line 2. Then there are two rows skipped and the last four rows are where the lines actually attach from the phone company box, as you can see hanging under the block at the left. I should have started from the top, but I didn't. Anyway, now look at the right side of the block from the top. These wires come from the phone locations throughout the house. Most of the old locations have 4 wire, but I have started using 8 wire CAT5 cable, just because I had it. The unused wires just hang around for future use. I have both lines available at every location in the house, which makes it very easy to use either line anywhere in the house.
Now, if I want to add a location, all I have to do is home run a cable from the location to this punch down block, terminate it at the location in an RJ11 jack or two, and punch down the pairs that I need on this block using the punch down tool.
Now, if I want to add a location, all I have to do is home run a cable from the location to this punch down block, terminate it at the location in an RJ11 jack or two, and punch down the pairs that I need on this block using the punch down tool.
Attachments

RobS
Super Member
Very slick MR. I'm sold, at least for the phone lines. Where did you get the block and tool?
Is there an equivalent for video/coax? I can hold off on the network for now, I'll run the wires but let them hang. I have seen some "all in one" boxes at the home centers, but they are pretty pricey /w3tcompact/icons/smile.gif
Is there an equivalent for video/coax? I can hold off on the network for now, I'll run the wires but let them hang. I have seen some "all in one" boxes at the home centers, but they are pretty pricey /w3tcompact/icons/smile.gif
MossRoad
Super Moderator
- Joined
- Aug 31, 2001
- Messages
- 60,225
- Location
- South Bend, Indiana (near)
- Tractor
- Power Trac PT425 2001 Model Year
I've picked up several of these 66 blocks over the years in construction demolition. I have the one like in the picture and the ones that are split down the center, which cuts the number of stabs per line down to 2, but increases the capacity to 100. The split one is more common.
I can't remember where I picked up the punch down tool, I've had it so long. You can get them anywhere for about $69.00. It has a two level impact spring and the blades are interchangeable for common phone equipment. The blades that I have are for the 66 block. One end has a blade for terminating and cutting, the other end is for looping through like on the left side of the picture. It will punch down, but not cut the wire.
I took some pictures of the punch down tool, but my camera batteries died last night and I couldn't download them. /w3tcompact/icons/mad.gif I'll try to get some batteries tonight and post them.
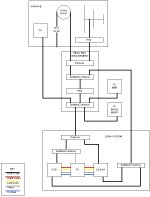
There is nothing similar for video, as of yet. I have a diagram of my video system attached. I just used high quality RG6 and bought the connectors and a crimping tool. Practiced on a couple of jumpers for the entertainment center and off I went. Not too hard at all.
I can't remember where I picked up the punch down tool, I've had it so long. You can get them anywhere for about $69.00. It has a two level impact spring and the blades are interchangeable for common phone equipment. The blades that I have are for the 66 block. One end has a blade for terminating and cutting, the other end is for looping through like on the left side of the picture. It will punch down, but not cut the wire.
I took some pictures of the punch down tool, but my camera batteries died last night and I couldn't download them. /w3tcompact/icons/mad.gif I'll try to get some batteries tonight and post them.
There is nothing similar for video, as of yet. I have a diagram of my video system attached. I just used high quality RG6 and bought the connectors and a crimping tool. Practiced on a couple of jumpers for the entertainment center and off I went. Not too hard at all.