How I added rear remote hydraulics to my tractor

   / How I added rear remote hydraulics to my tractor
  • Thread Starter
#21  
The hoses coming from the work ports of the new valve, to the rear remotes, were a bit tricky.

I used 24" hoses to connect the right side remotes, and 36" hoses to connect the left side remotes.

The tricky part was getting all those hoses connected to the 90* fittings, also, getting the 90* fittings into the valve.

The 90* fittings coming out of the valve, were difficult to screw into the ports because the 90* fitting would hit another 90* fitting as I tried to screw it in.

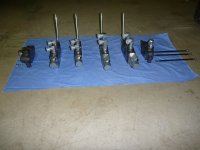
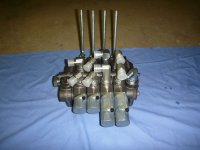
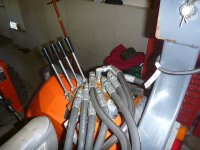
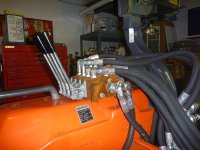
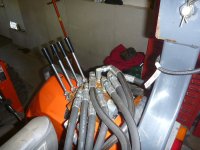
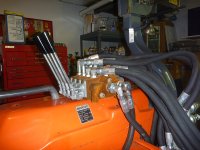
A time saving tip that I didn't know, would be to screw all the 90* fittings into the seperate spools before you put the valve together, like you see in the first and second pic (I put it all together, then tried to put the fittings in, then realized I had to take it apart)
However, if you don't go with a stack valve you wouldn't have this option, I believe they have fittings that swivel at the bottom which you could tighten without interfering with others, but keep in mind the more swivels and connections you have, the more chance of a leak. Notice in the first two pics, I used taller 90* fittings for 4 of the hoses, and shorter ones for the other 4, this way I could have 4 hoses going over the top of the other 4 hoses, rather than trying to cram 8 hoses side by side, because I could not have done that.


These 90* fittings were all SAE #8 (aka O-ring Boss) to 1/2" JIC male adapters. This way, once I have all the elbow's in the valve, all I have to do is tighten down the hoses (which were all JIC female fittings). I didn't tighten down the elbows in the valve until after the hoses were connected, which helped me because I had to adjust a few things here and there to get the hoses to fit where I wanted them.

SAE 37ー Flare (JIC) x O-Ring Boss (ORB) 90ー Elbow
SAE 37ー Flare (JIC) x O-Ring Boss (ORB) 90ー Extra Long Elbow
 

Attachments

  • i-xp3n7zP-L.jpg
    i-xp3n7zP-L.jpg
    117.2 KB · Views: 875
  • i-P7jKWd9-L.jpg
    i-P7jKWd9-L.jpg
    112.8 KB · Views: 1,040
   / How I added rear remote hydraulics to my tractor
  • Thread Starter
#22  
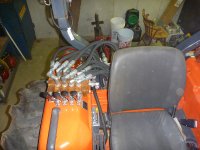
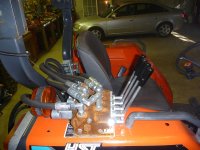
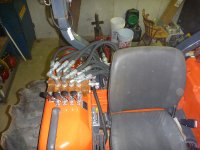
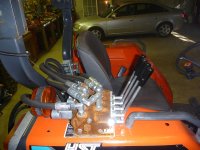
In the following pics, you can see how the hose routing ended up. Notice that I had to add an extra 90* (sideways) on one of the end fittings, I couldn't get it to tighten down the direction it was going, and had an additional fitting laying around.
(I ordered some extra fittings and hoses with my original orders, and returned a good portion I didn't use, but kept a good amount that I know I will use later)
 

Attachments

  • i-7dvWqfX-L.jpg
    i-7dvWqfX-L.jpg
    144.1 KB · Views: 1,154
  • i-dJxLnwk-L.jpg
    i-dJxLnwk-L.jpg
    154.8 KB · Views: 1,101
  • i-GFGTggH-L.jpg
    i-GFGTggH-L.jpg
    141.3 KB · Views: 1,016
  • i-k65hQ99-L.jpg
    i-k65hQ99-L.jpg
    154.6 KB · Views: 1,369
   / How I added rear remote hydraulics to my tractor
  • Thread Starter
#23  
It doesn't take a Sherwin-Williams specialist to notice that I didn't paint my valve :laughing:
As you can see, it rusted pretty quickly. The first time I used the box blade for much work, it rained, and the next day when I went outside to use it again, it was already rusted over. I was pretty surprised at first, but then it hit me that of course it would rust, I never did anything to protect it!
I'm not sure why I never thought of that, I'm usually pretty good with those things, but for some reason I was thinking that this was some sort of steel that wouldn't rust or something?? Or, I just never thought of it, I don't know, but either way, I felt like an idiot. :laughing:

I found a product on a motorcycle forum I'm on called Evaporust. I'm gonna try it out on the valve. It supposedly won't hurt any of the seals, or hoses, and I really don't want to take this whole valve apart again.
So my plan is to buy a couple gallons of Evaporust, and pour it into a plastic container, then unbolt the valve from the fender and slide the container under it, and set the entire valve in the tub of Evaporust for an hour or two.

Then, what most likely will happen, is it didn't work and I'm gonna have to take the valve apart and sand it down to paint it,:laughing: BUT.....what I'm hoping will happen, is that it will be magically rust free and ready for a coat of primer, then I will prime and paint it whatever color I have laying around. Hopefully, that will be sufficient.
 

Attachments

  • i-7dvWqfX-L.jpg
    i-7dvWqfX-L.jpg
    144.1 KB · Views: 600
  • i-dJxLnwk-L.jpg
    i-dJxLnwk-L.jpg
    154.8 KB · Views: 636
  • i-GFGTggH-L.jpg
    i-GFGTggH-L.jpg
    141.3 KB · Views: 533
  • i-k65hQ99-L.jpg
    i-k65hQ99-L.jpg
    154.6 KB · Views: 690
   / How I added rear remote hydraulics to my tractor
  • Thread Starter
#24  
I'll try to post all the hoses, fittings, and parts I needed for my install.


For the valve I used:

https://www.surpluscenter.com/Item.asp?item=9SV-4-Y
I ordered it with 2 spring return to center spools (SVW1BA1)
and 2 with float detent (SVW1DD1)
$426.85

I will probably add a 3 position detent spool if I keep my splitter (SVW1BB1)


For the three main hoses going to/from the valve, I used:

(2) 1/2" X 84" JIC 8F X JIC 8F 3500 PSI HYD HOSE $46.00
https://www.surpluscenter.com/Item.asp?item=940-2284

(1) 1/2" X 108" JIC 8F X JIC 8F 3500 PSI HYD HOSE $27.00
https://www.surpluscenter.com/Item.asp?item=940-22108

For the hoses coming from the 8 work ports of the valve, to the rear remotes, I used:

(4) 1/2" X 24" JIC 8F X JIC 8F 3500 PSI HYD HOSE $48.00
https://www.surpluscenter.com/Item.asp?item=940-2224

(4) 1/2" X 30" JIC 8F X JIC 8F 3500 PSI HYD HOSE $52.00
https://www.surpluscenter.com/Item.asp?item=940-2230


For the adapters/connectors/elbows for all the valve ports, including the IN/PB/OUT and 8 work ports I used:

(1) 90?????ー Elbow, 1/2" JIC x #10 SAE/ORB $3.23
SAE 37?????ー Flare (JIC) x O-Ring Boss (ORB) 90?????ー Elbow

(6 total-4 for work ports, 2 for IN/OUT) 90????ー Elbow, 1/2" JIC x #8 SAE/ORB $15.72
SAE 37???ー Flare (JIC) x O-Ring Boss (ORB) 90???ー Elbow

(4) 6801LL-08-08 | 90???ー Elbow, 1/2" JIC x #8 SAE/ORB, Double Long $23.92
SAE 37??ー Flare (JIC) x O-Ring Boss (ORB) 90??ー Extra Long Elbow


For the Adapters/elbows/connectors for the QD bracket fittings I used:

(8) 90??ー Elbow, 1/2" JIC Male x 1/2" JIC Female Swivel $18.16
SAE 37?ー (JIC) Swivel Nut 90?ー Elbow

(8) 1/2" NPTF Male x 1/2" JIC Bulkhead with Locknut $49.76
Male Pipe (NPTF) x SAE 37?ー Flare (JIC) Bulkhead

(8) Quick Disconnect fittings. (NPT female thread)
I'm not sure exactly how much these are, but they should be around $18.00 a piece, so for 8 it would cost $144.00. I got lucky and got all of mine from a good friend who gave them to me. I also got a lot of the above fittings I've mentioned from the same friend, it did however, cost me a 30 pack. :D But I wanted to post what the cost would be if I had to buy everything, I still spent a good amount.

For the 'other' ends of the 3 main hoses tying into the tractor I used:

(1) Run Tee, 1/2" JIC Male x 1/2" JIC Female Swivel x 1/2" JIC Male $3.68
SAE 37ー (JIC) Swivel Nut Run Tee
Pay VERY close attention to which ends you need male or female!

(1) 90?ー Tube Elbow, 1/2" JIC Male x 1/2" JIC Female Swivel $9.71
SAE 37ー (JIC) Swivel Nut 90ー Bent Tube Elbow

I didn't need an adapter of any sort for one of the 3 main hoses.

I also used one extra 90* JIC elbow for that one hose that has 2 elbows on it coming out of the valve.

I believe that is about it.....FINALLY :laughing:

I hope this write-up helps at least one person when they're planning they're valve install, if so, it will all be worth the time. If anyone has any questions feel free to ask.

You CAN do this job cheaper, my goal when I set out to add this valve, was to not only have everything I want for now, but have the ability to add more in the future, if I wanted to. I also planned it so when I do upgrade tractors, I could easily take the valve and brackets off this tractor, and put it back the way it was when I bought it, and add to my next tractor. I'm not sure if I will do that or not, but I wanted the option.

All in all, I achieved my goal, and I have one very nice and easy to operate system now. Every time I hook my box blade up to the back of my tractor, I smile and say to myself, it was all worth it!

I know it doesn't look as neat and clean as most installs on TBN, but I'm actually very proud of how it turned out. When I say I didn't know anything about hydraulics before I started this project, I am being 100% honest. I just did a lot of homework here on this site, a lot of planning, and a whole lot of learning.
I honestly could not have done it without the help of TBN support.
Thanks guys :thumbsup:


Special thanks to J.J, KennyD, Teg, and MtnViewRanch :thumbsup:
 
   / How I added rear remote hydraulics to my tractor #25  
Piston,

Nice write up and pictures. I think you covered everything down to the last detail.

Thanks
 
   / How I added rear remote hydraulics to my tractor #26  
Next, I mounted the two brackets, and connected the hoses.

Now, you would think by looking at the pictures, that I drilled a hole through the ROPS, and insterted two bolts per bracket to secure them, using washers and nylock nuts. However, since (as everyone on TBN knows) you should never drill a hole through your ROPS, I of course didn't do that....

What I actually did was....I used two sided sticky tape to secure the brackets to the ROPS, and then, I glued 2 bolt heads and 2 nuts per bracket, to the bracket and ROPS, to make it LOOK like I drilled through the ROPS to install the brackets. :D

SO, there is no need to warn me about the dangers of drilling a 3/8" hole through my ROPS, since that isn't actually what I did. :D
It just appears that way :thumbsup:

I'm not actually going to congratulate you on your construction since you used glue and double-stick tape, but those aluminum angles are so thick and strong that if you drilled your ROPS and bolted them on, you'd actually strengthen the structure. Anybody can see that they are the perfect medium on which to mount the quick-connects, but they are thick enough to reinforce anything they are attached to also. So if you'd drilled and bolted them on, I'd say congratulations on one pretty piece of work.:thumbsup:;)
 
   / How I added rear remote hydraulics to my tractor #27  
Disclaimer: This won't be as good of a write up as Jim's, or Teg's or most of the other's that I've read on here, but I'll do my best.
On vacation, have not read the whole thing but it looks like it kicks my post in the buttocks!!! :thumbsup: Looking forward to reading it through...

Flusher, ...I wish mine 'looked' a little neater and more factory! Not to mention I have more than $700 into this just doing it myself...
Ditto on both comments... :D Hydraulics ain't cheap...

Good things take time! Great post and pictures Piston:thumbsup:
FOR SURE... I'm sure this will be referred to and read many times over... For years to come. Great job.
 
   / How I added rear remote hydraulics to my tractor #28  
This is a great write up! Did you have to completely remove the existing hydraulics and re-install your current set-up, or did you add to the existing unit?
Also, what rear implements would require more than 1 rear svc?
 
   / How I added rear remote hydraulics to my tractor #29  
jeramie76, There are many uses for multiple rear remotes.

Hydraulic top link
Hydraulic side link
Hydraulic rippers on a box blade
Hydraulic angle on a rear blade
Hydraulic off set on a rear blade
Hydraulic tilt on a rear blade
Hydraulic tail (gauge) wheel on a rear blade

Very common to have both top and tilt hydraulics, so there are 2 remotes needed. And it is becoming more common to have 1 or more hydraulic functions on an implement itself. Very common would be the hydraulic angle for a rear blade or landscape rake.
 
   / How I added rear remote hydraulics to my tractor
  • Thread Starter
#30  
Jeramie,
I did not have to replace my existing hydraulics, rather, I added to them. Basically using the existing hydraulic system to run more hydraulics.

As MtnViewRanch stated, there are multiple reasons for more hydraulics. I never realized how helpful they would be until after the fact.

For me, I'm using 2 for a top N tilt system (hydraulic top link and hydraulic side link) then I'm using 1 for the hydraulic scarifiers on my box blade, which leaves me with one left over.
I plan to add a hydraulic gauge wheel to my box blade and will use the remaining port for it.

I also hope to have a heavy duty rear blade someday that will have hydraulic angle and offset, which, combined with top N tilt, will give me all sorts of adjustments....although, at that point I will want one more rear remote, to power a hydraulic gauge wheel for the blade. It never stops...:laughing:
 
 
Top