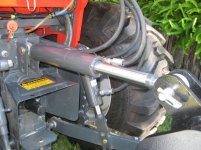
Made a "Type 1 Akkamaan Restrictor" today and installed it on the retract side of my tilt cylinder. I used Akkamaan's "Dremel groove" method, which is a lot easier than drilling the center. Because I was experimenting I installed it without any wires to start with, and it actually worked well. The control is definitely less sensitive in general and the cylinder retract speed is about 2/3 or so of what it was. Extend speed is noticeably faster than retract, which is ok with me. The Dremel cutoff wheel I used was .050" thick, so after accounting for slop caused by me during the cut my slot ended up to be around .060". Tomorrow I'll pull out the adapter and put a .030 wire in it and see what happens, I'm thinking the .030 wire will make things about right.
I used a 3/8 female to male NPT swivel and tapped 3/8-16 threads about 3/4 of the way into the body of the longer (male) section. For the restrictor plug I cut a 3/4" piece from a 3/8-16 mild steel bolt, cut a screwdriver slot in one end, grooved it lengthwise with the Dremel, and screwed it into the body of the adapter for a jam fit.
After doing this, I believe people who may think that using 1/4" hoses instead of 3/8" is going to "slow down" a cylinder are dreaming, since I'm going to end up going from 3/8" down to around .030"-.035" or so by the time I'm done to have any serious effect on cylinder rod speed. I was surprised, but that's the way it is.