Runner
Veteran Member
- Joined
- May 12, 2007
- Messages
- 1,722
- Location
- Missouri
- Tractor
- John Deere 2520, 1989 John Deere 185, 1960 Panzer T70B
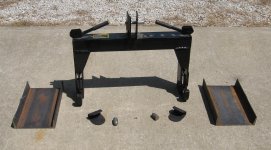
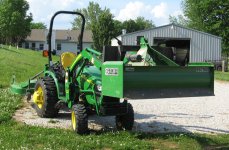
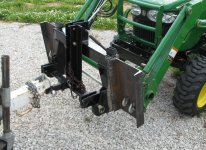
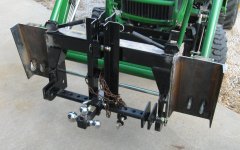
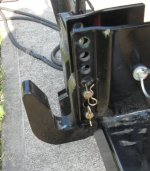
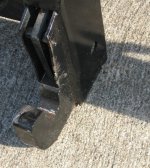
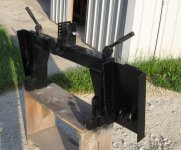
I put together a quick-attach loader mounted quick hitch for my JD 2520 with 200CX loader this afternoon. Parts needed were a Harbor Freight quick hitch, two 10 inch wide by 17 inch long pieces of channel iron and the quiick attach loader hooks and pins available from John Deere.
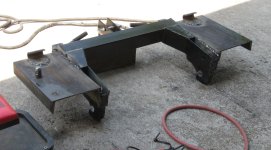
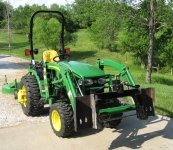
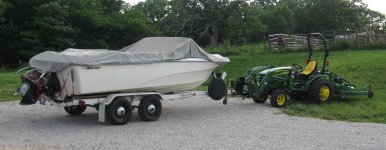
Pictures show the channel iron clamped to the quick hitch for welding, the hooks and pins being attached, some chain hooks added and the unit being tested lifting my box blade and using my quick hitch mounted trailer hitch.
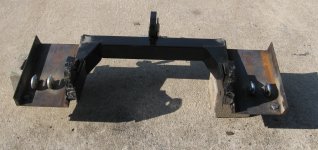
Lastly, some problem areas are shown. Mainly, the top hook, which is intended to be adjustable and is supplied with bolts from HF. However, the bolt heads and nuts are too big and get in the way of all of my attachments, so I cut the bolt heads off and tack welded the remainder of the bolt into the holes. The second problem area was the hinges for the latches at the lower hooks. These were spread too wide and got in the way of the attaching points on my attachments, so a slight adjustment with a hammer corrected the problem.
This project wasn't too bad, and the hardest part was creating the holes for the JD pins to go through for the mounting points. The step drill wouldn't do it, so I had to resort to opening the holes up with an air powered die grinder with a carbide bur tip.
Pictures show the channel iron clamped to the quick hitch for welding, the hooks and pins being attached, some chain hooks added and the unit being tested lifting my box blade and using my quick hitch mounted trailer hitch.
Lastly, some problem areas are shown. Mainly, the top hook, which is intended to be adjustable and is supplied with bolts from HF. However, the bolt heads and nuts are too big and get in the way of all of my attachments, so I cut the bolt heads off and tack welded the remainder of the bolt into the holes. The second problem area was the hinges for the latches at the lower hooks. These were spread too wide and got in the way of the attaching points on my attachments, so a slight adjustment with a hammer corrected the problem.
This project wasn't too bad, and the hardest part was creating the holes for the JD pins to go through for the mounting points. The step drill wouldn't do it, so I had to resort to opening the holes up with an air powered die grinder with a carbide bur tip.
Attachments
-
 100_0858 B.JPG518.8 KB · Views: 824
 -
 100_0861 B.JPG522.8 KB · Views: 771
 -
 100_0867 B.JPG503 KB · Views: 713
 -
 100_0868 B.JPG551.3 KB · Views: 606
 -
 100_0872 B.JPG715.5 KB · Views: 999
 -
 100_0876 B.JPG651.4 KB · Views: 844
 -
 100_0877 B.JPG367.9 KB · Views: 561
 -
 100_0879 B.JPG522.1 KB · Views: 1,051
 -
 100_0881 B.JPG494 KB · Views: 808
 -
 100_0883 B.JPG463.8 KB · Views: 527
 -
 100_0886 B.JPG528.8 KB · Views: 477
 -
 100_0889 B.JPG475.2 KB · Views: 626
Last edited:
 That will definitely be handy around the place. I can see lots of uses to use a QH on the loader. Nicely executed too.