Mid-Century Modern Build and Remodel Project

   / Mid-Century Modern Build and Remodel Project
  • Thread Starter
#41  
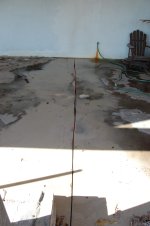
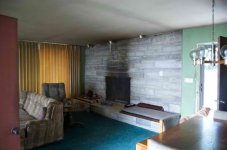
Here are the interior pictures before we began the remodel. We were going to limit ourselves to Phase 1 being to add the downstairs living space, move in and then attend to the upper. It quickly turned to lets paint and carpet the upstairs so mom would have a nice living space she deserves as we had to address the newly added sitting area where the exterior stairs were located and it did not take much to liven it up.

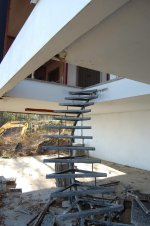
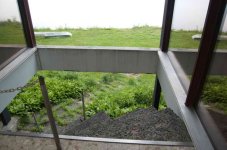
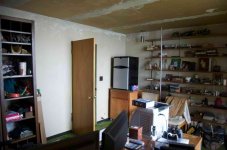
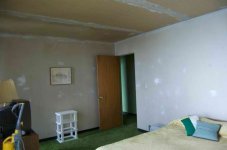
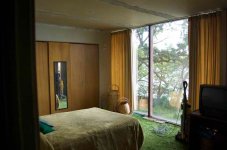
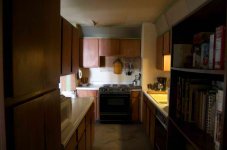
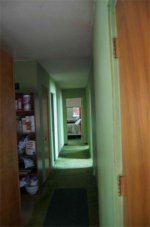
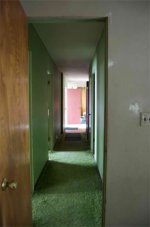
It is amazing looking at these pictures at how dark the house was, as the curtains were rarely pulled as mechanically half of them failed to work with their drawstrings. With such large window, the hallway and kitchen areas were very dark. In these pictures you can see the water damage from the roof that failed and left water stains in the ceiling drywall. The kitchen ceiling also gave way. That all happened in one spring's thaw cycle... My guess it had been leaking for years through the insulation and made its way down to the drywall that then gave way. You can also see the cement with mosaic black rock? on the exterior arched stairway that replaced the original redwood stairs. From what I can tell these were put in place one to two years after original construction...my guess due to the smoothness and slippery-ness of the wood they went with it. Each one weighed about 100-150lbs depending on where it was in the arch due to size.
 

Attachments

  • Exterior Stairs.jpg
    Exterior Stairs.jpg
    48.9 KB · Views: 342
  • Den.jpg
    Den.jpg
    41.6 KB · Views: 219
  • Den2.jpg
    Den2.jpg
    30 KB · Views: 157
  • Dining Room.jpg
    Dining Room.jpg
    32.6 KB · Views: 158
  • Guest BR2.jpg
    Guest BR2.jpg
    23 KB · Views: 129
  • Guest BR.jpg
    Guest BR.jpg
    41.2 KB · Views: 120
  • Guest Bath.jpg
    Guest Bath.jpg
    29.5 KB · Views: 120
  • Fireplace-Living.jpg
    Fireplace-Living.jpg
    34.3 KB · Views: 1,014
  • Living Room.jpg
    Living Room.jpg
    30.4 KB · Views: 138
  • Kitchen.jpg
    Kitchen.jpg
    27.1 KB · Views: 232
  • Hallway2.jpg
    Hallway2.jpg
    21.8 KB · Views: 127
  • Hallway.jpg
    Hallway.jpg
    24.3 KB · Views: 185
  • Master BR.jpg
    Master BR.jpg
    25.5 KB · Views: 125
   / Mid-Century Modern Build and Remodel Project #42  
Grass green carpet, nice ;) Thanks for posting this remodel. Very cool to see it through the years.
 
   / Mid-Century Modern Build and Remodel Project
  • Thread Starter
#43  
Yeah the gentleman that took measurements, said wow...haven't seen carpet like that in a LONG time.. Right, he was very relieved we were going to do the removal do the cement floor repair before install. I didn't even ask for that in the bid...
 
   / Mid-Century Modern Build and Remodel Project
  • Thread Starter
#44  
On to the remodel...

When we started the thought process we thought we'd add a garage with a living loft and bathroom / kitchenette on the ground level in front of the garage. We had seen a building structure we liked in a copy of Dwell and really liked the architects work - it had a mid century modern feel but in a more updated manner. We did not think twice about it as we thought there would be no way we'd be able to use them as they were growing and busy with some urban projects based out of Milwaukee so we approached a few local firms, and a friend of a family member. Each of the discussions left us looking back to the firm we saw in Dwell. So I mocked up some original pictures, and some current pictures and shared the story of what and why we wanted to do the project. I got a call the same day from them saying they'd be honored to work on the project. Again not thinking we'd be able to go with them due to pricing/availiblity we had our initial meeting and low and behold they were in between commercial projects and a large residential project had been stalled...and their fees were lower than the other three firms we talked to - SOLD. The two principles came on site, walked the property, fussed over my mom, took a million pictures and came back with two design options. In between this we found out that the detached garage with living quarters was nixed due to county code restrictions against having multiple living dwellings on a single parcel of land...Adding a bedroom without removing an existing bedroom also would have required an updated septic which would have put the phase 1 project out of our budget...

So the pictures below are what we ended up going with. Inserting a box under the original box, inserting an internal stairway that would help mom when she wanted to go out in the front by the lake and not have to walk down external steep stairs...opened up additional window space to the lake with some windows that would open, as none of them opened prior so the great breezes off the lake could not be taken advantage of for natural cooling versus A/C. As an aside the entire house is electric - no gas; so a future project will be how we can take advantage of the flat roof with solar and maybe wind generation, certainly open to your all's feedback and experience here - looking for an actual payback versus just being good to the environment. ComEd costs between $650-$850 in the winter months...ouch.

You can see in the first picture on the left - an aerial shot that has "The Pit" filled in. When I went for a building permit the first obstacle was the county rep asked what the dirt patch was..then pulled out a five year earlier GPS aerial shot and it showed the concrete depression clear as day during fall where there was no leaves on the trees....WHAT IS THAT? After explaining the first time politely..the gentleman advised he'd have to 'research' this farther. I got a little hot and told him we were under time pressure to get the project started as it was late fall and we wanted to get closed in by the first freeze. He advised he did not care about our desire and he would take the time necessary. At this point I advised him to talk to his health department counterpart as we had been slapped by the county to remove all metal and landscape waste from the pit prior to filling it in - by then we were getting tri-axle loads full of culvert cleaning by our Township who took filling our pit as a little pet project (I had worked on the road crew during college and knew most of the guys there). You can see the mess we cleaned up at 2009-2010. We were a little miffed as a neighbor reported this just prior to our dumpster arriving rather than coming to talk to us to see what was going on - to each their own I guess. In any regard a week later the County let us know that we were "ok" to proceed with the permit process, thank you very much. In the interim I had a plat and topo survey ordered and the gentleman that came out advised we needed to make sure our large office that was used as a guest bedroom would be classified as a bedroom for the sake of the permit, and since it would be downsized to a smaller office this would offset the additional bedroom downstairs and alleviate the requirement to expand the septic system, excellent advise... Then the second run in with the County, they advised we needed to provide proof we were not in a flood plain due to the fact we were on lake front property. I half jokingly said, how am I Joe Citizen supposed to do that, certainly the County knows the flood plain. No comment they go and pull the insurance / flood plain book 12" thick all dog eared and say - sorry - there is no study on record, you'll need to prove you aren't in the flood plain. No agitated, I ask - really how am I to do that, to which I get a shrug and they say you could do a Google search. I asked them how did the neighbor three doors down do a tear down and rebuild and they advise was it build more that 7 years ago, and I say yeah like 10-11. Well that is why sir, the previous planning director only followed the aerial flood line off the GPS system, our new director goes by the letter of the code you need some xyz LATA USGS reference study... Now pissed I call my surveyor who says common sense should prevail there is a spill over pond that would flood farmland before hitting the level of your house. Tell them you are building in the same footprint of the existing house - that should do it, otherwise since no study exists, we could do it but it could run between 10-15k but then it would exist for you and everyone around the lake. Now I'm all about help thy neighbor but hadn't budgeted a disposable 10-15k. After a week of different tactics, my surveyor finally got a subdivisions survey behind us that was put in and had a 100 year flood level indicator on it which was 9 ft below where we were building. Initially the same rep did not want to take it as it wasn't an official USGS report - but bringing my county rep and the survey co owner and talking to the director pushed it over the edge and we got the permit... Not to insert politics too heavily, this exercise certainly underscored my belief that there is too much big government, which certainly slowed us down from injecting money into the local economy. I'm all about following the rules, but this was extreme.

3 weeks were burnt at this point. Once we got past this issue we started moving rather quickly...
 

Attachments

  • Aerial.gif
    Aerial.gif
    121 KB · Views: 120
  • Materials.gif
    Materials.gif
    27.8 KB · Views: 114
  • Existing Main.gif
    Existing Main.gif
    13 KB · Views: 117
  • Existing Exterior.gif
    Existing Exterior.gif
    14.7 KB · Views: 142
  • Lower Level with Perspective View.gif
    Lower Level with Perspective View.gif
    89.5 KB · Views: 114
  • Option1 Upper Level.gif
    Option1 Upper Level.gif
    15.6 KB · Views: 120
  • Evolution Strategies.gif
    Evolution Strategies.gif
    6.9 KB · Views: 118
  • Rendering Option1.gif
    Rendering Option1.gif
    9.1 KB · Views: 107
  • Garage Rendering.gif
    Garage Rendering.gif
    80 KB · Views: 399
  • Driveway Options.gif
    Driveway Options.gif
    58.2 KB · Views: 199
   / Mid-Century Modern Build and Remodel Project
  • Thread Starter
#45  
We broke ground on 11/8. The first pics were from Jim Kelly our excavator asking me what the **** all the dirt was doing in the way from him getting his equipment to the lower level..the Township had made the decision for me that I needed some quality black dirt from a job they worked so i could grow a nice lawn. Nice of them, but 15 tri-axle loads came the day before when I was out of town. Interesting start to the project. 3 hours of skid steer work later I had a nice large pile and flat earth... The first order of the day was to remove the 100yr + Oak stump we took down in the summer. This took a few hours. While that was going on the patio cement was cut so it could be taken out to dig the foundation, and the dismantling of the stairs took place. You can also tell in the early pics Jim and crew are die hard Cummins Diesel Dodge guys...
 

Attachments

  • Township was busy.jpg
    Township was busy.jpg
    1 MB · Views: 93
  • Pete's Here.jpg
    Pete's Here.jpg
    1 MB · Views: 93
  • Talk with Jim.jpg
    Talk with Jim.jpg
    1 MB · Views: 121
  • Step 1 Move Dirt.jpg
    Step 1 Move Dirt.jpg
    942 KB · Views: 132
  • Stairs 1.jpg
    Stairs 1.jpg
    349.7 KB · Views: 166
  • Concrete Cut.jpg
    Concrete Cut.jpg
    273.7 KB · Views: 104
  • Measure Twice Dig Once.jpg
    Measure Twice Dig Once.jpg
    825.3 KB · Views: 96
  • Mini Escavator Staging.jpg
    Mini Escavator Staging.jpg
    963.2 KB · Views: 121
  • Stairs2.jpg
    Stairs2.jpg
    422.9 KB · Views: 221
  • Root1.jpg
    Root1.jpg
    1,015.9 KB · Views: 103
  • Root3.jpg
    Root3.jpg
    902.9 KB · Views: 108
  • Root4.jpg
    Root4.jpg
    1 MB · Views: 93
  • Root5.jpg
    Root5.jpg
    715.4 KB · Views: 101
  • Root6.jpg
    Root6.jpg
    966.7 KB · Views: 169
   / Mid-Century Modern Build and Remodel Project #46  
How well did the Komatsu mini-ex handle that oak stump? I see he dug all around it. Any idea how long it took start to finish? I've never had a chance to watch one of those in action, just curious.
Dave.
 
   / Mid-Century Modern Build and Remodel Project
  • Thread Starter
#47  
Hi Dave, I did see it, took about 2.5 hours. Pete was pretty good with it. Once he dug around all the roots, he tried to tip it from the top to snap it off at the bottom. All that got him was a teeter-totter ride. This was a smaller unit they rented so they could fit it under the lower level for digging the foundation I'll post soon. He kept cussing that he did not bring their bigger unit. Once they got cleaned up all around it, he used the blade to spin it around once or twice to bind up the lower root system, then the youngest on the crew climbed down with a chain around the bottom roots, and they yanked with the skid steer to effectively cut the bottom out from under. They were a little worried, and it took them an hour longer than expected. Taking out the root was something they normally did not do and that set me back $700. The guys I had take down limbs for me with equipment, and a large root grinder would not touch the job. This particular unit they said was underpowered, and the grease fitting placement sucked - but since they rented it they just beat it up.
 
   / Mid-Century Modern Build and Remodel Project #48  
Hi Dave, I did see it, took about 2.5 hours. Pete was pretty good with it. Once he dug around all the roots, he tried to tip it from the top to snap it off at the bottom. All that got him was a teeter-totter ride. This was a smaller unit they rented so they could fit it under the lower level for digging the foundation I'll post soon. He kept cussing that he did not bring their bigger unit. Once they got cleaned up all around it, he used the blade to spin it around once or twice to bind up the lower root system, then the youngest on the crew climbed down with a chain around the bottom roots, and they yanked with the skid steer to effectively cut the bottom out from under. They were a little worried, and it took them an hour longer than expected. Taking out the root was something they normally did not do and that set me back $700. The guys I had take down limbs for me with equipment, and a large root grinder would not touch the job. This particular unit they said was underpowered, and the grease fitting placement sucked - but since they rented it they just beat it up.

Thanks. Well, that stump is probably about the nastiest thing to dig up, but that gives me an idea of what it can do even if it is underpowered.

That's quite a project you have. Sorry you had to deal with a bu** head from the permit office. I've never run into that, being on a lake probably complicates things.

I did go round and round with an electric company install planner about where to set poles. He was bound and determined to put them in ledge rock which of course costs a ton for blasting the holes; and to run the line twice as far as necessary. Come to find out, he wasn't even from the right power company and didn't even realize it. Duh, got rid of him easily :laughing: We were on the border area between the two companies and luckily in the cheaper rate one. Got the installer from the correct company and he was nice as could be.
Dave.
 
   / Mid-Century Modern Build and Remodel Project #49  
Sorry you had to deal with so much bureaucracy. These people are getting paid via your taxes and they make you feel like you're making them do extra work.

Man, I wish I could get tons of free loam. My front yard looks like beach front property without the water. We built our house 7 years ago but just haven't had the funds to do the front yard properly.

As for the heat question, I think I noticed you have concrete floors but could be wrong. Anyway, could you lay down pex and add an inch of cement on top for a radiant system? We have radiant in our stick build house and it's great. Works the best in the basement seeing it's in the poured floor which retains the heat well. The upper floors are stapled under the flooring with heat dispersion plates. The system is easily adaptable for solar and/or to run off a regular water heater. We have a Bock oil fired water heater that does a good job keeping us in heat and hot water.

Keep up the great thread :)
 
   / Mid-Century Modern Build and Remodel Project
  • Thread Starter
#50  
We thought about putting in floor heating in for the ground floor addition, we just couldn't swing it in the phase 1 budget. Probably not a wise choice but out of necessity nonetheless. I do know we need to replace the existing fireplace with a quality insert which should save us as we have plenty of firewood we can burn.
 
 
Top