OK, I've been in the shop most of the day except when I went out to get an impact gun and sockets. I used a chisel to enlarge the hole in the cover a little. Then I stuck a pry bar in the hole and pried the cover off. Easy.
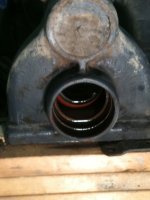
The cover only has the one side-I was mistaken about that-the metal on the other side turned out to be the axle. The pictures below show the axle and the nut with the nut keeper thingy and the bearing behind it. I tapped down the keeper tab to free the nut and used a punch on the corners of the nut and only mild taps were required to turn the nut loose a little.
Next I pulled the rear wheel
I took the nut off and removed the oil pan at the bottom of the axle housing. I put a 5 gal bucket with a 2x6 on top which worked out to be about 1 or 2 inches below the bottom of the bull gear.
Next I tapped on the wheel flange (where the rim bolts onto the axle) with a dead blow hammer and the axle let go and I pulled it out.
I cleaned up the housing a bit and called it a night. Tomorrow I need to see if I can get that other bearing off the shaft and bring them somewhere to see if they need replacing. I don't think they look too good but I really don't want to have to replace them as it'll be expensive.
nicely done! As an aside I find that bearing are often cheaper at a dedicated bearing supplier rather than a tractor supply house or Auto parts store (although not always) good luck!
To replace the seal, the bearing had to come off any way so I wound up getting both bearings. Earlier, when I tapped on the wheel hub to get the axle out, the bearing on the other side just fell out. It seems to be OK but being this far into the thing I decided to get a new bearing. I got a buddy to remove the pressed bearing and oil seal then press the new ones back on.
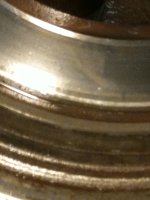
I also noticed that the seal "race" which is at the very outside of the axle housing is badly scored and grooved, which is what tore up the oil seal and caused the leaking. When I inspected the seal it was torn better than half way around. So now I'm waiting on the seal race.
You can see in the pictures how smooth the bearing cup is compared to the seal race.
So, for now, I'll be knocking the bearing cups out and installing the new ones while I wait for the seal race.
Knocked out the 2 bearing cups and the race seal today. Pulling the rear axle housing would've been a much better way to do it if I had a shop crane or some other means of lifting it.
I had to remove the 3 point hitch arms and links and the draw bar & attaching mounting plates.
I got a big hammer and a long punch and banged away. Because the inner bearing cup was easy to access from outside the tractor I was able to knock it out pretty quick. But for the outside bearing cup and the seal race, I had to lay on my back underneath the tractor to beat out.
I didn't have much room and the angles I had to work with placing the punch and then trying to hit it with the hammer were bad. After about a half hour I had made no progress so I got my propane torch and heated the axle housing and was able to drive both of them out.
The wheel hub with new bearing and seal
Close up of seal
The bull gear
The seal race
Hopefully tomorrow I can drive the new bearing cups in. Then I'll only have the seal race to install and then reassemble everything.
Thanks. Amazingly enough, in the "Removing the Wheel Shaft" section of the service manual there is a drawing showing the different parts and the bearing numbers are included. The parts book says "bearing". I ordered them day before yesterday and picked them up yesterday. They are different sizes.
Today I cleaned up the bore and installed both bearing cups. I received the seal race and plan on installing it tomorrow.
New cup installed for outside bearing
New cup installed for inside bearing
The service manual gives a procedure for preloading the bearings but it assumes that the rear axle housing has been removed from the tractor with the final drive shaft also removed, allowing the axle to be turned and preloaded. I haven't removed the housing and the bull gear, which is attached to the axle will be meshed with the final drive shaft, making it impossible to measure the preload torque specified. I'll have to figure this one out.
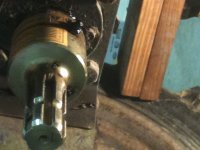
So, what I did was to install the wheel hub without the bull gear in place. I used my lathe and drill/mill to fabricate a wrench to fit the axle nut.
I tightened the nut according to the manual so that I had the specified preload on the bearings. I noted the torque value on the nut then I removed the wheel hub. I reinstalled it with the bull gear in place and torqued the axle nut to same value as before. Hopefully, that'll be good enough.
While I was taking the tractor apart the brake rod for the right side had to be removed. The adjusting nut was frozen solid. I wound up breaking off the threaded part of the shaft. I cut the shaft and welded a nut to the end of it. Then I screwed a piece of all thread of the right length into the nut and installed a locking nut. I also made a new part that the adjustment screw goes through and the spacer between it and the adjusting nuts.
I cut a piece of sheet metal and welded it to the axle nut cover. I cut a barbed wire staple in half and welded it to the cover so if I need to take it off again (I hope I don't) it may be easier. As you can see, I really need to work on my welding skills.
And here is the tractor.
I still have to put the 3ph on the rear and fill the housing with oil. I'll be running it this afternoon to see how it works. I hope everything is OK because I'm tired of crawling and working under there.
Ran the tractor a little bit yesterday and it seems OK. This morning I drove over to my neighbor's and hooked up to his box blade. Graded my driveway for an hour and returned the box blade. The tractor performed fine.
Overall the job wasn't too bad and I enjoyed doing the work and now I feel comfortable working on pretty much anything on it.
284 International and skylarkguy, thanks for your input on the project.


") ) good luck!
) good luck!