This fix is cheaper, quicker to get parts and better quality than new LS part. Just takes a little extra time.
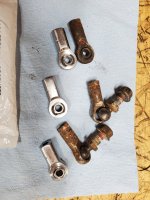
Joystick on backhoe and FEL are not very robust. I have gone through 2 ball end links on FEL (broken housing) within 50 hours and two on backhoe (wallered out housing) in about ~50 hours of use on BH.
LS ball end link quality is severely lacking and/or bad design puts to much stress on them.
Rather than replace shoddy part with new shoddy part I wanted to fix the problem for good.
Problem is, the LS ball end link is an odd size (6mm on female end and 8mm shoulder ball stud.) Completely custom to LS (or whoever makes them)
You can replace them with a vastly stronger US made QA1 part!
Caveat 1: QA1 parts are slightly different length, so you need to replace all 3 (per stick) together. They are only $13 each so no big deal.
Caveat 2: Parts require modification
Instructions:
This is a rough guide on how to modify/fix your LS tractor. You are responsible for using common sense and not hurting yourself or your tractor.
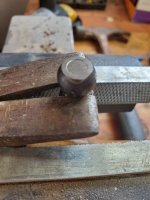
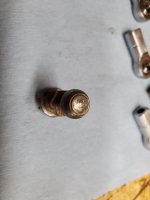
1. Remove ball from stud. LS stud end is peened or rotary riveted on end to prevent ball from coming off (see pic.) Grind off just enough to allow the pin to be driven out of ball. I used hack method with claw of hammer and large drift (pic.)
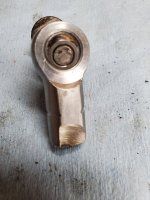
2. Machine down stud outer diameter to fit ball on QA1 link. The stud is oversized slightly as result of riveting process. If you have a lathe this is super easy, two minute job. I used a drill and file to whittle it down just enough by trial and error (pic.) I was able to make a tight press fit of stud to new link.
3. Assemble stud to end link. Place the ball flat face on flat plate and pressed the pin in. Warning: don't use body of link or you will damage. I planned to deform the end to retain, the fit was so tight this was not needed. Deform the end of the stud to retain if you think it could come off.
4. The flats on the body are slightly smaller on the QA1 link. This is where it fits into the handle end. Again if you have a mill, super easy and quick. I used a grinder and trial and error until I got a nice snug fit.
5. Third ball end link is a direct replacement and just slides over the small shaft on hydraulic control. Flats must be machined/ground to fit in handle end same as the other two. Again, this link was still good, but was replace to match length of the other two parts. I think the old part could be used, but didn't bother trying.
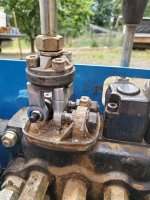
6. Re-assemble the joystick. grease, test... I added grease and a zip tie to top of boot to prevent future water ingress.
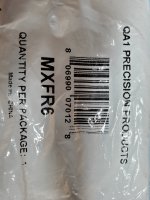
Action is much nicer and smooth. QA1 links are super high quality chromemoly and teflon lined. Part number in pic.
I am not 100% sure the FEL uses the same size link as I haven't done done FEL mod yet. If you do, please reply with results.
Hope this help others out. If you own this tractor, buy the parts to have on hand, because it is only a matter of time before they break.
Regards
Joystick on backhoe and FEL are not very robust. I have gone through 2 ball end links on FEL (broken housing) within 50 hours and two on backhoe (wallered out housing) in about ~50 hours of use on BH.
LS ball end link quality is severely lacking and/or bad design puts to much stress on them.
Rather than replace shoddy part with new shoddy part I wanted to fix the problem for good.
Problem is, the LS ball end link is an odd size (6mm on female end and 8mm shoulder ball stud.) Completely custom to LS (or whoever makes them)
You can replace them with a vastly stronger US made QA1 part!
Caveat 1: QA1 parts are slightly different length, so you need to replace all 3 (per stick) together. They are only $13 each so no big deal.
Caveat 2: Parts require modification
Instructions:
This is a rough guide on how to modify/fix your LS tractor. You are responsible for using common sense and not hurting yourself or your tractor.
1. Remove ball from stud. LS stud end is peened or rotary riveted on end to prevent ball from coming off (see pic.) Grind off just enough to allow the pin to be driven out of ball. I used hack method with claw of hammer and large drift (pic.)
2. Machine down stud outer diameter to fit ball on QA1 link. The stud is oversized slightly as result of riveting process. If you have a lathe this is super easy, two minute job. I used a drill and file to whittle it down just enough by trial and error (pic.) I was able to make a tight press fit of stud to new link.
3. Assemble stud to end link. Place the ball flat face on flat plate and pressed the pin in. Warning: don't use body of link or you will damage. I planned to deform the end to retain, the fit was so tight this was not needed. Deform the end of the stud to retain if you think it could come off.
4. The flats on the body are slightly smaller on the QA1 link. This is where it fits into the handle end. Again if you have a mill, super easy and quick. I used a grinder and trial and error until I got a nice snug fit.
5. Third ball end link is a direct replacement and just slides over the small shaft on hydraulic control. Flats must be machined/ground to fit in handle end same as the other two. Again, this link was still good, but was replace to match length of the other two parts. I think the old part could be used, but didn't bother trying.
6. Re-assemble the joystick. grease, test... I added grease and a zip tie to top of boot to prevent future water ingress.
Action is much nicer and smooth. QA1 links are super high quality chromemoly and teflon lined. Part number in pic.
I am not 100% sure the FEL uses the same size link as I haven't done done FEL mod yet. If you do, please reply with results.
Hope this help others out. If you own this tractor, buy the parts to have on hand, because it is only a matter of time before they break.
Regards