Ok, looks like Kenny had it right..
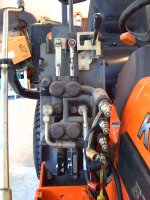
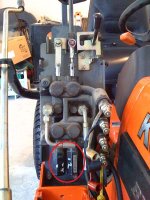
When standing at the front of the tractor, the one on the right is for the arms (up/dn) and the one on the left is for the bucket (lft/rt). Looks like you have to get to the detent balls from the end of the detent pack. You will have to remove the valve body from the tractor to get at them because they are held in by an internal C-clip.
Shouldn't be a big deal.. Remove the cotter pins from the linkage at the end of the spools (the rods that go in and out of the valve body to make it work). Disconnect the three hoses from the valve body (two on top, one on the side under the quick disconnects). The drawing for the mounting bolts is a bit weak, but there is one at the upper right (again from the front of the tractor) and one about half way down on the right both of which are accessed from behind. The drawing doesn't show bolts on the left, but from your picture it looks as though there may be two allen head bolts, one at the top and one at the bottom. They could just be dowels too, just look to see if they go through the mounting plate to know for sure.
Once you have the valve body off you should be able to look at the ends of the packs to see what kind of c-clips they are. Easy would be the kind with a couple holes in the to allow a clip pliers to squeeze the ends together so you can pull them out. Hard would be the kind w/o the pin holes.. I'm guessing hard.
Be prepared to swear a bit.. The ends of the hard ones usually have the outside of the ends ground down so you can get a screw driver behind them to pry the clip towards the center. Once it is pried in enough to get another screw driver behind the meat of the clip you can usually pry it up and out bit by bit. Expect it to want to fly across the room when it comes out..
Once the clips are off, there is a plug of some sorts, a spring, a ring, and 4 balls. Take a look at the Messicks website and look up the LA211 in the parts catalog (link in text at the upper right on the parts page). Look at the control valve component drawings and you will see what I'm talking about.. Your's is the 4 position w/ srl > 30001.
OR, you could spend $130 to get two new detent packs. They look like they do actually unscrew, you probably just need better leverage (pull the valve body and clamp it to a bench or something. And try to find a wrench instead of a channel locks.