This kind of neighbor is good to have!

   / This kind of neighbor is good to have! #21  
If your overhead welding skills are lacking, you could just put a piece of plate strapping on the bottom and put 2 bolts in it just like was on the top. Your neighbor must have run that thing thru Baja race or something to break the frame, that or a PP design from MTD.
 
   / This kind of neighbor is good to have! #22  
Your neighbor must have run that thing thru Baja race or something to break the frame, .

Or let his kids drive it. I will never forget my older brother's kids hot rodding my Dad's riding mower. I don't think I even ever got whupped that bad.
 
   / This kind of neighbor is good to have!
  • Thread Starter
#23  
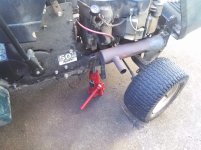
I got a little more done. I put a jack underneath the motor so I could get the mounting bracket out without having to lift the motor off.

2013-08-19 18.14.21.jpg

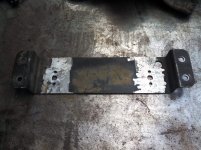
Then I welded the mounting bracket up.

2013-08-19 18.47.13.jpg

Unfortunately, I forgot to take a "before" picture, so you'll just have to take my word it was in three pieces.
 
   / This kind of neighbor is good to have!
  • Thread Starter
#24  
Here's tonight's progress.
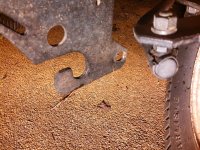
2013-08-21 22.06.45.jpg

The above pic shows the wallowed-out mounting hole for the front lift arms. I was kind of 50/50 on whether to just weld up the hole, grind it smooth, and drill it out again, or whether to cut off the tab and fab up a new one. I went with welding up the hole, because I figured that way, most of my bad weld would end up getting drilled out again anyway. I even used the opportunity to burn up some old 3/32" 7018 that run really bad. At first, I started trying to build from the bottom up, figuring the shelf I was building would help the next bead lay in well, but it actually worked better going from the top down. The molten metal would sag and fill the hole better than when I was working bottom-up. Also, I ran DCEN for less penetration and faster fill on the relatively thin metal.
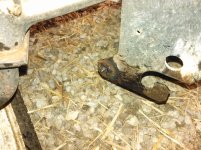
2013-08-21 23.55.21.jpg

Above is the result, before grinding and drilling. And also after driving through some wet grass. Honestly, nothing much to see there, because I haven't even chipped the slag or brushed it.
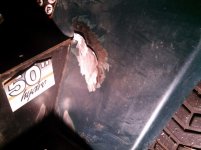
2013-08-21 23.15.15.jpg

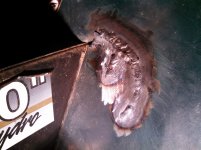
I also discovered a nice crack in the sheet metal of the fender. Now this is a job I would never attack with stick, although I might-could get it done if I had to. But this is tailor-made for TIG. Except that there is that huge gap, which is hardly ideal for TIG, but I can make it work. I tried to think of ways to jam the crack back together, but I don't have a clamp with a throat that deep, and so in the end, I just left it the way it was and filled up the hole with weld metal.
2013-08-21 23.43.42.jpg

The result. The part that looks like a hole is actually a piece of contamination that floated up.

Next will be some work on the deck. There are some cracks that I'm going to vee out and weld up, and there is an anti-scalp wheel that has plumb broke off, so I'll need to fab up a new mounting bracket for it. This thing is coming together!

One last funny thing: I have always liked the fact that my helmet has its on/off/shade dial on the outside where I can easily get at it without taking it off. But today I found a down-side of that. While welding up under the mower, I pressed my head against the wheel in such a way that I turned the knob all the way off. I got flashed and thought it was because I was obscuring the sensors, so I lowered my head and flashed myself again. Whoops! Fortunately, the hood is always a shade 3, and is always a shade 13 for UV.
 
   / This kind of neighbor is good to have! #25  
"I make sure to throw up my hand everytime we meet." You should leave out the my hand part.;)

As far as the repair, I was thinking along the same lines as Shield Arc, especially since the crack went through holes on the frame. That might be where the cracks originated from in the first place. I ripped the top swing mount right off my backhoe because a &%$#@ hole for a grease fitting in the wrong place.
 
   / This kind of neighbor is good to have! #26  
"I make sure to throw up my hand everytime we meet." You should leave out the my hand part.;)

As far as the repair, I was thinking along the same lines as Shield Arc, especially since the crack went through holes on the frame. That might be where the cracks originated from in the first place. I ripped the top swing mount right off my backhoe because a &%$#@ hole for a grease fitting in the wrong place.

This . . .

Honestly I wouldn't expect to see this type of failure in this situation (but like others have said, flying around a bumpy yard will tear stuff up), BUT it is a no-no to drill/burn/whatever holes in the flange of a beam (stress riser), so like Gary Fowler said, PP design.

I'm sure it will hold for quite sometime, but if you plan on being rough with it or want to avoid the possibility of it breaking again in the same manor, a possible redesign might be in order.

Great fix BTW! :drink:
 
   / This kind of neighbor is good to have!
  • Thread Starter
#27  
I agree that the failure is odd. There is a weld in approximately the same place on the other side, so my hunch is design defect. My neighbor doesn't seem like she would be particularly aggressive with the mower, but I guess you never know.
 
   / This kind of neighbor is good to have! #28  
Here's tonight's progress.

View attachment 333346

The above pic shows the wallowed-out mounting hole for the front lift arms. I was kind of 50/50 on whether to just weld up the hole, grind it smooth, and drill it out again, or whether to cut off the tab and fab up a new one. I went with welding up the hole, because I figured that way, most of my bad weld would end up getting drilled out again anyway. I even used the opportunity to burn up some old 3/32" 7018 that run really bad. At first, I started trying to build from the bottom up, figuring the shelf I was building would help the next bead lay in well, but it actually worked better going from the top down. The molten metal would sag and fill the hole better than when I was working bottom-up. Also, I ran DCEN for less penetration and faster fill on the relatively thin metal.

View attachment 333349

Above is the result, before grinding and drilling. And also after driving through some wet grass. Honestly, nothing much to see there, because I haven't even chipped the slag or brushed it.

Wallowed out holes on old junky equipment that I am trying to economically salvage like this is probably what I use my welders on the majority of the time. I have stated on this forum many times that I actually build very little with my welders but repair lots of stuff like this with my welders. From tractor drawbars, to mower deck hangers, to farm equipment hitches, to hay rake bushing type bearings, etc. Simply no other way to economically fix wallowed holes short of having a welder (and even a low grade welder can perform this work easily and the operator skill set needed to due it is minimal because even if the weld technique is less than ideal there is really nothing bad that can happen if the weld fails which I have never had happen).

One tip I will give you though is pick up a die grinder (a $25 HF electric is my preference but a $15 air operated one will work too)and a few carbide rotary burr tools with a 1/4" drive shank and then ends in 1/4" diameter, 3/8 diameter, and 1/2" diameter in cylinder shapes (some tapered shapes work good too for rough ins) . Then you can free hand shape any size hole that you build back up with weld rather easily and you are not be limited to only little 1/2" or smaller diameter holes of a standard drill bit set. Plus a drill bit sorta wants to self center and can sometimes wander and inadvertently move the hole on you. With the die grinder you can easily shape the one side of the hole that usually wears and keep it pretty close to where it was originally.

While I am not a huge fan of 6013 for general welding, I do like it for parts build up that I am ultimately going to free hand shape with a carbide rotary burr tool because it cuts more like the regular mild steel that you are replacing. Or in other words easy to shape freehand as it cuts like butter, but it is still nearly twice as strong as the mild steel you replaced so win and win scenario for the repairman operating with primitive cheap tools.
 
   / This kind of neighbor is good to have! #29  
To fix the crack in the fender you could have tacked a piece of flat bar on one side of the crack and used it as a lever to pull it down to meet the other side. Then tack it in place and weld it up. Having a helper makes it a lot easier too. With more experience you'll start to think out of the box more when fixing things.
 
 
Top