jenkinsph
Super Star Member
When I hear people describe problems like this, it usually means they are not floating the box blade. You should make sure the 3-pt hitch is dropped all the way down so the implement is floating. That way it stays in constant contact with the ground no matter what your wheels are doing (within reason of course).
To be honest, I don't understand how your box is going to dig a rut when the rear wheels enter a rut, because the 3-pt doesn't have downforce. It cannot drag the box down because the 3-pt cannot exert downforce.
Now if you'r driving around with the box blade slightly elevated, then it will contact the ground and float when you enter a dip with the wheels. But that's why I say to make sure the box is floating all the time. Keep it in contact with the ground and use toplink length to change how aggressively it digs or smooths.
As long as the box can float, it's going to be working under the action of gravity and be able to stay in fairly even contact with the ground no matter what the wheels are doing. From there, top link length tweaks the angle of attack.
I would agree that your method would help smooth out the bumps and dips to a degree. So it would help smooth out many problem areas and make them better than they were.
For accurate grading (cut and fill) you need to control the height of the box blade cutting edge on a constant basis. Simply dragging the box blade in full contact with the ground in float will not accomplish filling to the proper height.
For the last few years I have used my box blade rear gate unpinned which allows it to cut more aggressively. That saves me a lot of time when cutting down high spots. Once you get proficient at controlling the box blade height it seems to work better to me.
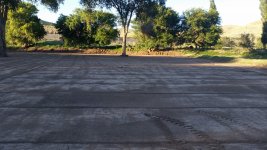
In the picture below the water flows from the background to the foreground with a .250% slope, the field is level from left to right. The grading work measured by the NRCS is within +/- .5 inch. I felt pretty good about it for the first job doing field leveling.