To add or remove soil for barn location

   / To add or remove soil for barn location #11  
Believe I would split the difference as long as I could still get positive drainage away from the barn site. That would involve about 14" of fill on the low side which isn't too much to compact in 5" lifts. You can do it with your tractor and a full loader bucket plus a lot of passes. If your poles will be set at 4' deep you will still be well into undisturbed ground also. Most important to me would be making sure you have good drainage.

MarkV
 
   / To add or remove soil for barn location #12  
The opposite of 'adding' is 'wet'.
 
   / To add or remove soil for barn location #13  
I did similar at my place, as it is ALL on a hill but what you SHOULD do is what I did. You need to get the Top Soil OFF and then deal with the clay/gravel as fill back to grade. See pics here need to start near the bottom of the photo page to see where I started. My place on a 50x50 had corner to corner about 32" of fall the Barn has one corner mostly Up-hill and the other Down-hill.

started with removal of the top soil using rototiller I softened up about 6" of grass/dirt and scrapped it out. I took the Top Soil and made a Berm UP-HILL from the Barn Foot Print to divert water from running/coming at the barn from up-hill.

I laid in about 50 ton of "Creek Run/Wash" gravel into the depression mainly to keep the Mud Down during construction. This was pretty much 80% compressed down into the clay that was HARD PACKED under the depression from driving the 4300lb tractor & 4' x 4' 900lb Roller behind my yard/garden tractor at the same time.

The Barn was put up by a Amish Crew with me & my equipment to assist moving stuff in about 8 days to the 2nd floor which left it set for about a month as they could not get back. OSB Sub Floor was slightly damaged as a result so getting it UNDER ROOF ASAP is needed once you start. The Roof/2nd floor was done in about 10 more days. ALl the roof and sub floor structure is on 16" spacing so pretty OVER BUILT but the plan is/was living space above 1st floor.

After the barn was up I had a lot of Down Hill FILL to do. the Uphill side was left Slightly Above Grade but the down hill had 24" of fill still needed as seen in this photo the skirt boards are 8" and 3 are visible elec service trench ~4\' deep photo by WPSPIKER | Photobucket

I have a pretty good part year wash that is all gravel bottom that I scrapped out probably 200 ton of gravel the two years after the barn was built to bring up the lower side. I also went back and RE-LANDSCAPED all around the barn cutting the uphill side down about 18" removed the top soil took out 10" of clay and put the top soil back in. I only removed the top soil from the barn foot print initially and the FLOW was right against the top side of the barn. I used this clay/top soil to build a 2nd berm inside the first one and made a slight gully all around the barn moving the water away. That solved the running water issues I had initially. those pics can be seen at the very bottom of the page.

I still have some fill work to do around my concrete but it has been a long process moving the amount of gravel I did took about 4 years and I ended up having about 160 ton of compactable sand fill intermixed with the gravel and topping the gravel prior to concrete.

Mark
 
   / To add or remove soil for barn location #14  
As per other comments, you need to strip the vegetation and top soil from the site. Sometimes the depth is uneven and the grade of your subsoil may be different than your current measurements (maybe better, maybe worse). As per your sophisticated CAD diagram, you will also need to do some grade work on the uphill side and should strip this soil at the same time to give you options. From that you'll have a nice pile of dirt - probably 40 yards or more (assuming your hill isn't a thinly covered rock).

I would also recommend you split the work and do some removal at the high side and put it on the low side. This is the quickest way to level a site - you're hauling dirt a shot distance and each bucketfull has twice the impact of a pure add or remove approach. You're also moving already exposed subsoil, if you haul from elsewhere on your property you may need to remove topsoil to get to the right stuff. As per all the other comments, compaction is important - again doing a combination add/remove reduces the total amount of compaction you need to do.

Personally, I have found that just adding dirt to level an area seems to take way longer and way more dirt than I ever expect (even after repeating the same learning multiple times). In your case, you'll also have to prepare to add dirt a few feet out from the walls on the downhill end and part way up along the sides to maintain the proper frost coverage for your posts - although you can reuse that top soil you removed earlier.

The downside of removing from the high side, is that you'll need to remove more solil beyond the walls and re-contour the land to drain water away from the building.

My other learning is to use this winter planning time to play out how you'll use the barn and in particular where to put the main sliding door(s) and man-door(s). Their location may impact how you grade the area around the perimeter of the barn.

All-in-all this is the type of dirt moving project which can be really satisfying seat time - as long as it doesn't get monotonous from having to haul too much dirt just from A to B.
 
   / To add or remove soil for barn location #15  
Hello,

In my opinion, the following are what I consider the most important aspects of building an engineered fill in order of importance. These recommendations are assuming that all the sod has been removed prior to you starting to build your fill.

#1. The moisture content of your soil. If it is too dry, it won't compact, if it is too wet it won't compact. The best and easiest way to judge the moisture content is to grab a good handful and squeeze it into a ball. Then take and break the ball of dirt in half. if you get a good crisp break your moisture content is ideal. If it is too dry or too wet, it won't form the ball. if it is close you can decide if you need to add water or drying agent,or utilize the sun or wind

Addressing the adding of water, think of your wife mixing pancake batter. She doesn't put water on the top of the dry ingredients, and then scoops up the stuff and cook the pancakes. The batter needs to be mixed it up to get a uniform batter. The same holds true for dirt. You need to mix the dirt and water. While it can be done with a smooth front bucket, it works a lot better if you have teeth on the bucket and can stir up the fill using the teeth. If you need to dry the soil, you can use lime and mix it just like mixing water. You can also disc the fill material. The best and easiest way is using the sun and wind to dry the soil.

#2. Placing the fill. Assuming you do not have a big loader, I would recommend not over four inch lifts. It is important that you drift the soil out to nothing. Do not leave a four inch cliff, always drift it out to nothing.

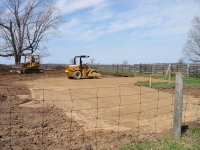
#3. Compaction. Forget about Plate Compactors, Jumping Jack Compactor, or a Tow Behind Rollers. You can achieve the needed compaction by using your rubber tired tractor. Most dirt has a 86% to 90 % compaction just dumped out of the bucket. With the loader running over the fill material . Once you place a complete four inch lift run the tractor over the fill completely both ways at least twice. Then start your next lift. If you have access to a dump truck you can also run the loaded dump truck over the fill on each lift. You will easily achieve 95% compaction.

One other thing, when you are building your fill always do the edges first, then the middle. If you fill the middle first, you will always end up with much more work filling the edges. Another consideration if your building site is wet, you might consider the use of typar or other types of filter fabric over the entire area

Another important step to take is to over dig your entire area by four inches. The easiest way to accomplish this is to dig about a bucket and one half width place the material out of the way for reuse. Then take your bucket with teeth and scarify the excavated area or disc the excavated area then follow the compaction procedure before you place any fill material. After that is complete, start building your fill up to grade in lifts. Lastly build your fill a minimum of a half bucket width outside of your building area.

If you follow the above procedure you will have constructed an excellent uniform engineered fill.

Hope this helps,

Respectfully,
Benjamin J. "Joe" Browning
 
Last edited:
   / To add or remove soil for barn location #16  
We rented a compactor for a few days. They cost less than you think to rent and anyone can drive it back and forth over your fill.

land-packer.jpg
 
   / To add or remove soil for barn location #17  
Be aware that different materials require different methods for proper compaction.:D
 
   / To add or remove soil for barn location #18  
Organics has to be removed. Compaction is the key. On a airbase they used what is called dynamic compaction. A weight is lifted by a crane and allowed to drop (freefall) 50 feet. Good work for over a year!
 
   / To add or remove soil for barn location #19  
What is your soils like? If its sandy or sandy loom moisture content is Key. Keep in mind you cant pack mud or dust. Strip your organic materials off the entire area, then "balance" your pad, taking some from the high areas, moving it to the low side. Gravel is not needed, think about it, there is no gravel or rock in a house pad, its simply clean compacted fill. When dealing with Free, keep in mind.its.free because its generally "unsuitable" material either containing organics or fat jumbo clays which are the bane of a good base.
 
   / To add or remove soil for barn location #20  
Thanks for the picture
 
 
Top