Welding Table Build

   / Welding Table Build #21  
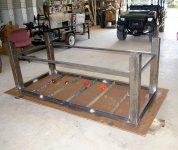
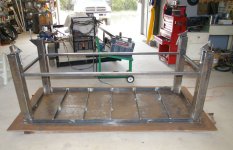
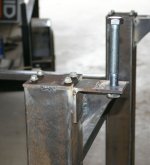
I have four lengths of six inch flanged ductile iron pipe just waiting for some I-beam and a thick plate to make a table. If and when I get some decent space to set up, I will set up one end with alternating square tubing instead of solid table. That is, open space equal to the tube stock so I can slip hold down clamps through the gap.

That limits welding to the table but I would still do that as required. I don't wax my tractors either. Heck, if I wax my vehicles once a year, it would be a "weak moment". LOL!
 
   / Welding Table Build
  • Thread Starter
#22  
i like the looks of that setup a little better. i'm sure the angle with the bolt will also work fine, but i wouldn't be surprised to see it a little springy at times, and maybe even bend a little over time. just your table top weighs 500lbs, and with all the support pieces you must be coming in at around 1000lbs for the table (i'm too lazy to add it all up). then put a several hundred pound metal project up on the table and you're getting into some real weight being supported by those legs. like i said before, i'm sure it will work fine as the original poster envisioned it. maybe i'm just a little fussy. at the lest i'd probably put a small stiffener in the angle near where the nut is welded to it.[/QUOTE]

My estimate puts the table at about 700 to 750 lbs with nothing on it. I should be able to go as high as 1000 without damaging my casters.

Been thinking about that too. I'll probably put a gusset in there.
 

Attachments

  • Gusset.jpg
    Gusset.jpg
    65.4 KB · Views: 534
Last edited:
   / Welding Table Build
  • Thread Starter
#23  
Dts1449, my work space is a 60x40x16 workshop/garage/tractor barn. We built it about five years ago. All I have to do is move out the ruck and tractor and there is lots of room. When not using the table I push it over to the side, that's why the casters.
Now it is my turn to be envious. WishI could make SketchUp work for me like it does for you. I like your idea, but too complex for my simple brain I'm sorry to say.

Harv, I like the receiver hitch idea. I can really see how it can come in handy, especially for things like a vise. I have tacked angle to my
"1/4" diamond plate" as you described. I'm one who isn't bothered by grinding marks on my table. :laughing:

Thanks fellas, great ideas. Keep 'em coming.
 

Attachments

  • putting up barn_1300.JPG
    putting up barn_1300.JPG
    61.3 KB · Views: 168
   / Welding Table Build
  • Thread Starter
#24  
All of the steel is here now and the work begins. There have been a couple of changes. The place where I get my materials never got the order so a few changes were made, all for the better too.
The legs will now be made with 4"x1/8" square tubing.
Work began by cutting the legs, the table will be 38" tall since all the work will be done while standing. Once cut, they were tack welded to the top.
 

Attachments

  • WT 1.jpg
    WT 1.jpg
    113.5 KB · Views: 644
  • WT 2.jpg
    WT 2.jpg
    131.5 KB · Views: 502
Last edited:
   / Welding Table Build
  • Thread Starter
#25  
The spreaders were cut and tacked to the legs. They will be 13" from the floor.
Next came the external stiffeners.
 

Attachments

  • WT 3.jpg
    WT 3.jpg
    125.7 KB · Views: 2,849
   / Welding Table Build
  • Thread Starter
#26  
Once the internal stiffeners were cut, they were fitted into place. They will be spaced at 14" intervals for a total of five. The rust on the underside of the table top still needs to be cleaned off before they can be tacked in place. Had to knock off working at this point to go help out a friend with a computer problem.
 

Attachments

  • WT 4.jpg
    WT 4.jpg
    127.4 KB · Views: 569
Last edited:
   / Welding Table Build #27  
Once the internal stiffeners were cut, the were fitted into place. They will be spaced at 14" intervals for a total of five. The rust on the underside of the table top still needs to be cleaned off before they can be tacked in place. Had to knock off working at this point to go help out a friend with a computer problem.

Looks good:thumbsup:
 
   / Welding Table Build #28  
Where's the supports for the expanded metal deck below the table?

Expanded metal because it won't hold much dust and no little stuff that shouldn't be stashed under the tacle anyhow.

It's nice to keep the table and its accessories together. Nothing does that better than an expanded metal shelf under the table itself.
 
   / Welding Table Build
  • Thread Starter
#29  
Where's the supports for the expanded metal deck below the table?

Expanded metal because it won't hold much dust and no little stuff that shouldn't be stashed under the tacle anyhow.

It's nice to keep the table and its accessories together. Nothing does that better than an expanded metal shelf under the table itself.

Thanks, Jason, much appreciated.

Harv, No expanded metal deck on this table. You can't see it in the pics, but there is a 24' workbench along the wall not ten feet from where the welding table is setting. That workbench has 90% of the tools needed either on it or under it. The other 10% is in a toolbox about three steps away. But you are right about the reason to have the deck under the table. But, there will be a bar welded to the legs on one end to hold clamps.
 
   / Welding Table Build
  • Thread Starter
#30  
Had a good day in the shop today. Tack welded all of the internal stiffeners and added gussets to the leveller/brakes.
 

Attachments

  • WT 5.jpg
    WT 5.jpg
    102.6 KB · Views: 2,928
  • WT 6.jpg
    WT 6.jpg
    82.4 KB · Views: 568
 
Top