making an hydraulic thumb for my new mini-excavator

   / making an hydraulic thumb for my new mini-excavator #1  

dfkrug

Super Member
Joined
Feb 3, 2004
Messages
7,703
Location
Santa Cruz Mtns, CA
Tractor
05 Kioti CK30HST w/ Prairie Dog backhoe, XN08 mini-X
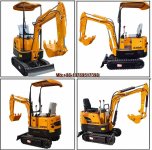
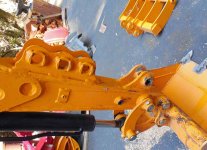
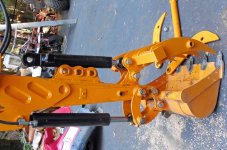
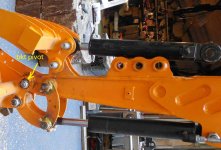
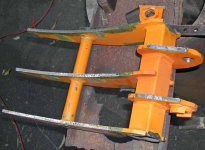
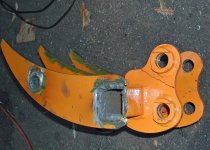
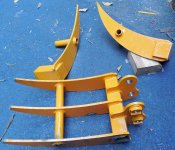
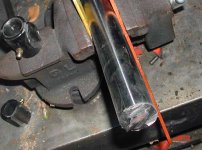
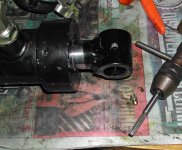
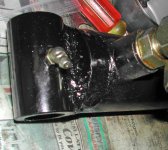
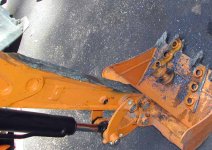
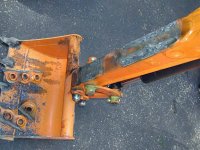
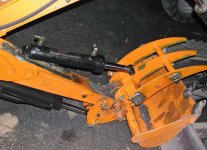
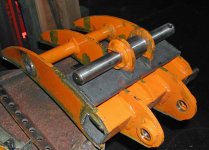
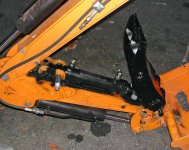
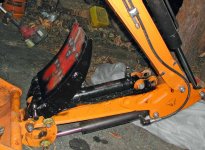
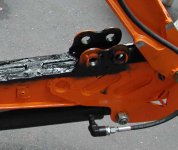
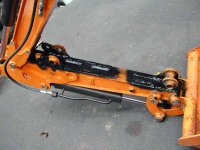
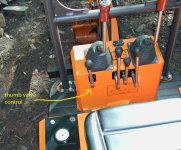
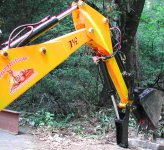
I recently imported a new 1-ton mini-X from China, and it needs an hydraulic thumb.

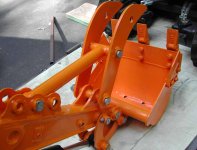
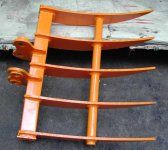
It came with a mechanical thumb installed, but it is flimsy and won't do at all. I made an
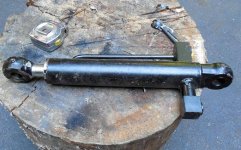
hydraulic thumb for my backhoe years ago, and it is indispensable. So, over the next several
days, I will post pix and words on my cool new thumb, now working.

My thread on importing my new machine is here:
https://www.tractorbynet.com/forums...6-importing-modifying-new-mini-excavator.html
 

Attachments

  • XN08_mini-X.jpg
    XN08_mini-X.jpg
    90.5 KB · Views: 551
  • thumb.jpg
    thumb.jpg
    78.7 KB · Views: 683
   / making an hydraulic thumb for my new mini-excavator #2  
Awesome!! Looking forward to following this project!!
 
   / making an hydraulic thumb for my new mini-excavator #3  
That does look flimsey. You could add two pieces of 2in square tube between the two flat plates to make it stronger.

My mini ex needs a hyd cylinder for the thumb i built. Its a manual with two different settings.
 
   / making an hydraulic thumb for my new mini-excavator
  • Thread Starter
#4  
When I bought this machine, I also got a lot of spares, including 2 spare hydraulic cylinders.

They seem well-made and are 50mm ID, and about 10" stroke. Only $50 each, which I suspect is
cost. Same size as the bucket cylinder.

I also bought this accessory, a rake that mounts where the bucket usually goes. I don't really have a use
for a rake, but it was so inexpensive I bought it anyway. I was thinking of using it for my future hydraulic
thumb. It was only about $60 more, IIRC.
 

Attachments

  • rake.jpg
    rake.jpg
    94.7 KB · Views: 409
  • hyd_cyl.jpg
    hyd_cyl.jpg
    105.9 KB · Views: 456
   / making an hydraulic thumb for my new mini-excavator
  • Thread Starter
#5  
You could add two pieces of 2in square tube between the two flat plates to make it stronger.

Yeah, to make this mechanical thumb usable, you would need to weld the 2 sides together, with tubing or plate. I took it off entirely when digging. It was in the way.

I have just over 4 hours on this machine.
 
   / making an hydraulic thumb for my new mini-excavator
  • Thread Starter
#7  
After removing the OEM mechanical thumb, you can clearly see the pivot on the end of the dipper and the 3 anchor point for the thumb brace. These are all 25mm holes, fabricated with DOM tubing over steel plate. The DOM is notched to accommodate the anti-rotate feature of the pins.

Next is the mockup to see what mods I have to make.
 

Attachments

  • mech_thumb.jpg
    mech_thumb.jpg
    113.7 KB · Views: 570
  • mech_thumb_2.jpg
    mech_thumb_2.jpg
    106 KB · Views: 452
   / making an hydraulic thumb for my new mini-excavator
  • Thread Starter
#8  
Here is the mockup, using the spare bucket cylinder and the rake.

Right away, you can see that the 3 anchor holes are too far down the dipper to serve as the upper thumb cylinder pivot. The lower thumb pivot also needs to be closer to the end of the dipper. Using the bucket pivot as the shared thumb pivot will not work, either. In my experience, 25mm pins are the minimum size for the forces involved here. Sharing the bucket pivot pin will increase the bending stresses and result in failure.

Both the bucket and the thumb cylinders are 50mm ID, and push with 7700 pounds of force (2400psi).

Finally, the pivot on the rake is all wrong. Much work to be done.....
 

Attachments

  • mockup.jpg
    mockup.jpg
    105.8 KB · Views: 555
  • mockup_2.jpg
    mockup_2.jpg
    88.1 KB · Views: 418
   / making an hydraulic thumb for my new mini-excavator
  • Thread Starter
#9  
First the business-end of the thumb. I made it narrower and trimmed off the "toenails". Then I cut off two of the "ears". I will reuse these later.
 

Attachments

  • thumb_7.jpg
    thumb_7.jpg
    89.1 KB · Views: 316
  • thumb_6.jpg
    thumb_6.jpg
    152.2 KB · Views: 299
  • thumb_5.jpg
    thumb_5.jpg
    119.5 KB · Views: 285
   / making an hydraulic thumb for my new mini-excavator
  • Thread Starter
#10  
Next, the cylinder.

Sadly, I can not make the 2 x 10" cylinder fit. Fully-retracted, it has to clear the boom at the top of the dipper, while retracting the thumb far enough to be out of the way for digging action.

I had one of these 2 x 8" cyls, acquired from Surplus Center years ago. They have only 3/4" ID crosstubes, so that has to be fixed. I cut them off and welded on some 1" ID DOM tubing, which is undersized enough to give ideal grease clearance with a 25mm pin.

The last photo is the final cylinder, in the process of having zerks tapped.
 

Attachments

  • cylinder_2x10_a.jpg
    cylinder_2x10_a.jpg
    125.4 KB · Views: 387
  • cylinder_2x10_b.jpg
    cylinder_2x10_b.jpg
    88.1 KB · Views: 398
  • cylinder_2x10_c.jpg
    cylinder_2x10_c.jpg
    93.4 KB · Views: 409
  • cylinder_2x10_d.jpg
    cylinder_2x10_d.jpg
    116.6 KB · Views: 413
   / making an hydraulic thumb for my new mini-excavator
  • Thread Starter
#12  
curious what welder you use for the cylinder modification.

The new crosstubes were welded on using my Hobart Ironman 210 MIG at the highest current setting using .035 wire and Ar/CO2. Most of the other welding was done with my Miller Thunderbolt DC stick welder and 1/8" 7018 rod. I prefer the MIG for this kind of welding, but I was almost out of gas, and I need to find a new supplier.

Here is a photo of the big end of the cylinder.
 

Attachments

  • cylinder_2x10_e.jpg
    cylinder_2x10_e.jpg
    98.8 KB · Views: 288
Last edited:
   / making an hydraulic thumb for my new mini-excavator
  • Thread Starter
#13  
Next, I need to cut the "ears" and the thumb pivot off the dipper. This took a while, using my Thermal Dynamics Cutmaster 51 plasma cutter. The maker used fabricated box tubing with machine welds, and reinforcement plates in these areas. Very good construction, Xiniu.

I then relocated the thumb pivot as far down the dipper as possible.
 

Attachments

  • dipper_2.jpg
    dipper_2.jpg
    117.2 KB · Views: 326
  • dipper_1.jpg
    dipper_1.jpg
    126.8 KB · Views: 305
   / making an hydraulic thumb for my new mini-excavator
  • Thread Starter
#14  
Here is the new mockup, using my new modified cylinder and the thumb. I need to decide on placement of the cylinder pivot on the back side of the thumb. The most critical concern is that the thumb must retract far enough so that conventional digging with the bucket is not impeded. How far the thumb extends is of secondary importance.

I will cut down and reuse the original ears, and provide 2 rear cylinder pivot points.
 

Attachments

  • dipper_3.jpg
    dipper_3.jpg
    114.8 KB · Views: 314
  • dipper_4.jpg
    dipper_4.jpg
    105.3 KB · Views: 291
   / making an hydraulic thumb for my new mini-excavator
  • Thread Starter
#15  
Now to finish up the thumb. The new pivot warrants a reinforcement plate. Other reinforcements were welded between the tines. After that, I formed some 1/8" steel plate to the business side and capped it off with rattle-can black.
 

Attachments

  • thumb_8.jpg
    thumb_8.jpg
    88.6 KB · Views: 266
  • thumb_9.jpg
    thumb_9.jpg
    93.2 KB · Views: 275
  • thumb_10.jpg
    thumb_10.jpg
    86.9 KB · Views: 274
Last edited:
   / making an hydraulic thumb for my new mini-excavator
  • Thread Starter
#16  
The last fabrication effort is the placement of the upper cylinder pivot on the dipper stick. I cut the ears I removed earlier back to 2 holes instead of 3. This gives me a stronger weldment, plus I may want to utilize the upper pivot to gain more thumb retraction. Field-testing will tell.

All thumb welding is now complete. Next, the hydraulics.
 

Attachments

  • done_2.jpg
    done_2.jpg
    118.9 KB · Views: 287
  • done_1.jpg
    done_1.jpg
    116.4 KB · Views: 272
  • dipper_6.jpg
    dipper_6.jpg
    67.5 KB · Views: 260
  • dipper_5.jpg
    dipper_5.jpg
    116.7 KB · Views: 286
   / making an hydraulic thumb for my new mini-excavator
  • Thread Starter
#17  
As shown in my other mini-X thread, I bought a spare 8-spool stack valve for this machine. The AUX valve is intended for any hydraulic device installed on the dipper, but it comes detented. The maker sells an hydraulic auger, which I did not buy, but I question the value of a detented valve with a single-pump system. It really needs a spring-centered valve, like the other 7.

The maker was nice enough to airmail me the parts needed for the conversion from detented to spring-centered for both my spare stack and the one on the machine. Gratis.

The conversion was easy enough for the spare valve on the bench, but the installed one required several hours of labor. Lesson: make hydraulic valve repairs on the bench if you can!
 

Attachments

  • stack_valves_1.jpg
    stack_valves_1.jpg
    192.3 KB · Views: 256
  • stack_valves_2.jpg
    stack_valves_2.jpg
    150.3 KB · Views: 248
  • stack_valves_3.jpg
    stack_valves_3.jpg
    120 KB · Views: 249
   / making an hydraulic thumb for my new mini-excavator
  • Thread Starter
#18  
Here is the installed thumb and cylinder, waiting on hoses.

I could not find an adapter for the metric hose to a -4 JIC, even from our pals at Discount Hydraulic Hose. So I drilled out a metric tubing cap and welded it to a common JIC male adapter. Tho I air-tested for leaks, one of them leaked under hydraulic pressure and had to be re-welded. The pinhole leak had to be cooked with a torch to burn out the oil contamination before re-welding. My experience has been that without the cooking, subsequent welding will also have pinholes.
 

Attachments

  • installed.jpg
    installed.jpg
    109.4 KB · Views: 262
   / making an hydraulic thumb for my new mini-excavator #19  
Having that skin on the thumb will prob allow for things to slip out real easily. Mine is just a skeleton with some sharp teeth at the end.

Also your bucket teeth shanks look way to small for that bucket. You want them to go further back on the edge so your not trying to bend the end of the cutting edge. Unless thats just a rough grading bucket.
 
   / making an hydraulic thumb for my new mini-excavator
  • Thread Starter
#20  
Having that skin on the thumb will prob allow for things to slip out real easily. Mine is just a skeleton with some sharp teeth at the end.

The current hyd thumb I use on my backhoe has a smooth face as well, and the load slipping has never been a problem for me. When grabbing a log, the edges of the bkt keep that from happening. I deal with a lot of rocks, which cause intense point-loads. Without the plate welded over the skeleton of my thumb, I would bend it. I have already slightly bent the side walls of my bucket lifting rocks.

I have many hours on this thumb (photo).
 

Attachments

  • hyd_th_closed_max.jpg
    hyd_th_closed_max.jpg
    303.4 KB · Views: 351

Marketplace Items

UNUSED FUTURE QSJ HYD MINI SWEEPER (A60432)
UNUSED FUTURE QSJ...
2018 ALLMAND MAXI-POWER 45 GENERATOR (A58214)
2018 ALLMAND...
2006 Ford E-350 Enclosed Service Van (A59230)
2006 Ford E-350...
2019 TAKEUCHI TL10V2 SKID STEER (A60429)
2019 TAKEUCHI...
2021 Ver-Mac PCMS-3812 Solar S/A Towable Trailer Message Board (A55973)
2021 Ver-Mac...
2000 Sterling L9513 Winch Truck (A61306)
2000 Sterling...

Here are some similar links:

 
Top