Clutch Repair Kama 554

   / Clutch Repair Kama 554
  • Thread Starter
#111  
Good morning,
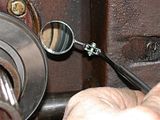
Before bolting the tractor together, I made a felt washer that fit behind the throwout bearing where the shield and Sliding Seat (which holds the TOB) meet. This is instead of the "O" ring idea. It's to keep the grease that comes out of those little holes localized around the .020" shield gap. I was worried about the "O" ring and "felt" this is better alternative (no pun intended). I tried to take a photo of it.
Maybe you can see the little mirror in the photo which shows the brownish colored felt washer?


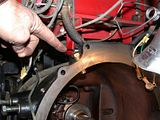
Also, I have a question about this sensor which is screwed into the bell housing. When the tractor is assembled, it appears to rest over the rotating flywheel. Could it be a speed sensor for my tachometer?
What is it?

 
   / Clutch Repair Kama 554 #112  
Rob

That does appear to be a tach sensor. The way I was told to adjust it on my Jinma was to hand tighten till it touches the flywheel then back it off 1/4 to 1/2 turn and tighten down the retaining nut.

Chris
 
   / Clutch Repair Kama 554
  • Thread Starter
#113  
Yesterday, the solar guy came up to fix the blown fuse and complete the by pass for the generator to run the shop. I needed that to run my large 7-1/2hp lathe plus the 10hp rotary phase converter motor. We found out running through the solar outback converters only, we can't run the electric dryer and start all those large motors at the same time. The amp draw is giant.

That gave me a chance to spin up the clutch alignment tool. It has 3 diameters on it. One for the pilot bearing, one for the PTO clutch and one for the main clutch.
I got the entire clutch pack mounted back onto the flywheel using it.
Once everything was concentrically lined up, I torqued the 6 bolts to 60ft/lbs.


When I set the PTO clutch gap on the bench, I did not compress the clutch pack to adjust that, so I had to adjust the 1.2mm PTO clutch gap once the assembly was mounted on the flywheel. I had to grind one open end wrench flat to fit under the other one to lock the 2 nuts together, but it was easy to do.
Here you can see the feeler gauges and wrench technique.
Rob-

 
   / Clutch Repair Kama 554
  • Thread Starter
#114  
After that, it was time to slide the tractor back together again.
Tommy had warned me to be patient when trying to line up the halves. He advised me to prepare for several attemps but not to get discouraged. Most of all he told me NOT to use longer bolts to "suck" the 2 halves together. If the clutches or splines or pilot bearings are not lined up, you can seriously damage them by using force. He said roll the tractor together and it should "slide" together easily if engaged properly. He also said to engage the PTO so when it touches, you can rotate it from behind and "feel" the splines mesh and slide in once lined up.

It took Loretta and me several tries just to get the 2 halves somewhat close to lining up ... even before getting close to the splines. We must have rolled one half off crooked on splitting. Well, we got the 2 halves pretty close after rotating both halves a little and got the elevation of both halves correct. Then we started closing the gap. Each 1/2 inch or so we checked the line up through that little dinky inspection window which is a joke. Once the PTO splines hit we turned the shaft a little while at the same time pushing and "nudging" the tractor together. Then it engaged and we could feel it slide in another inch or so.
That was good.

Now we had to get the main clutch splines to line up.
We put the tractor in gear so the shaft would turn a little while moving the rear half. In nudging it together, the front half was pushed back a little each time until the those splines match up. Then it went together all the way to the dowel pins that line up the bell housing to the engine flange.
It was 1/2" from being home.

We tried repeatedly the "nudging" technique but soon discovered the engine side had tilted ever so slightly so the dowel pins were not lined up. I got a farm jack and lifted one side of the front half to "rotate" the dowel locations into place. Then the 2 halves got onto the dowel pins and there was about 3/8" gap left. At that time I put in the bell housing bolts and ran them up hand tight. A couple of little nudges and we could screw the bolts in more and more until there was only 1/8" gap. Then I used a wrench to equally seat all the bolts. There was very little pressure running them in so I was certain everything lined up.

Below are the photos of the tractor together again and also the gap between the release fingers and the throw out bearing. I think you can see the gap through the inspection window.
It is too big.

 
   / Clutch Repair Kama 554
  • Thread Starter
#115  
Rob

That does appear to be a tach sensor. The way I was told to adjust it on my Jinma was to hand tighten till it touches the flywheel then back it off 1/4 to 1/2 turn and tighten down the retaining nut.

Chris
Thanks Chris, that's what I figured but wasn't sure.
I'll check to see if it's properly adjusted while I'm at it.
 
   / Clutch Repair Kama 554
  • Thread Starter
#116  
I'm not done but I sure learned a lot from this.
In measuring the throw out bearing gap all 3 fingers were identical. So that was good.
But they measured 7.5mm ... about 5.5mm too much gap.
Why was that? I remembered that the PTO clutch had to be adjusted about the same amount after it was bolted into the flywheel pocket. Now I know I needed to compress the entire clutch pack with the PTO clutch in it. The PTO clutch compressed the Belleville disc springs which moved the pressure plates (both of them) more away from the flywheel, sucking the finger tips in more . In other words, the true stack height (now compressed with all the components inside) went back to 105.3mm.
Amazing!

Since I measured everything and ended up making my stack height 110.8mm instead of 105mm, that meant had I compressed all the components on the bench I would've been within .3mm of the 105mm stack height after all. I figure the .3mm difference might be due to clutch wear and new finger geometry, since they were all over the place. So I will adjust the outside linkage to get the 2mm release finger gap.

Had I done that, both the 1.2mm PTO gap AND the release finger stack height would've come in bang on. Next time I will spin up an aluminum plate with the same recess as the flywheel and clamp the whole shebang together. That will simulate exactly how the clutch pack, PTO gap and release finger gap will be when bolted to the flywheel. It will be a true clutch adjustment tool to make all the adjustments on the bench without having to make any on the tractor, including the exterior linkage.
lol ... that's next time.:)

Today I'll connect the 4wd shaft back up (it's in there already) and adjust the exterior linkage to get the 2mm release finger gap. Then start reconnecting all the little electrical, hydraulic, fuel lines and other linkages etc. I'll take some photos and get back to you guys to tell you how it all turned out.
I need to get my post count up anyway.:D
Thanks for looking.
Rob-
 
   / Clutch Repair Kama 554 #117  
I"m a little bihind and skimmed through most of this. The bearin I sent was from the factory, it was not a return from Greg. the bearing is a thrust bearing and they are a little loose radially, that said, I like the replacement bearing and if you will PM me the part number, I will use it in future clutch kits we send out. Also the picture to me looked like the fingers were too far into the clutch (away from the bearing) but you addressed that in your most recent post. The only other thing I will add here now is when you adjust the tach sensor, be sure the to do it with the entine off. They don't like contact with the spinning flywheel teeth:)

Happy 2009
 
   / Clutch Repair Kama 554
  • Thread Starter
#118  
The bearin I sent was from the factory, it was not a return from Greg.
lol Chip, I figured as much.
I'm with you though, I like the Napa replacement bearing. You'll be quite impressed with the quality of it.
I'll send you a PM with all the information and sizes.

I did take up the release finger gap this afternoon by adjusting the linkage and also the stop for the clutch pedal. Then I made a long feeler gauge to measure the gap through the inspection window. It's 2mm thick on the machined end. I also tried to take a photo of the feeler gauge and the fingers, but it came out sort of crummy.


The clutch feels really good when I step on the pedal. There is a definite feeling between the main clutch and the PTO clutch now. I can't wait to get the rest of the tractor back together to try it out.
Rob-
 
   / Clutch Repair Kama 554 #119  
Congrats getting her back together Rob. What a chore! Let's hope there is no "next time"! Great job and a great thread; thanks for sharing with the detailed posts and photos.

Remember earlier I advised making some alignment plumb marks down to the concrete and some height gauge blocks before the tractor was split? In hindsight, after you rejoined the two halves, do you think the alignment marks would have made the assembly any easier?
-Ray-
 
   / Clutch Repair Kama 554 #120  
Nice job as usaual Rob.

Having only used my HST tractor I am curious about the 2 stage clutch. What are the 2 stages and when do you use them?
 

Tractor & Equipment Auctions

8 Ft Fork Extensions (A50322)
8 Ft Fork...
Online Buyers Premium (A47384)
Online Buyers...
2008 INTERNATIONAL 4300 M7 SBA 4X2 DUMP TRUCK (A51406)
2008 INTERNATIONAL...
2018 FORD EXPEDITION (A51406)
2018 FORD...
2 (A51876)
2 (A51876)
Koyker Loader DoubleTine Bale Spear - Versatile for Round and Square Bales (A52128)
Koyker Loader...
 
Top