The Chicken Palace

   / The Chicken Palace
  • Thread Starter
#11  
Once the outside was stained, and the shutters and windows and doors were installed, I turned my attention to the inside. I knew that I didn't want "ugly framing material" for the interior, and that I would need something that was attractive and still cost effective. I ended upon deciding on using cheap 1x3 firring strips from the local Home Depot. At about a dollar per board, the cost per square foot was pretty low. These aren't finish boards, so the first step was to clean them up. I ran them all through my Porter Cable planer and ended up with boards that looked pretty darn good.
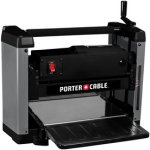
Porter Cable Planer.jpg

BTW -- this planer is awesome. I highly recommend it if you're looking for an inexpensive but high-quality planer for occasional use.

After a day in the interior, I had managed to add insullation to all of the walls, put up the interior boards, lay down a rubber stall mat from Tractor Supply, and then cover the ground with coarse sand. To test it out, we put the chickens in, and they seemed happy. So far, so good.
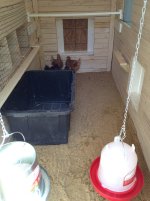
Image00022.jpg

Image00023.jpg

Image00024.jpg
 
Last edited:
   / The Chicken Palace
  • Thread Starter
#12  
BTW... in the last picture above, you can see the egg boxes on the right. They're covered with mesh to keep the hens out for the first few weeks. You always want to keep them out of the boxes until they have established their roosting routines and are ready to start laying so that the "egg boxes" don't become "roosting boxes."
 
   / The Chicken Palace #13  
It's about 500% nicer than the one I built last spring. Mine is a simple 16 ft long 6'8" high "A" frame, 8 ft with metal, 8 ft with chain link. And the most ghetto rebar, and hog wire door you can imagine. Kept planning to do more to it, but havent
 
   / The Chicken Palace
  • Thread Starter
#14  
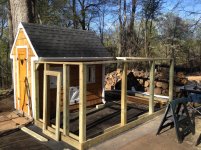
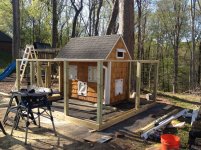
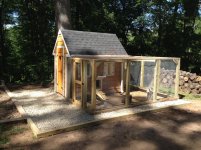
Building the run was a little bit more tricky. Since I wanted to be able to convert this back to a shed at some point in the future, I wanted to build the run as a "stand alone" structure that I could remove without leaving holes in the shed. After some more time in Sketchup, I came up with an idea. The principle was that the run should be built as a unit NEXT to the shed, not built into the framing of the shed. I used pressure treated lumber and built a "skirt" around the bottom that I could fill with gravel and a few "spreaders" that I could anchor in the ground with landscape spikes to hold it in place. I wanted the run to be large enough for us to get inside, but it didn't have to be "full human height" so I built it to be level with the bottom eve of the run.

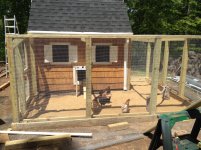
Wow... metal mesh (NOT chicken wire) is expensive at the local Home Depot. I walked out in shock and ended up ordering all of the metal fabric mesh from an online supplier for about 1/3 of the cost that HD wanted. Since the run walls were going to be sitting on the ground and not burried in the earth, I also ordered some coated wire to place along the bottom of the run, extending about 18" out from the base so that critters like foxes and our local raccoon couldn't dig under the fence. This part of the project was actually the hardest to do as a one-man show. It's REALLY REALLY HARD to stretch wire mesh by yourself, and I ended up with more holes and cuts on my hands and arms that if I had spent the day picking blackberries. But, after a long day, it had started to take shape.

Image00020.jpg

Image00021.jpg

The run is attached to the shed in only 3 places -- 2 wood screws at each corner into the shed frame and one hanger strap screwed into the shed to hold a support beam. If I ever need to take it down, it is as simple as unscrewing a total of 8 screws and then just pulling the run away from the shed.
 
   / The Chicken Palace
  • Thread Starter
#15  
After a painful, un-fun day of installing the wire mesh the run was finished and I added drainage pipes, landscape fabric and sand. We added a few roosts and the chickens went in permanently.

Image00026.jpg

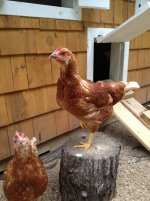
If happy chickens was the goal, then I think this was a 100% success. Our favorite girl never looked happier.

Image00028.jpg
 
Last edited:
   / The Chicken Palace
  • Thread Starter
#16  
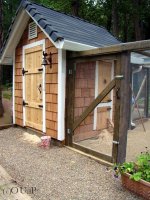
The last step was to add some gravel around the perimeter and seal up any potential "critter cracks" where the foxes could get in. By the time we were done, I think it turned out looking pretty darn close to our original idea.

Original Inspiration:

IMG_3390.JPG


Our final Chicken Palace:

Image00027.jpg


So far, after a year of use, it has been better than expected. No predators have made it into the run, the girls seem happy, and we're getting more eggs than we can use. The structure has been solid -- not a sag or a settling problem to be seen, and the Sherwin Williams stain/sealer has worked perfectly through our very, very rough winter.

The next project for THIS spring -- building a tractor shed that matches the coop.
 
Last edited:
   / The Chicken Palace
  • Thread Starter
#17  
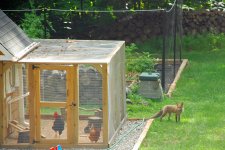
The proof is in the pudding as they say... this fox tried to get into the coop for weeks after we built it, but now he's just given up. When I see him on his morning walk-abouts, he just walks right past the coop and the chickens don't even squawk anymore. It's like the Chicken Palace has a moat. We did lose one girl to a hawk while they were free-ranging one day, but so far the coop has been fully predator proof.

fox.jpg
 
Last edited:
   / The Chicken Palace #18  
That's very nice. Good job.

The attachments on the last three posts are "invalid."
 
   / The Chicken Palace
  • Thread Starter
#20  
Free shipping. Even faster for InCircle at Neiman Marcus. Shop the latest selection of top designer fashion at Neiman Marcus.

Yours looks very nice indeed, but don't you think your hens would be better served by this $100,000 model from Neiman Marcus?

Oh, man... if I had just seen that last year I could have saved myself a lot of work and a lot of money. Mine ended up costing me almost $200K by the time I added in wife's hourly billing rate for the day she helped me. :)
 

Tractor & Equipment Auctions

1042 (A50459)
1042 (A50459)
2 Vintage Metal Signs (A48081)
2 Vintage Metal...
JOHN DEERE 4100 TRACTOR (A51243)
JOHN DEERE 4100...
2016 John Deere 35G Mini Excavator (A49461)
2016 John Deere...
Deere 9965 Cotton Picker (A51039)
Deere 9965 Cotton...
2007 Pace American Enclosed Trailer (A49461)
2007 Pace American...
 
Top