Criticize my welds please

   / Criticize my welds please #1  

Tractorguy24

Bronze Member
Joined
Aug 15, 2017
Messages
98
Location
BC, Canada
Tractor
.
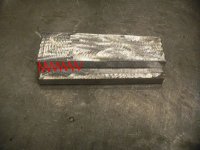
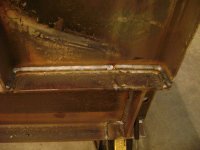
Today I MIG welded the stabilizer pads on the backhoe because they were cracked on both sides, but had not come apart yet. Before welding, I took the grinder and cut grooves along the crack about the size I expected the weld to be. I set the voltage just a bit above what the door chart said to make sure I get good penetration. Welder is a ESAB migmaster 250. When welding, there seemed to be some kind of a "flame" around the arc which haven't ever noticed before. I might be wrong but it also seemed to be louder than usual?
After welding, there seemed to be something like slag on top of the weld of which some came off as the workpiece cooled down.
Also the welds look kinda weird.
I don't think it is cast because there were a lot of sparks when grinding.
What did i do wrong? What should I have done different?
Thanks!

Pictures:
IMG_0906 (1).jpgIMG_0907 (1).jpgIMG_0908 (1).jpg
 
Last edited:
   / Criticize my welds please #2  
Grinding a grove is a very good idea. The base metal might be, cast steel.
Your travel speed is way too fast! You need to slow down. When Mig welding I make very small movements.
 

Attachments

  • Mig motion.JPG
    Mig motion.JPG
    158.2 KB · Views: 501
  • Beam weld.jpg
    Beam weld.jpg
    312.6 KB · Views: 458
   / Criticize my welds please #3  
Yea, slow down and snall steady movements.

It looks as though you held the gun in one spot for a few seconds, then quickly advanced 1/2" or so, then paused again for a few seconds, repeat repeat.

Either that or a whole lot of stitch welds, but it doesn't look like that.

You want a smooth uniform weld. Not something that looks like a bunch of ball bearings cut in half with alot of cold laps
 
   / Criticize my welds please #4  
Yea, slow down and snall steady movements.

It looks as though you held the gun in one spot for a few seconds, then quickly advanced 1/2" or so, then paused again for a few seconds, repeat repeat.

Either that or a whole lot of stitch welds, but it doesn't look like that.

You want a smooth uniform weld. Not something that looks like a bunch of ball bearings cut in half with alot of cold laps

Both are correct. It looks like your heat is okay, you are getting penetration, but not moving steadily. You likely did delay failure with your welds though.
 
   / Criticize my welds please #5  
Kind of looks like cast iron with freeze plugs in it? Is it an engine block or something similar? Cast iron could cause the weld to do weird things too. Also if it is cast iron, you should clean it up with a file or carbide burr after grinding. It does look fairly heavy so preheat would have helped and it looks like there's another crack in the 2nd pic.
 
   / Criticize my welds please
  • Thread Starter
#6  
Kind of looks like cast iron with freeze plugs in it? Is it an engine block or something similar? Cast iron could cause the weld to do weird things too. Also if it is cast iron, you should clean it up with a file or carbide burr after grinding. It does look fairly heavy so preheat would have helped and it looks like there's another crack in the 2nd pic.
It's the stabilizer pad from the backhoe. Shouldn't be cast iron because there were a lot of sparks when grinding.
 
   / Criticize my welds please #7  
I have found that when grinding then welding, there is a lot of weird flame around the electrode.--I always thought it was the burning of the grit embeded by the grinding wheels abrasive.---Just my observation! thanks; sonny580
 
   / Criticize my welds please #8  
I have seen a lot worse welds that is for sure, and in one spot you actually did pretty good. These are between the two arrows on the right hand side of the photos. The arrows on the left hand side show some inclusions that resulted from slow travel speed as others noted.

As for what you experienced, a lot of it probably has to do with the steel being an outrigger pad and fouled with dirt. It may be from debris of the grinding wheel, but could also be from dirt ground into the steel too.

As for pointers, as others have said, slow down your travel speed.

But in just getting back to basics, you realize with wire feeders you PUSH the weld and not drag it? That is stick welding, not wire feed welders. Always push!

You also never watch where you have been, but watch instead the sides of your weld. Keep the width even and you end up with a nice looking weld.

Always watch for globular transfer (droplets coming off the wire and not spraying which means a lack of fusion).

ALWAYS use two hands, NO ONE, and I mean NO ONE, welds good one handed. People will tell you otherwise; their Grandfather's Great Uncle who welded nuclear power plants together...they lie. Use two hands.

Make a few practice runs before pulling the trigger; see if the weld is going to be comfortable for you before you are committed to it. As you get better, you can make longer and longer welds, but short welds (12 inches or less) are better well done, then a crappy one that is longer.

Never weave more than 3/8 of an inch, if you have to for a deep weld, run stringers, it is far stronger.

At the end of a weld. Wait a second, then squeeze the trigger for just a second to fill the crater that will inevitably form.

A ground weld never looks as good as a well made weld, but never be afraid to dig out a bad weld with a grinder and start over. Only you know what is inside, so do it right.

...
Don't take these pointers as an affront, your welds were not that bad. But if you realize that I mean these comments in genuine sincerity, and practice them a bit, I think you will be pleased with how much of an improvement you will see.
 

Attachments

  • IMG_0908 (1).jpg
    IMG_0908 (1).jpg
    140.3 KB · Views: 355
   / Criticize my welds please #9  
What shade did you have your welding lens at?

With wire feed you want it a little darker because it emits more light. I like shade 11, but having welded for years and now retired, my eyes are a bit bad. But the point is, if you are running 10 like for stick welding, it might be too bright and hard to see, yet shade 12 or 13 might be too dark to see too. So just realize adjusting your welding shade can make a huge difference.
 
   / Criticize my welds please #10  
I have seen a lot worse welds that is for sure, and in one spot you actually did pretty good. These are between the two arrows on the right hand side of the photos. The arrows on the left hand side show some inclusions that resulted from slow travel speed as others noted.

As for what you experienced, a lot of it probably has to do with the steel being an outrigger pad and fouled with dirt. It may be from debris of the grinding wheel, but could also be from dirt ground into the steel too.

As for pointers, as others have said, slow down your travel speed.

But in just getting back to basics, you realize with wire feeders you PUSH the weld and not drag it? That is stick welding, not wire feed welders. Always push!

You also never watch where you have been, but watch instead the sides of your weld. Keep the width even and you end up with a nice looking weld.

Always watch for globular transfer (droplets coming off the wire and not spraying which means a lack of fusion).

ALWAYS use two hands, NO ONE, and I mean NO ONE, welds good one handed. People will tell you otherwise; their Grandfather's Great Uncle who welded nuclear power plants together...they lie. Use two hands.

Make a few practice runs before pulling the trigger; see if the weld is going to be comfortable for you before you are committed to it. As you get better, you can make longer and longer welds, but short welds (12 inches or less) are better well done, then a crappy one that is longer.

Never weave more than 3/8 of an inch, if you have to for a deep weld, run stringers, it is far stronger.

At the end of a weld. Wait a second, then squeeze the trigger for just a second to fill the crater that will inevitably form.

A ground weld never looks as good as a well made weld, but never be afraid to dig out a bad weld with a grinder and start over. Only you know what is inside, so do it right.

...
Don't take these pointers as an affront, your welds were not that bad. But if you realize that I mean these comments in genuine sincerity, and practice them a bit, I think you will be pleased with how much of an improvement you will see.

Well said. Great pointers to be sure, especially two handing the weld process--I'm guilty of not doing that.
 

Tractor & Equipment Auctions

Adams Conveyor (A51039)
Adams Conveyor...
WE DO NOT GUARENTEE HOURS UNLESS WE SAY SO!!! (A50774)
WE DO NOT...
1271 (A50490)
1271 (A50490)
2015 FORD F-150XL SINGLE CAB TRUCK (A51406)
2015 FORD F-150XL...
2017 Yamaha VX1050B Deluxe Jetski (A50324)
2017 Yamaha...
2017 PETERBILT 579 TANDEM AXLE SLEEPER (A51222)
2017 PETERBILT 579...
 
Top