I designed our in floor heat differently from any other. It works wonderfully. See if any of this works for you.
1. Any specific considerations I should make for boiler location?
The location for the boiler doesn't matter. What does matter is laying out the floor in "zones".
You can have as many or as few as you want, but zones allow each to be heated or isolatd individually.
I used 8 zones and each one has it's own wall thermostat that turns that zone on/off. Each zone can be operated indiviually or in any combination.
All of the zones are connected to a manifold and then the manifold is connected to the boiler.
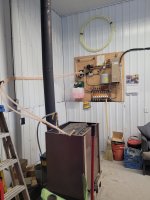
Boiler, all the levers and controls and associated piping are arranged in the special hydronic utility room. Mine also has tools and a workbench and a library. It's a sanctuary.
2. Do you recommend in-floor heat and would you do it again 3. If it is gas or propane, is it vertically vented or just out the wall or out the wall and then vertical?
Of course I would recommend in-floor heat. There are no downsides. I wasn't looking for full house heat - my main interest was in something fail safe that would maintain a baseline temperature of about 60 degrees inexpensively and without any fire danger. We live in a cold climate, have lots of plants, and like to be able to take come and go without worrying about home heat.
I vented - and inspected - for a boiler vented out the wall and then vertical.
But then I didn't use the vent! Read on....
After reading all the information and doing a lot of heat transfer calculations I didn't like any of the commerial recommendations. They all seemed like they didn't take advantage of this manner of heating.
Or was it that I just was not understanding the subject???
So I just couldn't decide on a boiler....., to keep building inside during the wintr and to do something - anything - so I could test the system until I understood it better I bought a standard 50 gallon 220 volt Hot Water Heater. My choice was a Marathon brankd epoxy/fiberglass wound type so that the hydronic fluid would not corrode it. Total cost of this "boiler" was hundreds of dollars instead of thousands.
I typically run about 5 psi and fluid at 100 degrees.
BTW, "hydronic fluid" is just propylene glycol or RV anitfreeze plus distilled water. You can pay a lot more, but that is what you get.
I typically run about 5 psi and after a day to reach equilibrium I see the fluid vary from about 95 to 110 degrees as it enters the manifold.
Circulation is via a small "taco" pump about the size of my hand. Very low wattage silent pump.
The floor is working from about Oct until May each year - actually it is ON all the time, but I turn the thermostats down so it goes to sleep half the year.
3. Recommendations & dos and don'ts for laying the pipe.
Make each zone of pipe within its section of concrete to be one continuous length of your hydronic heat pipe. Avoid any joints where you cannot service them standing or sitting comfortably in your "hydronic room.
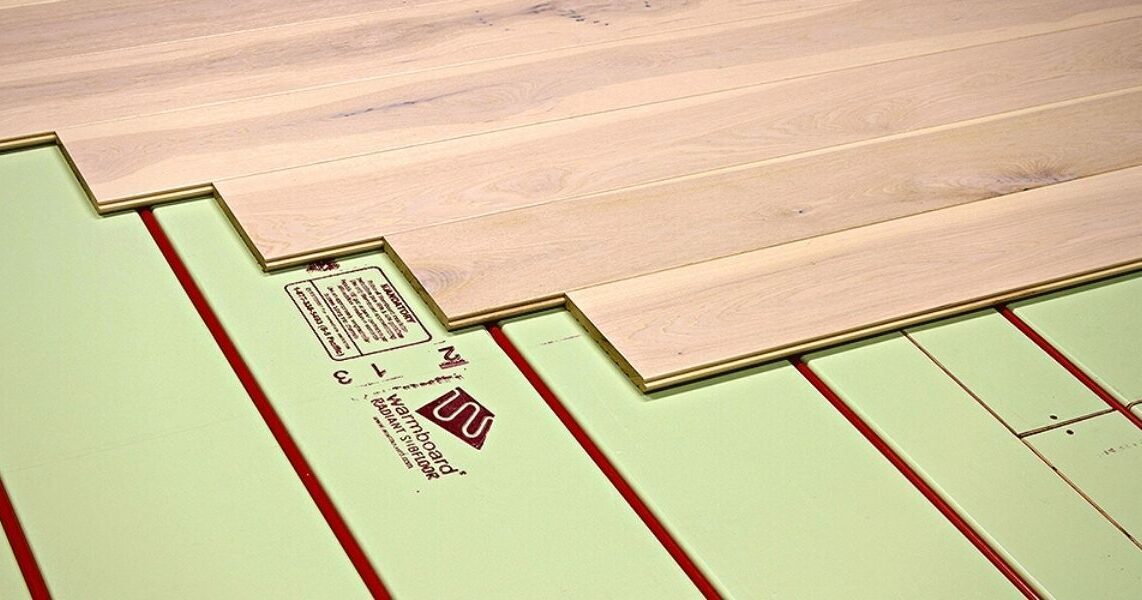
Space within the concrete on 6" to `12" apart using 1/2" pex in a zig zag pattern.
Take lots of photos before pouring the concrete.
Once the concrete is in, you cannot drll through the floor for any reason to access basement or crawl space without the danger of hitting a buried pipe. So before pouring, make yourself some way to access through the concrete. Put some thought into that. I used stubby pieces of pipe level with the finished floor.
4. OTHER - finishing the floor
I made the living room floor to have a perimeter of hydronic & concrete and the center section a faster thermo-responding design of hydronically heated hardwood wood. So it looks tradtional. Most of the rest of the house has very smooth stained/waxed/buffed concrete floors. Basic house construction is lots of massive beams and varnish....like an old sailboat. You can finish concrete floors really nicely with a water stain and then burn wax into it with an industrial buffer like they do for gymnasium floors. Makes the floor look like old leather. Lots of rugs.
Enjoy,
rScotty