Restarting My '70 Nova Project

   / Restarting My '70 Nova Project #711  
You’re the man!
1730215194563.png
 
   / Restarting My '70 Nova Project
  • Thread Starter
#712  
I got all the rings gapped this afternoon, and once I got started, it went pretty quickly. The cheapo ring filer I bought from Summit Racing works pretty well, just hold the ring in place and turn the crank. According to the directions with the ring package, the top ring gets a 0.018" gap (4.155" bore X 0.0045) and the 2nd ring gets 0.020" (4.155" bore X 0.0050), I though that was strange that since it's the top ring that runs hottest gets less gap than the 2nd ring, but that's what the instructions say, so that's what I did.
Then it was on to clearancing the block for the rods. I had thought the block would accommodate a 4" stroke, but upon investigation, it is only good for a 3.75" stroke without modifications.
I installed the old main bearings in the block rather than use the new ones, and dropped the crank in. I set the bearing caps in place and when I tried to seat them in the block, They wouldn't seat without binding the crank. Hmmmmm? Since the caps didn't have arrows on them pointing to the front of the block, I installed the caps with the stamped numbers readable from the front. Wrong! Turned them around and they seated in place like they should, and the crank spun freely. That just seems nonintuitive and bassackwards to me.
I installed the #8 rod/piston assembly with more old bearings and located where I had to start relieving the block. I got out the old Black and Decker air die grinder and put in a carbide burr and got started. I started with #8, as I knew it would need some work, and got started. I probably had to take out 3/16" at the bottom of the cylinder bore and about the same at the pan rails . The carbide burr does a really good job on the cast iron, so it doesn't take too long. I got #7 done also, so only six more to go. I was surprised at all the cast iron grindings on the floor under the block when I got done, going to be a lot more.

IMG_20241029_161618479.jpg
IMG_20241029_163001404.jpg
IMG_20241029_164425398.jpg
IMG_20241029_170932922_BURST000_COVER.jpg
 
   / Restarting My '70 Nova Project #713  
When we're retired and have the time & patience we can do great things. But like with toy or model trains, building workshops, or clearing land for better use it's always about the journey.

btw, I keep driving by a first gen Chevy II 4-door with rough paint and possible neglect. It's not quite what we know and love as more recent Novas but IMO the spirit is there, and more interesting if it has the 4-cyl engine. The early Corvair down the road also beckons me to approach the owner.

(don't expect much :sneaky:)
 
   / Restarting My '70 Nova Project
  • Thread Starter
#714  
Well, I spent about 4 hours carefully grinding on my new block to get the rods to clear the pan rail. The carbide burr I had worked really well, was easy to remove material where I wanted and left a fairly smooth surface. When I was done, I swept up the material on the floor amd it wold probably filled a one cup measure, and that didn't include what was stuck on my clothes. The air die grinder throws the filings everywhere, but it works great.
After that was done and all the rods and bolt had at least 1/16" of clearance, the next job was to clean up the rods, pistons, crank and block. I thoroughly washed the rods, pistons and main bearing caps in the parts washer (and yes, it has a really good filter on it) and blew them dry with compressed air. Did the same with the crank, making sure to blow out all the oil passages a couple of times, wiped it dry with clean shop towels and covered it up on the bench with the other parts.
There is no way to get the block in the parts washer, so I dug out a compressed air siphon sprayer and used a better part of a gallon washing it down and then blowing it off and blowing out all the oil passages and bolt holes. I finished it off with a couple of cans of brake cleaner that left it squeaky clean and dry.
Next came the job of masking it off so I could paint it. That took a couple of hours because of all the irregular surfaces, but I got it all done in time to give it a coat of self etching primer before I had to leave to pick up a friend for dinner. I only had about a third of a can of Chevy orange paint, so on the way home I stopped at O'Reilly's and picked up another can. Stopped at the shop and gave it a couple of good coats, so it'll good and dry to work in tomorrow.
One thing I forgot to check when I had some of the rods in the block was to see if they clear the new oil pan. The old pan was made to clear stroker cranks, the new one doesn't look like it is made with as much clearance at the pan rails, so I don't thinkit;s going to work. But, I'll check it, and if it doesn't, I'll either have to modify the old one to accept the dipstick on the right side, or get one that will clear the rods. That would suck, because all the ones I saw when looking on Summit were $200-$300. I'll just have to see and decide what to do.
Oh yeah, and even if the new pan will work, I'll have to get a new oil pump and pickup because the old one is 8.5" deep and the new one is only 7.5" deep, and I can't just change the pickup because it's welded to the pump cover.

Nothing is simple.

IMG_20241030_165334353.jpg
IMG_20241030_165411704.jpg
IMG_20241030_165516843.jpg
IMG_20241031_145258333.jpg
IMG_20241031_154957017.jpg
IMG_20241031_155003948.jpg
IMG_20241031_160757292.jpg
IMG_20241031_160806111.jpg
IMG_20241031_201412302.jpg
IMG_20241031_201430494.jpg
IMG_20241031_201503101.jpg
 
   / Restarting My '70 Nova Project #715  
Is yours a stroker? Im just wondering why the block needed that much relief but maybe that’s normal.
 
   / Restarting My '70 Nova Project
  • Thread Starter
#716  
Is yours a stroker? Im just wondering why the block needed that much relief but maybe that’s normal.
Yes, it's a 4" stroker rotating assembly I got from Eagle. 4.155" bore and 4" stroke give me 434 cubes. From what little I drove it so far, it is a real torque monster with that long stroke.
Interestingly, the stock 400 block required less grinding to get clearance than the new Dart block did. Apparently it is beefed up in the lower pan rail area, and it does weigh about 20 pounds more than a stock block.
 
   / Restarting My '70 Nova Project #717  
Yes, it's a 4" stroker rotating assembly I got from Eagle. 4.155" bore and 4" stroke give me 434 cubes. From what little I drove it so far, it is a real torque monster with that long stroke.
Interestingly, the stock 400 block required less grinding to get clearance than the new Dart block did. Apparently it is beefed up in the lower pan rail area, and it does weigh about 20 pounds more than a stock block.
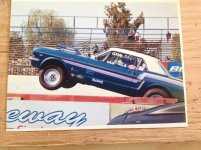
I had a Dart block based on the Ford 351 Windsor, if I remember correctly 4”x4” = 427 about 650hp, those strokers like you say are torque monsters, and make power at only 6500rpm (mine) best et 10.08 @ 132, mustang with me in it 3,150 lbs!
IMG_3015.jpeg
 
   / Restarting My '70 Nova Project
  • Thread Starter
#718  
That's a good looking FAST Mustang you had there.
FYI, a 4" X 4" V8 is a 402 cu.in.
You have to go to 4.125" bore to get 427 cubes.
My 434 is just a 0.030" over 427.

Pulled all the paper off the block today, it looks pretty good, really orange.
Spent about an hour chasing out all the threaded holes in the block, and there are a lot of them. Blew them all out with the air nozzle, the head bolt holes on the Dart block are blind instead of open into the water jacket like the stock block.
Unpacked the new main bearings and made a small modification to the rear main shells to get more oil the the thrust surfaces, a mod I've seen a few SBC builders recommend. Installed the rear seal half in the block and the rest of the upper bearing shells. Got the crank, wiped and blew it off, lubed the bearings and journals and dropped it in place. Installed the lower shells in the caps, lubed them and dropped them into place. Seated them in the block, installed the cap bolts, snugged them up, forced the crank forward and aft to set the rear cap and thrust bearing properly. Dial indicator show .005" end play, which is in spec. Torqued the 7/16" main bolts to 65 ft.lbs. and the splayed 3/8" bolts to 35 ft.lbs., as per the block specs. The crank even spins nice and freely, which is good!
Not sure I'll have time to work in it tomorrow, going to visit some friends from out of town and need to get the BX out and mulch up all the leaves that have fallen. Most of the trees are pretty bare, except for the oaks, they always hang on to their leaves all winter.

IMG_20241101_162815722.jpg
IMG_20241101_170345331.jpg
 
   / Restarting My '70 Nova Project #719  
Looking great ! Coming along nicely.
 
   / Restarting My '70 Nova Project #720  
Don’t forget to double check everything. Treat it like a pilots check list. I did engine work on a 70 Challenger, I double checked everything twice except adding coolant and water to the radiator. I caught it in time but just barely.
 

Tractor & Equipment Auctions

1589 (A46502)
1589 (A46502)
John Deere Van Brunt Model FB 10X7 (A49339)
John Deere Van...
2003 VIKING TRAILER CEMENT MIXING TRAILER (A47001)
2003 VIKING...
2080 (A46502)
2080 (A46502)
2002 (A46502)
2002 (A46502)
2023 CASE IH Farmall 75A MFWD Tractor (A46502)
2023 CASE IH...
 
Top