I followed Soundguy's 3M Headlight Restoration Kit thread with great interest, the Spousal Unit's '04 4-Runner's lens were pretty yucky at that time. Based on what I read, thought I would give it a try. Pics and commentary as follows...
First pic is of the kit itself... Gold 500 grit discs, white 800 grit discs, gray 3000 grit disc, orange buffing pad, rubbing compound and the disc/pad holder. Instructions suggest using a 1200-1600 rpm drill, I'd certainly suggest using a plug-in drill. I'm sure a battery powered one will spin fast enough, but unless you have brand new batteries, I don't know if they'll last long enough to complete the process on two lenses?
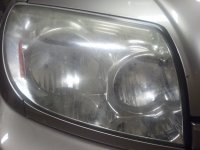
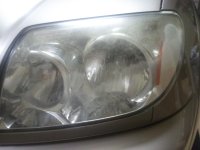
2nd and 3rd pics are of the headlights themselves... You can see they aren't completely yellowed, but pretty spotty and getting hazy. Will only show the left lens from here on out, the lighting in the garage was a little better on the left side of the vehicle. And forgive the sharpness of the photos, next cell phone will have image stabilization on the camera!
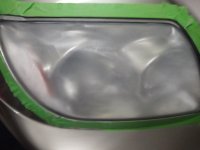
4th pic is after using the 500 grit pad. Mental note to self: Use the masking tape! The drill "hopped" twice on me during the whole process and if the masking tape wasn't there, I'd have been using this stuff to clean up some clear coat... :ashamed:
Have some paper towels handy, you can use them to wipe the dust off and see what you've missed. You know you're done with the 500 pad when 1) your sanding dust turns white (the first couple of passes were really yellow, which makes sense) and 2) you don't have any shiny spots left on the lens. At this point, you've gone too far to turn back! :laughing:
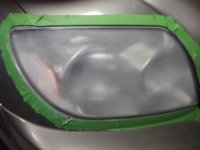
5th pic is after using the white 800 discs. A handheld shop light is really useful here, you can use it to see if you have any big scratches left. You'll know what I'm talking about as you go through the process. When you've gotten all the coarse scratches out, you're ready to go to the next step.
#6 is after using the gray 3000 pad... I kept both the pad and lens wet with a spray bottle through this step. I'd go across the lens, wipe, inspect and repeat until I thought I'd gotten all the 800 scratches out of the lens. The instructions talk about this step making a "slurry" if you are doing it right. Yep, it sure does! It also slings the slurry all over the place, which the instructions fail to mention... Be prepared to wash 1) the car afterwards 2) your clothes afterwards and 3) mop the floor afterwards! Pair of safety glasses aren't a bad idea here. You'll know you're done with the step when you aren't making a white slurry anymore. Your water will just disappear as it evaporates from the heat of the pad.
#7 is after the first application of buffing compound. I soaked the buffing pad in water and wrung it out before the first use. This contributes to some splatter in the process, but I didn't want the pad to get hot and smear the plastic. Used about a quarter-sized dollop of compound, would rather use too much as opposed to too little at this point. You can see that it has cleared up quite well.
Last pic... 2nd pass with the buffing compound, about a dime-sized amount this time. This pass really did the trick! Really cleared the lens up... If you get your eye on a sharp angle on the lens you can still see a slight bit of haze, but I think you need a finer grade of rubbing compound to get that out and I didn't have any.
Overall, I'm really pleased with the outcome and Momma is really happy! And you all know what that means... Thanks again, Soundguy, for originally posting this, good stuff!
Eagle
First pic is of the kit itself... Gold 500 grit discs, white 800 grit discs, gray 3000 grit disc, orange buffing pad, rubbing compound and the disc/pad holder. Instructions suggest using a 1200-1600 rpm drill, I'd certainly suggest using a plug-in drill. I'm sure a battery powered one will spin fast enough, but unless you have brand new batteries, I don't know if they'll last long enough to complete the process on two lenses?
2nd and 3rd pics are of the headlights themselves... You can see they aren't completely yellowed, but pretty spotty and getting hazy. Will only show the left lens from here on out, the lighting in the garage was a little better on the left side of the vehicle. And forgive the sharpness of the photos, next cell phone will have image stabilization on the camera!
4th pic is after using the 500 grit pad. Mental note to self: Use the masking tape! The drill "hopped" twice on me during the whole process and if the masking tape wasn't there, I'd have been using this stuff to clean up some clear coat... :ashamed:
Have some paper towels handy, you can use them to wipe the dust off and see what you've missed. You know you're done with the 500 pad when 1) your sanding dust turns white (the first couple of passes were really yellow, which makes sense) and 2) you don't have any shiny spots left on the lens. At this point, you've gone too far to turn back! :laughing:
5th pic is after using the white 800 discs. A handheld shop light is really useful here, you can use it to see if you have any big scratches left. You'll know what I'm talking about as you go through the process. When you've gotten all the coarse scratches out, you're ready to go to the next step.
#6 is after using the gray 3000 pad... I kept both the pad and lens wet with a spray bottle through this step. I'd go across the lens, wipe, inspect and repeat until I thought I'd gotten all the 800 scratches out of the lens. The instructions talk about this step making a "slurry" if you are doing it right. Yep, it sure does! It also slings the slurry all over the place, which the instructions fail to mention... Be prepared to wash 1) the car afterwards 2) your clothes afterwards and 3) mop the floor afterwards! Pair of safety glasses aren't a bad idea here. You'll know you're done with the step when you aren't making a white slurry anymore. Your water will just disappear as it evaporates from the heat of the pad.
#7 is after the first application of buffing compound. I soaked the buffing pad in water and wrung it out before the first use. This contributes to some splatter in the process, but I didn't want the pad to get hot and smear the plastic. Used about a quarter-sized dollop of compound, would rather use too much as opposed to too little at this point. You can see that it has cleared up quite well.
Last pic... 2nd pass with the buffing compound, about a dime-sized amount this time. This pass really did the trick! Really cleared the lens up... If you get your eye on a sharp angle on the lens you can still see a slight bit of haze, but I think you need a finer grade of rubbing compound to get that out and I didn't have any.
Overall, I'm really pleased with the outcome and Momma is really happy! And you all know what that means... Thanks again, Soundguy, for originally posting this, good stuff!
Eagle
Attachments
-
 2011-11-18 21.49.18_1.jpg556.7 KB · Views: 231
 -
 2011-11-18 21.54.36_1.jpg557.8 KB · Views: 247
 -
 2011-11-18 21.54.48_1.jpg621.9 KB · Views: 185
 -
 2011-11-20 14.14.48_1.jpg578.4 KB · Views: 208
 -
 2011-11-20 14.36.04_1.jpg559.8 KB · Views: 208
 -
 2011-11-20 14.47.23_1.jpg619.9 KB · Views: 193
 -
 2011-11-20 14.57.08_1.jpg569.9 KB · Views: 220
 -
 2011-11-20 15.15.46_1.jpg556.1 KB · Views: 329
Last edited:
")
