3PH Question

   / 3PH Question #11  
RK,

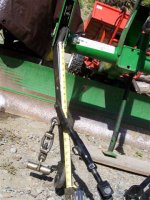
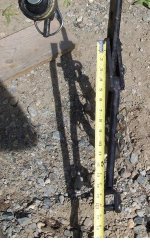
2nd Pic. 4" length from attachment pin end to 1st bend. the other end of the draft arm is the same 4".

Tom
 

Attachments

  • 716513-Draft Link 1st Bend Length.JPG
    716513-Draft Link 1st Bend Length.JPG
    54 KB · Views: 185
   / 3PH Question #12  
RK,

3rd Pic. 19" center section of draft arm, between "bends".
 

Attachments

  • 716516-Center Sect Length.JPG
    716516-Center Sect Length.JPG
    45.1 KB · Views: 137
   / 3PH Question #13  
Last pic...just incase there's something odd about the lift links they provided you. This is the fixed lift link. I measure 16", pin center to pin center.

Hope this helps. I could find no part numbers stamped on any of the arms /forums/images/graemlins/frown.gif

Tom
 

Attachments

  • 716523-Lift Link P-P.jpg
    716523-Lift Link P-P.jpg
    67.5 KB · Views: 149
   / 3PH Question
  • Thread Starter
#14  
Tom:

That's really helpful, and I appreciate it.

The draft link lengths seem the same as mine. My top link is adjustable, but my recollection is that its shortest length is around 19" also. I'll be able to check the measurements when I'm with my tractor tomorrow.

I figure I just haven't set it all up right.

I noticed that you leave the links on the attchment. Does that make easier or harder to hook up to the tractor? Seems like it would save a few steps but could be more difficult to line everything up.

Thanks again.

RK
 
   / 3PH Question #15  
RK,

Hope they do help. Are you installing the draft arms on the tractor's link pins 1st (i.e. both draft arms closest to center) then the attached spacer (with turnbuckle) then the short spacer? I'm not sure that it would appreciably change the distance from the link pins to the mower, all that much but, when I look at my manual it is some times hard to tell from the pictures which component is supposed to go on first. Draft arms on first is the best fit, for me. Putting them in the position that would make them the closest together at the link pins on the tractor appears to be where the draft arms belong.

As for leaving the 3PH parts on the attachment, I've found that the "I-Match" makes for convenient storage for the 3PH. Hanging it off the RB, in the pic, is a matter of convenience and keeps the parts up off the ground (still no barn /forums/images/graemlins/frown.gif). As for attaching, with the parts connected to the I-Match, it is pretty easy to line up and attach to the tractor. It still takes a bit of muscle power to move parts around and, I've been known to take a wooden or plastic head mallet to "persuade" parts to get to where they belong. I usually back up, slide one link pin in to attach a lower draft arm, lift arms, and top link, then, as needed, release the I-Match from the RB to attach the 2nd draft arm (this is where the mallet occasionally comes in /forums/images/graemlins/tongue.gif ). Seems to work for me. I used to take it all apart and hang the pieces in the shed before realizing I was wasting a lot of time when I could just leave it all hanging on the I-Match and RB, or Mower, or,...and only have to adjust the toplink for which ever 3PH implement I was going to use.

Let me know how it works out. Seems as though you must have some thing in the wrong place if your dimensions match mine.

Tom
 
   / 3PH Question
  • Thread Starter
#16  
Tom, You got it, a setup issue. Same draft arms as yours. I had the sway hitch too far inboard and didn't get enough leverage. The ops manual photos and the lack of text leave something to be desired as far as where to put that spacer. Also, the turnbuckles in the ops manual photos are set all the way to one end. But after taking the sway away from the 3PH, I've got about 4" of clearance to the tire with the cutter dropped to 6.5, and 1.5" of clearance with the cutter raised to rockshaft 10. And the draft arms are no longer rubbing on the inside of the tire. I took photos, but kept getting them rejected for size, so they're in the TBN gallery now. I'm going to go tackle some brush.

Thanks again.
 
   / 3PH Question #17  
Arcane,

Glad you got on right now. I agree that the photos leave a GREAT DEAL to be desired. I had similar quandries the first time I put the parts on...which link and spacer goes where and how tight to bring in the turnbuckles, just to set it up before final adjustment. Guess it's a good learning experience, maybe /forums/images/graemlins/tongue.gif

As for photos; If you run MS XP, you can open up "My Computer", go to the folder with the pic's, click on (single click) the pic you want to send. Mine has a menu on the left that has "E-mail this photo" (or something to that effect). If you click on it, it will ask if you want to minimize the photo (again, or something like that). If you say yes, it will shink it, open up your e-mail and attach it. You don't have to send it, just select the attached photo and save the smaller version. Usually will take a 1.3M file down to less than 100K. I save the pic's in a sub-folder named "Resized" and then select one of them when I want to post a pic. Learned this here from another TBN'er. Amazing all the info available here.

Happy mowing,

Tom
 

Tractor & Equipment Auctions

2019 CATERPILLAR 289D3 SKID STEER (A51246)
2019 CATERPILLAR...
2014 INTERNATIONAL MA025 26FT NON CDL BOX TRUCK (A52576)
2014 INTERNATIONAL...
Same Row Crop 85 (A50121)
Same Row Crop 85...
(1) HD 27ft x 24ft Full Garage Kit Metal Building Frame (A51573)
(1) HD 27ft x 24ft...
2019 FORD F-150 XL SINGLE CAB TRUCK (A51406)
2019 FORD F-150 XL...
BUYER'S PREMIUM INFO (A53084)
BUYER'S PREMIUM...
 
Top