Hi there,
I've been an occasional lurker on here for a while, so here goes for a LONG first post. I do not own any equipment, but several family members do and for better or worse I do lots of work on them. This weekend I offered to help with some spring changeovers and inadvertently got sucked into extensive - and in some cases very overdue - maintenance. When dealing with a problem I usually start here and extend my search a little wider if I can't find anything. I didn't come up with a lot on these issues anywhere so I thought I'd share and try to fill any gaps in the searchable tractorbynet knowledge repository!
F3680: stripped oil drain plug (Skip if only interested in filter story )
Short version: 12x1.25 stripped plug can be replaced by 1/2-20 plug subject to the guidance and provisos below. Attempt at own risk!
This all started with an offer to help switch the blower to the mower on a relatively recently acquired low-hour F3680. Naturally, we greased up the mower and I went to check the gear oil. "Huh?" goes tractor owner, "I didn't know there was oil in the mower". RTFM . Of course the previously used ride-on mower had none. Assumptions..... No big deal though as the oil was at the correct level, if a tad dirty as used gear oil usually looks. We swapped it out for the last bit of gear oil that was on hand. Overall though, I didn't get the warm fuzzy maintenance feeling and decided to push a bit further and check over the entire machine.
As I went to change the oil I noticed one of the drain plugs was a bit 'wet', usually the sign of a somewhat stripped plug. Sure enough, trying to tighten it (gently) to check, I was greeted with that unwelcome feeling of stripped threads. Of course the misses wanted the lawn mowed asap - that's what we were changing it over for after all - so I had to come up with something quickly!
I arrived at Napa 15 minutes before Saturday's noon closing and while they didn't have a 'plus size' 12x1.25 drain plug for a quick fix, looking through the case of replacement plugs it turns out that 1/2-20 is almost the same pitch and naturally slightly oversized (If you do the math, a 1.25 metric thread pitch equates to 20.32 threads per inch, while a 1/2 equals 12.7mm, and perhaps that's why they don't make over sized 12x1.25's???). I was pleasantly surprised that the plugs were only a couple bucks each, so I grabbed a regular 1/2-20, a plus sized 1/2-20 (one of those nasty self-tappers) and a 14x1.5 as backup should I need to drill and tap to the larger size. I also grabbed a 5 gallon pail of gear oil - super UDT is a bit dear for the steering differentials in these and larger machines.
I ended up running a 1/2-20 tap through, coated in grease to trap any filings, more or less as you would installing a timesert repair insert. It was pretty effortless going in, so I was nervous about what the result would be. If it was too loose I could throw in the oversized plug, but those are usually a very last resort for me and this one was particularly undesirable because it lacked the flanged head to mate with the copper washer! For the paranoid among you, even though there was almost no work being done by the tap - i.e. not many filings to speak of - I flushed half a gallon of some old but unused 15w40 through to be extra sure. A great use for one of those lingering jugs that you can't bring yourself to use on your beloved machinery but which seems wasteful to recycle!
The new plug went in with a bit more play/wiggle than I'd really want, but I was able torque it down properly and it's not going anywhere for now. In retrospect, and part of why I'm sharing this, I really should have just skipped the tap and threaded the new plug in as is. The new harder bolt would have acted as a forming tap (reshaping the threads rather than cutting away metal when there wasn't quite enough to begin with). I'm pretty sure the result would be stronger and faster to boot! If you want to be a real keener I guess you could actually pick up a forming tap as well. I didn't have one on hand :roll eyes:. For those keeping track, the proper bit size for 1/2-20 in aluminum is 29/64, which works out to 11.5mm, while for harder steel it's 15/32 or 11.9mm. In theory I should have at least 50% thread engagement though it feels like I didn't quite get there. 100% is never the goal, usually 75% for aluminum and down to 50% for hard steels, but that's for structural stuff! It goes without saying that drain plugs are oversized for speedy draining rather than absolute strength.
So there you have it. If you find yourself with a questionable 12x1.25 drain plug, a 1/2-20 replacement is a viable option and in an emergency is available just about anywhere they sell bolts! Is this a permanent fix? Maybe/Maybe not. I really think I would have been happier with the result had I not run the tap through or used a forming tap instead. As it is, I would not want to pull and retorque this bolt at each service for fear that the marginal thread engagement wouldn't hold up to the repeated abuse.
Going forward I have a few options: (1) use an oversized plug (assuming I can find a nicer one with a flange, or maybe even a piggyback version with a smaller internal drain plug); (2) drill and tap to a larger size; (3) drill and repair (i.e. timesert, etc); (4) install a 1/2-20 Fumoto drain valve quasi-permantly with the appropriate gap filling loctite; (5) do nothing and use the other plug - it is, after all, is a low-use home-owner machine anyways so not getting the last half-pint is really not a big deal because the oil is usually changed early anyways. Option #5 is where it stands now, and I put a big X "don't use" and "1/2-20" warning on the bottom of the pan with a corresponding checkmark and 12x1.25 on the other side with a paint pen.
Any thoughts on how you'd proceed if it was your machine?
For reference, here is a list of engines that use the 12x1.25 size: D600, D750, D850, D950, D1102, D1105, D1302, D1402, F2302, S2600, S2800, D1005, DF1005, V1100, V1502, V1702, V1902, V4300, ZB600C, Z400, Z500, Z751, Z851.
L48 TLB: 678 hour filters - horror or not?
Short version: Kubota makes (or specifies) some FINE filters!
After completing a bunch of other routine maintenance on the F3680, I turned my attention to the L48. This was also acquired relatively recently, and the owner dutifully bought pretty well every replacement filter for the machine when it was purchased. I had seen the two overflowing boxes full of Kubota filters in the tractor's bay and below them 3 or 4 5-gallon pails of Super UDT and a smattering of other Kubota brand oil; surely this tractor was being pampered, right? Best intentions I guess :laughing:
At this point I was working solo and going over the usual routine maintenance, along with an oil change and fluid checks. Pretty well everything looks okay, but when it came to checking the transmission/hydraulic oil, it's actually fairly low. I grabbed a half (or so) full pail of SUDT and start topping it up. Once I had dumped a couple gallons in and still wasn't full I figured there must be a leak. Crawling around I see some oil and trace it back to a grey filter. What's this? Checking the manual, I realize it's the HST filter, but how come it's grey? Also, one of the hydraulic filters has two large dents in it. There's even a bit of rust visible where the dent on the filter caused the paint to crack. This ISN'T a recent occurrence. Both hydraulic filters were also grey. Could these be the original filters? You bet!
Bewildered, I run over the the tractor's home bay and look at the filters. Sure enough there are two sets of everything boxed, plastic wrapped and NOT ON THE TRACTOR! To be fair to the owner, very few hours have been put on the machine. The neglect falls mainly on the previous owner. I don't have all the background info and frankly don't care, but that's not cool either way! What about all the pails of UDT you say? The owner said it's had a very slow leak and that it's always topped up. I guess he was planning on changing it at some point :roll eyes:.
 IF YOU HAVE A LEAK, FIND IT. I've had old cars with leaky rear main seals, and even newer Subaru's with slow external head gasket leaks (i.e. leaking outside and not to coolant). Nothing wrong with a very slow leak you know about and can monitor, but blindly dumping fluid it is a bad idea. Particularly here because said oil leak was just a filter that was slightly loose; a filter apparently destined to be neglected and apparantly crying for attention :confused2:.
So between the owner topping up for leaks and my recent top-up, we've pretty well changed the 51 litres of SUDT on the tractor already. Here I am with this thing sitting almost full of nearly new oil with these nasty old filters. I decided to swap in new filters (without changing oil yet or running the machine really, just to 'plug the holes' really) and then dissect the filters to see what we're dealing with. Unfortunately I didn't document the whole process. I guess I was too curious!
Now anyone that has done a 50 hour service will remember the factory grey filters. But some may also remember that Kubota at one time had some grey replacement filters. I don't think that these are replacement filters, but I'd be delighted to be proven wrong! Any takers?
Starting with the dented filter, note that it was not actually dented this badly and got much worse as I fought it to cut open. I cut the HST filter first with a hack saw, but it was a really PITA being so thick, yet at the same time not thick enough to withstand adequate pressure from the vise and therefore slipping around constantly. I got lazy on the second one, but the dents made it too sketchy to cut with a hack saw on the lathe and the safest feeling tool was a cut-off-stand-mounted portable bandsaw. Some cursing, an aborted first cut and decent sized pry bar later, I had it apart! Of course ignore the cuts/damage that are obviously from the bandsaw.

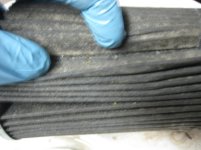
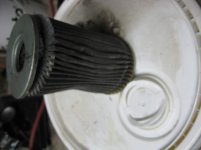
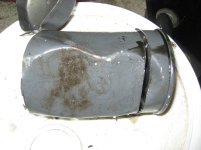
Surprisingly good looking, right? This is the worst of the three. Even the dents didn't really do much harm! For each filter I've tried to grab an average pic and a 'worst' pic, showing as much crap as possible. Beyond that, inside the filter housing was one little chunk of solidified RTV, but nothing else to note. On to the second hydraulic filter, it's much the same, though this one had a sliver of plastic in addition to another small chunk of RTV.

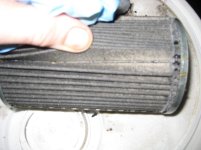
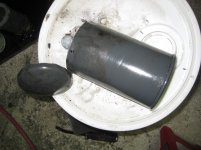
Moving on to the HST filter, it too was remarkably clean. Is it normal that it doesn't have the magnet sometimes found on the factory filter? Could this be an indication that something else is going on?
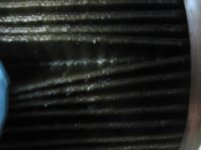
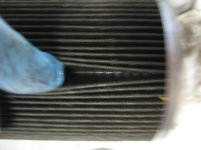
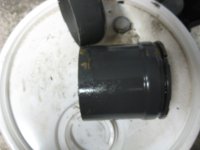
I took some videos as well, but I think I'm going to try to take a single video with a little tripod or something because it's not a clear as it could be.
Overall, I've got to say I'm impressed with the Kubota filters. I've seen some pretty mangled oil filters on vehicles where you replace the filter element only. I've never cut one apart before so I don't have a lot else to compare with though. The most reassuring thing is that even if the metal fragments aren't a great sign, the filter media was all completely intact without any signs of degrading at all.
Before someone suggests it, I've already replaced everything else on the tractor (coolant, 8 litres of gear oil into the front diff!, fuel/air filters, etc.). The fuel and air filters were very almost spotless so I really had to convince myself not to reuse them assuming they were also not serviced. The only thing I haven't done is the transmission strainer. At first this was because it was an absolute pain to break loose. For one, it's a 26mm bolt covered in paint. I have way more tools than just about everyone I know, but the location of this was such that only a wrench would fit, not a socket. I don't have a 26mm wrench! I was able to get a couple cheaper (read looser) 1" wrenches on nice and tight, but couldn't quite get enough leverage with a standard combination wrench with too much offset. In other words, having a standard 26mm combination wrench wouldn't have worked! (the tool guy in me still think the experience justifies buying one now...:thumbsup
After digging through old tools I found a nice old rusted split/closed wrench that had the 15/16 end broken off and the perfect offset. I had to hammer it on to knock of the paint and 'pair' the two together. I got the tractor up a few feet in the air with the hydraulics and supported underneath with some 12 ton jack stands. Then I leaned into it with a three foot cheater bar that fit perfectly onto the broken end of the wrench. Once it gave I was absolutely sure it was the wrench and not the strainer that had broken free... until it started pissing oil on my arm (pan was ready)! I tightened it back to stop the draining and that's where I'm at now.
So, how to proceed? As a starting point I was thinking draining the fluid (as much as it pains me) and cleaning the strainer followed by new fluid. The machine's earned it, right? Anything else you think I should be addressing while the fluid is out?
I've been an occasional lurker on here for a while, so here goes for a LONG first post. I do not own any equipment, but several family members do and for better or worse I do lots of work on them. This weekend I offered to help with some spring changeovers and inadvertently got sucked into extensive - and in some cases very overdue - maintenance. When dealing with a problem I usually start here and extend my search a little wider if I can't find anything. I didn't come up with a lot on these issues anywhere so I thought I'd share and try to fill any gaps in the searchable tractorbynet knowledge repository!
F3680: stripped oil drain plug (Skip if only interested in filter story )
Short version: 12x1.25 stripped plug can be replaced by 1/2-20 plug subject to the guidance and provisos below. Attempt at own risk!
This all started with an offer to help switch the blower to the mower on a relatively recently acquired low-hour F3680. Naturally, we greased up the mower and I went to check the gear oil. "Huh?" goes tractor owner, "I didn't know there was oil in the mower". RTFM
As I went to change the oil I noticed one of the drain plugs was a bit 'wet', usually the sign of a somewhat stripped plug. Sure enough, trying to tighten it (gently) to check, I was greeted with that unwelcome feeling of stripped threads. Of course the misses wanted the lawn mowed asap - that's what we were changing it over for after all - so I had to come up with something quickly!
I arrived at Napa 15 minutes before Saturday's noon closing and while they didn't have a 'plus size' 12x1.25 drain plug for a quick fix, looking through the case of replacement plugs it turns out that 1/2-20 is almost the same pitch and naturally slightly oversized (If you do the math, a 1.25 metric thread pitch equates to 20.32 threads per inch, while a 1/2 equals 12.7mm, and perhaps that's why they don't make over sized 12x1.25's???). I was pleasantly surprised that the plugs were only a couple bucks each, so I grabbed a regular 1/2-20, a plus sized 1/2-20 (one of those nasty self-tappers) and a 14x1.5 as backup should I need to drill and tap to the larger size. I also grabbed a 5 gallon pail of gear oil - super UDT is a bit dear for the steering differentials in these and larger machines.
I ended up running a 1/2-20 tap through, coated in grease to trap any filings, more or less as you would installing a timesert repair insert. It was pretty effortless going in, so I was nervous about what the result would be. If it was too loose I could throw in the oversized plug, but those are usually a very last resort for me and this one was particularly undesirable because it lacked the flanged head to mate with the copper washer! For the paranoid among you, even though there was almost no work being done by the tap - i.e. not many filings to speak of - I flushed half a gallon of some old but unused 15w40 through to be extra sure. A great use for one of those lingering jugs that you can't bring yourself to use on your beloved machinery but which seems wasteful to recycle!
The new plug went in with a bit more play/wiggle than I'd really want, but I was able torque it down properly and it's not going anywhere for now. In retrospect, and part of why I'm sharing this, I really should have just skipped the tap and threaded the new plug in as is. The new harder bolt would have acted as a forming tap (reshaping the threads rather than cutting away metal when there wasn't quite enough to begin with). I'm pretty sure the result would be stronger and faster to boot! If you want to be a real keener I guess you could actually pick up a forming tap as well. I didn't have one on hand :roll eyes:. For those keeping track, the proper bit size for 1/2-20 in aluminum is 29/64, which works out to 11.5mm, while for harder steel it's 15/32 or 11.9mm. In theory I should have at least 50% thread engagement though it feels like I didn't quite get there. 100% is never the goal, usually 75% for aluminum and down to 50% for hard steels, but that's for structural stuff! It goes without saying that drain plugs are oversized for speedy draining rather than absolute strength.
So there you have it. If you find yourself with a questionable 12x1.25 drain plug, a 1/2-20 replacement is a viable option and in an emergency is available just about anywhere they sell bolts! Is this a permanent fix? Maybe/Maybe not. I really think I would have been happier with the result had I not run the tap through or used a forming tap instead. As it is, I would not want to pull and retorque this bolt at each service for fear that the marginal thread engagement wouldn't hold up to the repeated abuse.
Going forward I have a few options: (1) use an oversized plug (assuming I can find a nicer one with a flange, or maybe even a piggyback version with a smaller internal drain plug); (2) drill and tap to a larger size; (3) drill and repair (i.e. timesert, etc); (4) install a 1/2-20 Fumoto drain valve quasi-permantly with the appropriate gap filling loctite; (5) do nothing and use the other plug - it is, after all, is a low-use home-owner machine anyways so not getting the last half-pint is really not a big deal because the oil is usually changed early anyways. Option #5 is where it stands now, and I put a big X "don't use" and "1/2-20" warning on the bottom of the pan with a corresponding checkmark and 12x1.25 on the other side with a paint pen.
Any thoughts on how you'd proceed if it was your machine?
For reference, here is a list of engines that use the 12x1.25 size: D600, D750, D850, D950, D1102, D1105, D1302, D1402, F2302, S2600, S2800, D1005, DF1005, V1100, V1502, V1702, V1902, V4300, ZB600C, Z400, Z500, Z751, Z851.
L48 TLB: 678 hour filters - horror or not?
Short version: Kubota makes (or specifies) some FINE filters!
After completing a bunch of other routine maintenance on the F3680, I turned my attention to the L48. This was also acquired relatively recently, and the owner dutifully bought pretty well every replacement filter for the machine when it was purchased. I had seen the two overflowing boxes full of Kubota filters in the tractor's bay and below them 3 or 4 5-gallon pails of Super UDT and a smattering of other Kubota brand oil; surely this tractor was being pampered, right? Best intentions I guess :laughing:
At this point I was working solo and going over the usual routine maintenance, along with an oil change and fluid checks. Pretty well everything looks okay, but when it came to checking the transmission/hydraulic oil, it's actually fairly low. I grabbed a half (or so) full pail of SUDT and start topping it up. Once I had dumped a couple gallons in and still wasn't full I figured there must be a leak. Crawling around I see some oil and trace it back to a grey filter. What's this? Checking the manual, I realize it's the HST filter, but how come it's grey? Also, one of the hydraulic filters has two large dents in it. There's even a bit of rust visible where the dent on the filter caused the paint to crack. This ISN'T a recent occurrence. Both hydraulic filters were also grey. Could these be the original filters? You bet!
Bewildered, I run over the the tractor's home bay and look at the filters. Sure enough there are two sets of everything boxed, plastic wrapped and NOT ON THE TRACTOR! To be fair to the owner, very few hours have been put on the machine. The neglect falls mainly on the previous owner. I don't have all the background info and frankly don't care, but that's not cool either way! What about all the pails of UDT you say? The owner said it's had a very slow leak and that it's always topped up. I guess he was planning on changing it at some point :roll eyes:.
So between the owner topping up for leaks and my recent top-up, we've pretty well changed the 51 litres of SUDT on the tractor already. Here I am with this thing sitting almost full of nearly new oil with these nasty old filters. I decided to swap in new filters (without changing oil yet or running the machine really, just to 'plug the holes' really) and then dissect the filters to see what we're dealing with. Unfortunately I didn't document the whole process. I guess I was too curious!
Now anyone that has done a 50 hour service will remember the factory grey filters. But some may also remember that Kubota at one time had some grey replacement filters. I don't think that these are replacement filters, but I'd be delighted to be proven wrong! Any takers?
Starting with the dented filter, note that it was not actually dented this badly and got much worse as I fought it to cut open. I cut the HST filter first with a hack saw, but it was a really PITA being so thick, yet at the same time not thick enough to withstand adequate pressure from the vise and therefore slipping around constantly. I got lazy on the second one, but the dents made it too sketchy to cut with a hack saw on the lathe and the safest feeling tool was a cut-off-stand-mounted portable bandsaw. Some cursing, an aborted first cut and decent sized pry bar later, I had it apart! Of course ignore the cuts/damage that are obviously from the bandsaw.


Surprisingly good looking, right? This is the worst of the three. Even the dents didn't really do much harm! For each filter I've tried to grab an average pic and a 'worst' pic, showing as much crap as possible. Beyond that, inside the filter housing was one little chunk of solidified RTV, but nothing else to note. On to the second hydraulic filter, it's much the same, though this one had a sliver of plastic in addition to another small chunk of RTV.


Moving on to the HST filter, it too was remarkably clean. Is it normal that it doesn't have the magnet sometimes found on the factory filter? Could this be an indication that something else is going on?


I took some videos as well, but I think I'm going to try to take a single video with a little tripod or something because it's not a clear as it could be.
Overall, I've got to say I'm impressed with the Kubota filters. I've seen some pretty mangled oil filters on vehicles where you replace the filter element only. I've never cut one apart before so I don't have a lot else to compare with though. The most reassuring thing is that even if the metal fragments aren't a great sign, the filter media was all completely intact without any signs of degrading at all.
Before someone suggests it, I've already replaced everything else on the tractor (coolant, 8 litres of gear oil into the front diff!, fuel/air filters, etc.). The fuel and air filters were very almost spotless so I really had to convince myself not to reuse them assuming they were also not serviced. The only thing I haven't done is the transmission strainer. At first this was because it was an absolute pain to break loose. For one, it's a 26mm bolt covered in paint. I have way more tools than just about everyone I know, but the location of this was such that only a wrench would fit, not a socket. I don't have a 26mm wrench! I was able to get a couple cheaper (read looser) 1" wrenches on nice and tight, but couldn't quite get enough leverage with a standard combination wrench with too much offset. In other words, having a standard 26mm combination wrench wouldn't have worked! (the tool guy in me still think the experience justifies buying one now...:thumbsup
After digging through old tools I found a nice old rusted split/closed wrench that had the 15/16 end broken off and the perfect offset. I had to hammer it on to knock of the paint and 'pair' the two together. I got the tractor up a few feet in the air with the hydraulics and supported underneath with some 12 ton jack stands. Then I leaned into it with a three foot cheater bar that fit perfectly onto the broken end of the wrench. Once it gave I was absolutely sure it was the wrench and not the strainer that had broken free... until it started pissing oil on my arm (pan was ready)! I tightened it back to stop the draining and that's where I'm at now.
So, how to proceed? As a starting point I was thinking draining the fluid (as much as it pains me) and cleaning the strainer followed by new fluid. The machine's earned it, right? Anything else you think I should be addressing while the fluid is out?
