72 7-Iron MMM Removal Aid

   / 72 7-Iron MMM Removal Aid #1  

Killer_B

Platinum Member
Joined
Sep 24, 2004
Messages
586
Location
Kalamazoo Michigan
Tractor
John Deere 3320
The most cumbersome part of removing this mower deck, in my opinion, is lowering the front anti-scalp wheels. In order to do this, you have to put the two spacers that are above the carrier under it. In order to do that, the wheels have to be removed completely from the carriers. And you can't do that very easily, because the deck does not lift high enough. I did find ways to do it, but it seemed harder than it should be.

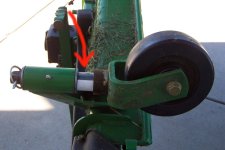
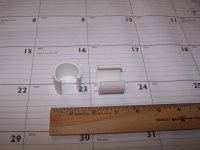
My solution was to cut a couple spacers from schedule 40 PVC pipe. This stuff is 1 1/4" OD. I cut it to be about as long as the two spacers stacked together, and cut a notch lengthwise. Now I just remove the two upper spacers, lower the gauge wheels and install these spacers below the carrier. Viola! Much easier.

The attached photos do a better job of describing this than I do.

PS: I use the moweraxle.com storage wheels on this deck, and they work great.
 

Attachments

  • spacers.jpg
    spacers.jpg
    201 KB · Views: 516
  • in place.jpg
    in place.jpg
    158.7 KB · Views: 485
   / 72 7-Iron MMM Removal Aid #2  
Cool! Looks like a $10.00 "custom" part on Ebay to me:D
 
   / 72 7-Iron MMM Removal Aid #5  
I did the 4X4 under the front wheel, lowered the deck onto it, unhooked the front bracket, removed the 4X4. your way may be easier. I will try it that way next time. Great idea! Bump!
 
   / 72 7-Iron MMM Removal Aid #6  
After first struggling with removal of the 72" MMM I finally found a way to remove the deck without spacers or blocks (I did use the block system when I first got the mower). My technique is this. First, raise the deck and rotate the wheels 90 degrees. The front caster spacers do not have to be shifted. I have an index mark on the depth adjustment knob. I rotate the knob counter-clockwise 6 turns. This allows the deck to rest on the wheels with all linkage loose when the deck is lowered. Of course, the front wheels of the tractor must be cut all the way left. Then the rear turnbuckles, front linkage, and the draft arms can be disconnected. I have a gravel floor in my machine shed, so I use OSB boards to place under the deck. If part of the deck interferes with the bottom of the tractor when I pull the deck out, I use one of the casters to steer the deck around the interference.I can remove the deck in about 9-10 minutes, with replacement taking 4 or 5 minutes more.
 
   / 72 7-Iron MMM Removal Aid #7  
I mow between 4-5 acres a season and have changed and sharpened the blades three times thus far this year. The blades are ready for the fourth now. On my 2520 I have a 72"mmm and have made this project no sweat. Here is the secret...if you have a loader, leave it on and use it.
If you have the loader on, with just the arms or the bucket too (it doesn't matter) follow these steps:

1. Lower the loader all the way to the ground, then keep pushing the joystick forward, raising the front tires right off of the ground (do not jamb the joystick forward as this will place the loader in the float position and will not lift the front end). Once the front end is airborne, lock the parking break. Oh yeah, if you have any touchy feely friends over tell them you'll break their fingers if they touch anything at this point especially the joystick! Also do not ever put yourself under the machine...period.

2. Turn the tires all the way to the left.

3. Turn the four wheels of the mower deck perpendicular to the rear tires.

4. De-tatch the linkage and roll the deck out. You shouldn't even need spacers. Who wants to put those in and get all greasy any way??

5. If you have trouble with the front linkage because the loader is in your way, simply start the tractor, lower the front wheels gently, raise the loader up and out of your way and de-tatch the front linkage. Then, lower the loader or arms back down, make the front end airborne again and turn the wheels left again if you moved them. Re-engage the parking break and remove the deck.

There are so many ways to skin a cat...everyone on this site is great and would love to hear how others have found easier ways too! My method works very well for me, but if there is an easier way I'm all ears!:D
 
   / 72 7-Iron MMM Removal Aid #8  
Hi:

I agree the 72" MMM is a pain to remove and install - I recently switched to an 84" RFM due to the pain.

Mine is on a 3720 and you don't have to remove the wheels to flip the
spacers. Unless they changed the design and I have the new one. -
The vertical axle shaft has two slots ground in it just above bottom on the wheels. You simply let the wheel drop (After taking out the pin), pull the bottom spacer up maybe 3/8" of an inch, turn it and it'll slide right off the verticle shaft. No need to completely remove the wheel. If you notice the spacers have a slot in them. This is the same width as the slot ground in the
vertical shaft.

Now, on my 84" RFM the spacers have no slot so I need to lift it and completely unbolt the wheel to adjust it.
 
   / 72 7-Iron MMM Removal Aid
  • Thread Starter
#9  
orlo said:
Hi:

I agree the 72" MMM is a pain to remove and install - I recently switched to an 84" RFM due to the pain. .

Hey, that's cheating.
 

Tractor & Equipment Auctions

John Deere 310K Backhoe (A51573)
John Deere 310K...
New Land Honor Heavy Duty Plate Compactor (A53002)
New Land Honor...
2021 Delta Redirective Crash Cushion 75000 (A51692)
2021 Delta...
John Deere Z915E Zero Turn (A51573)
John Deere Z915E...
2010 Ford Edge SE SUV (A51694)
2010 Ford Edge SE...
PLEASE CHECK BACK!!! ITEMS BEING ADDED DAILY!!!! (A50775)
PLEASE CHECK...
 
Top