Added TNT to my 5225...

   / Added TNT to my 5225... #1  

bjcsc

Platinum Member
Joined
Feb 20, 2007
Messages
559
Location
Johns Island, SC
Tractor
JD 5225, JD 555B, JD 333E, JD 225DLC
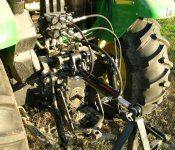
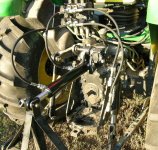
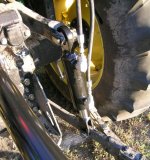
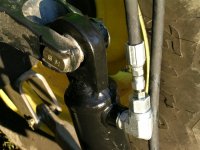
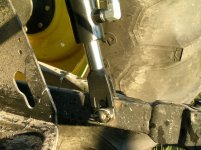
Well, after much planning I have finally finished my TNT for my 5225. I designed my own around two 2 1/2" cylinders. On the longer (2.5x12x1.5) for the toplink, I had to modify it by cutting the swivel ball off of the tube and shimming it out 3/4" so it would clear my top link bracket. I welded it back on so the ports were on the side when in place for easier hose routing (it came with them on the top/bottom). On the shorter (2.5x6x1.5) for the side link, I cut of both of the swivel balls that came on the cylinder. I ordered replacement OE link ends from JD and cut them down to the lengths I needed to make it work and welded them to the tube and rod. This way I still have the floating position on the lower fitting (which I use a lot - esp. bush-hogging) and the right profile ball for the top, and I still have the original manually adjustable side link intact. My side link is level at the center of a 6" stroke. The hoses are all 1/4" 5000PSI and each cylinder has a .05" diameter restricting fitting in the extend plumbing that makes it very controllable and micro-adjustable. I did not need DPOCVs as my valves have checks.

Anyway, so when do I get my TNT club hat and t-shirt?:D

PS.
For the safety police: my PTO guard is removed because I was using my boom flail mower and it's check chains interfere with it.

For the tractor waxers: If I had time to keep it shiny I wouldn't need a tractor;)
 

Attachments

  • OAV Center.JPG
    OAV Center.JPG
    176.6 KB · Views: 308
  • OAV Left.JPG
    OAV Left.JPG
    213.4 KB · Views: 268
  • OAV Right.JPG
    OAV Right.JPG
    242.1 KB · Views: 256
  • Side Link.JPG
    Side Link.JPG
    223.2 KB · Views: 245
  • Top of Sidelink.JPG
    Top of Sidelink.JPG
    129 KB · Views: 235
  • Bottom of Sidelink.JPG
    Bottom of Sidelink.JPG
    156 KB · Views: 231
   / Added TNT to my 5225... #2  
Good Job. Hydraulic top links make life so much easier.
 
   / Added TNT to my 5225... #3  
Ok bj, you get the hat but not the t-shirt.
You have to have 2 hydraulic side links for that....just kidding man. Your set up is very clean and you sure did a nice job with the cylinders mods. Now just wait until you start using it. You've just made everything easier. Even hooking up will be a little easier, let alone all the adjusting on fly you can do.
In fact, you may never have to get off the tractor again.:D
 
   / Added TNT to my 5225...
  • Thread Starter
#4  
Thanks Rob. I am really looking forward to using it and I sure won't miss that manual side link adjuster! This is one of three tractor projects I'm working on and this one is done. The other two are a hydraulic FEL mounted brush cutter and a 3pt. auxilliary hydraulic setup to run it (20GPM @ 3000PSI). The latter will be done first. You've inspired me - I'm out of control...;)
 
   / Added TNT to my 5225... #5  
Very nice job. As Rob mentioned, I can stand behind my tractor and reach up to operate the remotes while attaching implements. I never struggle anymore with getting everything in position because of TNT and my adjustable link ends. Also, when I installed my HSL, I took the manual link and moved it to the left side. Can you do that on your tractor?
 
   / Added TNT to my 5225...
  • Thread Starter
#6  
Thanks. Yeah, I can put the manual on the other side. That's one of the reasons I wanted to keep it intact vs. cutting it's ends down for the cylinder. I figure if I ever get in a situation where I need more angle I can get it by swapping it in. (Although I suppose it makes more sense to go ahead and have it in place). I never have hookup troubles. Telescopic link ends are the cat's meow! For the top link, I just push my remote through to float and I can pull/push the rod at will. I can't reach the remotes from the rear (without climbing), but I have position switches on the rear of my left fender and all of my rear SCVs float. I'm very pleased with how it came out!
 
   / Added TNT to my 5225... #7  
BJCsc how did you weld the ends on without damaging the seals inside the cylinder from excessive heat? did you use 7018 or 6011 rods, very nice job.agh
 
   / Added TNT to my 5225...
  • Thread Starter
#8  
Hey. Sorry, just saw you had posted a question. I MIG welded the ends on with our big shop MIG. I was initially going to to take the cylinders apart, but decided I would try it without disassembling as the worse case scenario would be having to disassemble it to replace the seals. I figured I could try and save a step. So I filled the cylinders with hydraulic fluid by using a funnel in the ports and using the rod like a syringe (cap end in a vise). When full, I had the rod fully extended. I then welded on the rod ends and I had two wet towels. I had one towel wrapped around the rod about 6 inches away from where I was welding. After welding, I would leave one towel on until it got warm, then replace it with the second and I kept doing this until I could hold onto the rod ( about 10 minutes or so). I left the rod fully extended and then welded the cap side, repeating the towel procedure about 6" away on the tube. Thanks for the compliment...
 

Tractor & Equipment Auctions

2004 Stage Line SL-250 Mobile Folding Stage Trailer (A50322)
2004 Stage Line...
Toro Workman Utility Cart (A51694)
Toro Workman...
2014 KENWORTH T680 (A52472)
2014 KENWORTH T680...
(INOP) VOLVO L70H WHEEL LOADER (A51243)
(INOP) VOLVO L70H...
2014 Chevrolet Impala Limited Sedan (A51694)
2014 Chevrolet...
2015 FORD F-450 SERVICE TRUCK (A52472)
2015 FORD F-450...
 
Top