jrdepew
Silver Member
I have noticed that if I have my FEL packed to the max and go down some of the hills on my property, the back wheels will start to skid a little instead of gripping like they should. I have the tires filled partially, and am going to finish that ASAP, but a ballast barrel is going to help too. I got most of the ideas off the forum here, including the 2.5" PVC to hold tools. I have 4 PVC tubes.
The main structure is 2x2x.120 wall steel tubing. This was welded into an "L" shape, and then a 2" receiver from HF was welded onto that, protruding form the barrel. There is a 1.25" 0.120" wall piece of tube going through the barrel and the main "L" structure as well. This allows a 7/8" piece of 1045 steel to be inserted through the tubing to connect the 3pt arms. I figured this was a little less permanent should something happen to the 7/8" rod, although I do foresee anything.

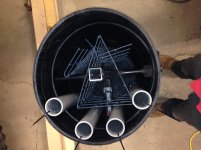
I also made a cage around this structure out of extra goat panel that I had, which is welded wire mesh about 3/16" in diameter. This also gave me a support for the PVC tubes until the concrete is poured:

I stuck some of my extra goat panel and some scrap steel in there as well. We grow rocks here in upstate NY, so some rocks will probably get placed in during the pour as well, along with any other scrap steel I find in my garage. I did a quick paint job, and that is where I am at now, waiting to do the pour. I filed off some sharp edges and caulked the openings so water/crete doesn't run out during the pour.
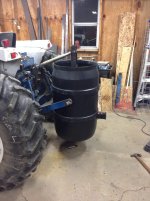
If you notice, the top of the "L" shape doesn't come above the edge of the barrel. I did this on purpose, and am building a bolt on section to attach the top-link. Anyone who has build a ballast barrel knows that the barrel is too tall to have a proper toplink attachment without barrel modification, so I built a bracket that raised my toplink as well. I can unbolt the bracket and run the ballast barrel without a toplink, allowing me to put a lid on it if the weather gets nasty and I still want the barrel on The geometry can be seen here:

At full height lift, the edge of the bucket just brushes the top link, so I should have no issues with bending the toplink. I have a friend who recently set up a CNC plasma cutter table. If this all works as I want I may have him cut a bracket with a bunch of toplink attachment holes to replace the factory bracket. Would be nice and easy to fab up.
I posted this before I poured the concrete in case anyone had some good suggestions that I missed. I thought about a chainsaw scabbard, but I don't really bring this into the woods and I only have 3.5 acres or so, so no real need for a saw holder. The level of the concrete will be below the top of the bucket, right about to where the bucket flares inward to narrow down near the top. This will give me plenty of room for chains and tool storage in the top of the barrel. I am thinking I will need close to 10 80lb bags for the pour, which should lock everything in tight and give me close to 900lbs when it is all said and done.
Pretty simple build, and gave me some practice with my stick welder, as all my projects were done using a MIG before this.
Let me know what you think...I hope to pour the concrete this weekend!
-Joe
The main structure is 2x2x.120 wall steel tubing. This was welded into an "L" shape, and then a 2" receiver from HF was welded onto that, protruding form the barrel. There is a 1.25" 0.120" wall piece of tube going through the barrel and the main "L" structure as well. This allows a 7/8" piece of 1045 steel to be inserted through the tubing to connect the 3pt arms. I figured this was a little less permanent should something happen to the 7/8" rod, although I do foresee anything.

I also made a cage around this structure out of extra goat panel that I had, which is welded wire mesh about 3/16" in diameter. This also gave me a support for the PVC tubes until the concrete is poured:

I stuck some of my extra goat panel and some scrap steel in there as well. We grow rocks here in upstate NY, so some rocks will probably get placed in during the pour as well, along with any other scrap steel I find in my garage. I did a quick paint job, and that is where I am at now, waiting to do the pour. I filed off some sharp edges and caulked the openings so water/crete doesn't run out during the pour.
If you notice, the top of the "L" shape doesn't come above the edge of the barrel. I did this on purpose, and am building a bolt on section to attach the top-link. Anyone who has build a ballast barrel knows that the barrel is too tall to have a proper toplink attachment without barrel modification, so I built a bracket that raised my toplink as well. I can unbolt the bracket and run the ballast barrel without a toplink, allowing me to put a lid on it if the weather gets nasty and I still want the barrel on The geometry can be seen here:

At full height lift, the edge of the bucket just brushes the top link, so I should have no issues with bending the toplink. I have a friend who recently set up a CNC plasma cutter table. If this all works as I want I may have him cut a bracket with a bunch of toplink attachment holes to replace the factory bracket. Would be nice and easy to fab up.
I posted this before I poured the concrete in case anyone had some good suggestions that I missed. I thought about a chainsaw scabbard, but I don't really bring this into the woods and I only have 3.5 acres or so, so no real need for a saw holder. The level of the concrete will be below the top of the bucket, right about to where the bucket flares inward to narrow down near the top. This will give me plenty of room for chains and tool storage in the top of the barrel. I am thinking I will need close to 10 80lb bags for the pour, which should lock everything in tight and give me close to 900lbs when it is all said and done.
Pretty simple build, and gave me some practice with my stick welder, as all my projects were done using a MIG before this.
Let me know what you think...I hope to pour the concrete this weekend!
-Joe

