Thumb Backhoe Thumb Installation

   / Backhoe Thumb Installation #1  

hayden

Veteran Member
Joined
Sep 23, 2000
Messages
2,271
Location
VT
Tractor
Kubota L5740 cab + FEL, KX121, KX080
A number on months ago I bought a thumb for my backhoe, and finally got around to installing it this past weekend.

The Thumb is from Rankin Equipment, and is the smallest model they make. It seems to fit well on my 7 1/2' Kubota 4690 BH.

This picture is is thumb before installation.
 

Attachments

  • 447802-DSCN2339w.jpg
    447802-DSCN2339w.jpg
    65.2 KB · Views: 1,846
   / Backhoe Thumb Installation
  • Thread Starter
#2  
Here's another shot of the thumb welded to the dipper stick. I do not have a career as a welder - that's for sure. At the same time, my litle Hobart welder did a pretty good job.
 

Attachments

  • 447804-DSCN2342w.jpg
    447804-DSCN2342w.jpg
    83.9 KB · Views: 1,393
   / Backhoe Thumb Installation
  • Thread Starter
#3  
Here it is all together with the mounting base painted to match the tractor BH color. After LOTS of grinding and with the camera at a healthy distance, my weld joint doesn't look too bad (ignore the pock marks).
 

Attachments

  • 447806-DSCN2344w.jpg
    447806-DSCN2344w.jpg
    71.1 KB · Views: 2,260
   / Backhoe Thumb Installation #4  
Nice looking thumb. Looks very well built. How much did you have to give for it?

/forums/images/graemlins/smile.gif
 
   / Backhoe Thumb Installation
  • Thread Starter
#5  
It was around $450 with shipping. It is quite beefy, yet I managed to bend it already, however it was totally my fault. I lifted a VERY large, long rock from one end, and it twisted as I lifted bending one of the tooth points. I'm luck I didn't do more damage. Stupid move on my part.

Lesson: Always lift something from it's center so it's balanced.

That said, the thumb is great. It's another one of those "I can't believe I waited so long to do this" attachments. I picked and plicked a number of rocks, stumps, and other crap. Very handy.
 
   / Backhoe Thumb Installation #6  
Re: Backhoe Thumb Installation *DELETED*

Post deleted by Junkman
 
   / Backhoe Thumb Installation #7  
<font color="blue">You can do my welding anytime..</font>
Looks fine to me, you should see mine. It is not pretty(mine), but it holds. I need to show some homemade stuff, one of these days.
 
   / Backhoe Thumb Installation #8  
Just built a thumb for my bradco 509, I used 3/4" T1 steel for the claws, when I welded it up it changed the alignment on the main pin, so I tried a 20 ton jack to realign it, did'nt even phase it. I finnaly ended up heating it for over 1/2hr to a dull red and applied 12 tons of force on press to get it back-- wondering how big that rock was to bend the claw /forums/images/graemlins/confused.gif
 
   / Backhoe Thumb Installation #9  
How about adding a picture or two? I also have a model 509 and would like to see how you attached yours. Did you attach the claws to the linkage pins or ??. Thanks
 
   / Backhoe Thumb Installation #10  
Sorry, no digital camera, can't post pictures--
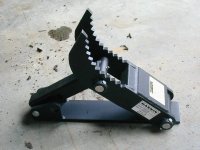
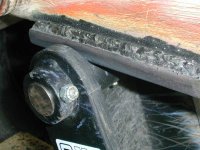
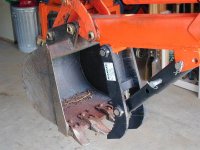
But I can explain what I did, my 509 came with thumb mounts welded to the dipper, only problem was bradco wants $820 for the fixed thumb and over $1500 for the hydrulic one, not exactly cheap but very well built. No other thumb will work with it because its set up to piviot on the main bucket pin. What I did was ordered the main pin from bradco (1 3/8" x 15" cost $35) and turned some T-bushings on my lathe to reduce the pin diameter on the leg mount thats welded on dipper, 1 3/8" to 1". bradcos fixed thumb has a folding leg, after thinking about it I decided to use a telescopic leg-that way I could get the strength of the fixed leg and the adjustabilty of the hydraulic leg, so what I used was some 2" square tube sliding in 2 1/2" tube, and drilled holes to allow different lengths on the leg, I welded 2"x 1" seamless tube(not cheap), to the ends of the square tube, this leg weighs 33#.

For the claw , my son was going to a welding trade school, I made a pattern on black poster board and took it to his school, they had this plazma cutter that followed my pattern and we cut the side plates out of 3/4" T1-- very cool to watch this. I then turned some 2 1/2"x 1 3/8" bushings to go on the bucket end of thumb, pared up the plates and drilled 1 3/8" and 1 1/2" holes for the pivot pin and main support rod (no easy task thru 1 1/2"of T1 steel) welded claws to 1 1/2" rod, welded 1/2" gusset plate from 1 1/2" rod to sides, fab 1/2" contour tabs with 1" holes for leg and storage, straighten after welding sand blast and paint------

This was no easy project , but was a good father son project, and kept him interested in school /forums/images/graemlins/smile.gif

After typing all this I see where " A PICTURE IS WORTH A THOUSAND WORDS " /forums/images/graemlins/crazy.gif

Probably need to get a digital camera, I work on consumer electronc equipment--- just hate how they ladder joe consumer thru all the latest and greatest toys only to be outdated in no time- it is planned that way /forums/images/graemlins/mad.gif


Tractor & Equipment Auctions

2016 Chevrolet Colorado Crew Cab Pickup Truck (A46684)
2016 Chevrolet...
2016 Chevrolet Caprice Sedan (A46684)
2016 Chevrolet...
3128 (A46502)
3128 (A46502)
Massey Ferguson 175 Front Loader Utility Tractor (A45336)
Massey Ferguson...
Mohawk 2-Post Hydraulic Auto Lift (A44571)
Mohawk 2-Post...
2007 John Deere 4320 Cab 4wd (A48561)
2007 John Deere...
 
Top