Bale Spear

/ Bale Spear #1  

Brad_Blazer

Veteran Member
Joined
Aug 19, 2004
Messages
1,927
Location
Caldwell Co. NC
Tractor
2006 Kama554; 92 Belarus 250AS
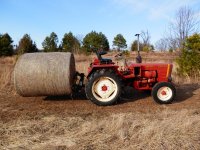
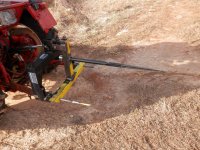
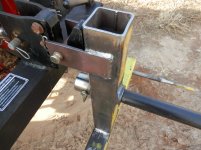
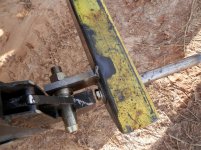
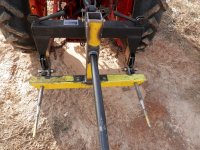
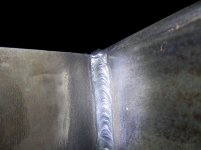
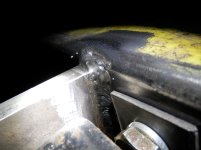
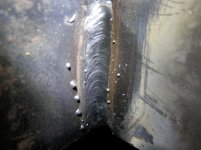
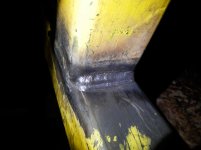
Made a bale spear this weekend. Tubing is 3x3x3/16. Spear and socket from Agri Supply. Fired up the SA200 and used 1/8 7018 for everything but the upper pin clevis where I used 7014 because I was running low on 7018. I still need to cap the vertical tube and paint it. Had to test it out first. The closeups are after I unloaded that little bale.
 

Attachments

  • P2230159.jpg
    P2230159.jpg
    1.1 MB · Views: 226
  • P2230160.jpg
    P2230160.jpg
    1.1 MB · Views: 262
  • P2230161.jpg
    P2230161.jpg
    888.7 KB · Views: 277
  • P2230162.jpg
    P2230162.jpg
    1 MB · Views: 259
  • P2230163.jpg
    P2230163.jpg
    1.1 MB · Views: 294
/ Bale Spear #2  
That looks as good as any could buy.
 
/ Bale Spear
  • Thread Starter
#3  
Thanks, Forgot to mention I cut out for the spear socket by tracing it with a sharpie and cutting freehand with my Longevity Forcecut 50D, finishing with a die grinder.
 
/ Bale Spear #4  
Good job. I've got an Agri Supply spear myself. It's waiting for me to make it a frame.
 
/ Bale Spear #5  
Looks too good for the hay I fed this year!!
Nice work.
 
/ Bale Spear #7  
Round the corners on the attachment points so it looks finished. It looks like you welded the lower 3 pt. brackets with a wide downhand weave. Downhand 7018 has very little penetration and leaves a concave weld. I'd take the spear out and put 2 good passes on in the flat/horizontal position.
 
/ Bale Spear
  • Thread Starter
#9  
Thanks for the positive replies.

Good Advice Arc Weld. I did make those welds in the position you described with the frame face down and the hitch tabs pointing up. No weave, just fed the rod in a straight line. I should have added another pass like I did on the upright, don't remember why I didn't. That particular weld was one of the worst. The rod must have been damaged because I saw a big chunk of coating flake off as it approached the puddle and I got some porosity. Here are some more pics of the welds.
 

Attachments

  • P2250170.jpg
    P2250170.jpg
    888.3 KB · Views: 199
  • P2250171.jpg
    P2250171.jpg
    607.5 KB · Views: 218
  • P2250172.jpg
    P2250172.jpg
    628.3 KB · Views: 227
  • P2250175.jpg
    P2250175.jpg
    649 KB · Views: 199
/ Bale Spear #10  
I don't mean to criticize, just trying to help! You need to fill your craters more. Also a good way of welding something like this, leave the craters in the center, not out on the edge. Generally the crater is the weakest point of a weld, especially if you don't fill them up.
Otherwise some very nice looking welds! :thumbsup:
 
/ Bale Spear #11  
For something that has to hold weight, like a 1000 bale flexing on the 3 pt., downhand 7018 is a bad idea. This isn't a big heavy implement. I don't understand why you couldn't put the tubing flat and put a nice horizontal fillet in? In the one weld, you can see voids and pin holes in the weld. It's a lot easier to fix now than after it breaks.
 
/ Bale Spear #12  
Looks well made. Personally, I don't like such a long spear. Long spears make getting away from the bale when stacking them in tight quarters difficult. You don't really need a very long spear to lift a bale.
 
/ Bale Spear
  • Thread Starter
#14  
For something that has to hold weight, like a 1000 bale flexing on the 3 pt., downhand 7018 is a bad idea. This isn't a big heavy implement. I don't understand why you couldn't put the tubing flat and put a nice horizontal fillet in? In the one weld, you can see voids and pin holes in the weld. It's a lot easier to fix now than after it breaks.
I thought I said I did have the tubing flat when I made those welds and I will add another pass or 2 to the lower hitch mounts. The only downhand welds I made were on the front side of the upper hitch tabs with 7014. Those shouldn't see much stress.

Thanks for the tip on the craters Shield Arc. Do you have a good technique for finishing up the bead or do you clean it up and add a weld over the crater? I did run the rod back upstream a little before I pulled away but I was pretty hesitant to dwell too long for fear of blowing through the 3/16 tube. The corners do look under-welded in the pics. That tube-tube joint should mainly see compression and shear but I'll fill in the craters before I paint it.
 
/ Bale Spear #15  
I try to make a conscious effort to start the rod 1/2 to 3/4 inch ahead of where I want the weld to start. This allows the rod to be hot when the weld starts. When stopping I change the rod angle to almost 90-degrees to the plate, or maybe a little backwards, and close up the arc length some, (push the rod into the puddle). This helps cool the puddle, then I back up a little to fill the crater.
 

Attachments

  • Flat fillet.jpg
    Flat fillet.jpg
    218.8 KB · Views: 156
/ Bale Spear
  • Thread Starter
#16  
Belated thanks for the instruction on craters Shield Arc. I beefed up some of the welds but didn't take any more detail pics.

Here are a couple of pictures with it painted and the top capped off. I really like the pin-on spear. It's nice to be able to pull it off when parked and it's easy to handle in 2 pieces.
 

Attachments

  • P3230191.jpg
    P3230191.jpg
    1 MB · Views: 132
  • P3230192.jpg
    P3230192.jpg
    1.1 MB · Views: 134
/ Bale Spear #17  
Looks well made. Personally, I don't like such a long spear. Long spears make getting away from the bale when stacking them in tight quarters difficult. You don't really need a very long spear to lift a bale.


I think it has a lot to do with how tightly the bale is wrapped, or by what kind of baler and how big it is. An open chamber baler tends to make a softer center than a belt type which has a harder core most times. A softer center is going to need a longer spear to support the weight all the way through or it can break apart on a long carry. I prefer the super penetrater types which are fluted and tapered....they are less likely to push the center out of a tight centered bale.
 

Marketplace Items

2020 DRAGON ESP 150BBL ALUMINUM (A58214)
2020 DRAGON ESP...
John Deere 5525 (A60462)
John Deere 5525...
500 BBL FRAC TANK (A58214)
500 BBL FRAC TANK...
2006 INTERNATIONAL 7400 6X4 DUMP TRUCK (A52706)
2006 INTERNATIONAL...
PNEUMATIC GREASE UNIT (A58214)
PNEUMATIC GREASE...
2019 Toro Workman GTX Electric Utility Cart (A59228)
2019 Toro Workman...
 
Top