whodat90
Silver Member
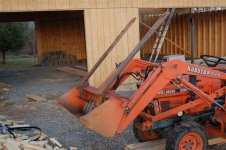
Well, kind of. I wanted a set of forks, but didn't like any of the clamp on designs, and didn't want to pay for a dedicated set since I have a pin-on bucket. Fork material was 1x2x.125 box, welded into a 1x4 rectangle, because I had some left over from a previous project. Finished length came to about 3.5' past the bucket edge. Then came the mounting style. I came up with about 19 different designs before I ever put pencil to paper, then asked a couple of budding (college) engineers for their input, and revised mine a couple more times. Finally I decided on a plan, and set to.
The forks were going to sit inside the bucket, but not necessarily rely on the cutting edge for strength. They were cut to follow the natural angles of the inside of the bucket, and in operation hang from a 3/4" pin inside the bucket. Terrible explanation, but the pics should explain all.
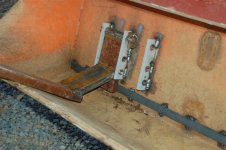
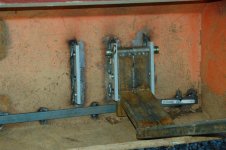
I was going to drill 3/4" holes in some 1/4" strap steel, cut to 6" lengths, and weld those perpendicular to the back of the bucket, vertical relative to the ground. That turned out to be hard, so I quit. Then I looked through my metal stack and found a bunch of 5/16"x2" brackets with three almost 3/4" holes already punched. Score! I finished reaming the holes out to 3/4" and started grinding the bucket paint for welding. I am using pins that are about 6" long, so I placed the first bracket 6.5" from the edge of the bucket, the next 4" away from that, the next 4" away from that. This gives me a wide and narrow position. I thought about putting the fork right at the edge of the bucket and drilling through the side, but for some reason I don't like the thought of doing that. Personal hangup, but I want it reasonably watertight. I also considered, and may still, put a pair of brackets in the middle for a spear position.
Next, I put a piece of .25x1" strap across the bottom of the back (inside) of the bucket, under the upright brackets. This is what the bottom of the back of the forks rest against, to distribute the load. Again, a pic tells the story so much better than words.
Still have to paint everything up, but I've already tested it well beyond design limits and they held up so I'm happy. Future plans for the forks are slide-on clamps that will add both uprights to keep stuff from rolling back on me and will have a lip that does clamp the bottom of the cutting edge, so that I can use the downforce of the loader.
Design advantages: Multi position, self-aligning, inherently laterally stable at the tips. Can't fall out of the bucket. Can fold up vertical for transport. Easily removable. Distrubute the load along the strongest part of the bucket rather than concentrating the force on the cutting edge of the bucket. Brackets lend themselves to other attachments; pin-on toothbar, bucket extension for loose material, 2" receiver hitch, etc. Adds little weight to bucket. Doesn't compromise bucket watertight integrity. Used stuff I had mostly laying around (total cost: a couple bucks for the pins)
Now for the pics, the pic names tell the story.
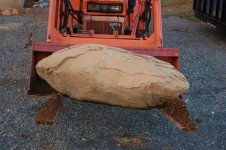
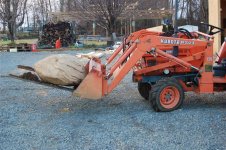
That rock was too heavy for the loader to lift by itself (the loader's only rated for 730lbs, that rock has to weigh as much as the tractor) but once I slid the forks under it and popped it out of the ground, it could curl the tips of the forks up a bit. Once they did, I drove over to a nearby stump and slid the forks up the stump, curling and lifting as I went. Once I got it off the ground, the tractor could keep it there, but couldn't get it any higher. Look at the front tire!
Edit: My bucket lip is bent slightly, which is why the right fork looks like it rests on the bucket lip. It doesn't, but it does bend down onto it with load, as does the left fork. The difference is, it uses the lip as an overload helper, and as a fulcrum; weight applied to the tip of the fork pushes down against the cutting edge, which becomes a fulcrum and pushes up against the mounting brackets, putting my welds either in compression or shear rather than tension. If I need to, I can add a strap from the upper mounting point to the fork above the cutting edge to transfer all the force, but for now I prefer to have the ability to fold the forks up.
The forks were going to sit inside the bucket, but not necessarily rely on the cutting edge for strength. They were cut to follow the natural angles of the inside of the bucket, and in operation hang from a 3/4" pin inside the bucket. Terrible explanation, but the pics should explain all.
I was going to drill 3/4" holes in some 1/4" strap steel, cut to 6" lengths, and weld those perpendicular to the back of the bucket, vertical relative to the ground. That turned out to be hard, so I quit. Then I looked through my metal stack and found a bunch of 5/16"x2" brackets with three almost 3/4" holes already punched. Score! I finished reaming the holes out to 3/4" and started grinding the bucket paint for welding. I am using pins that are about 6" long, so I placed the first bracket 6.5" from the edge of the bucket, the next 4" away from that, the next 4" away from that. This gives me a wide and narrow position. I thought about putting the fork right at the edge of the bucket and drilling through the side, but for some reason I don't like the thought of doing that. Personal hangup, but I want it reasonably watertight. I also considered, and may still, put a pair of brackets in the middle for a spear position.
Next, I put a piece of .25x1" strap across the bottom of the back (inside) of the bucket, under the upright brackets. This is what the bottom of the back of the forks rest against, to distribute the load. Again, a pic tells the story so much better than words.
Still have to paint everything up, but I've already tested it well beyond design limits and they held up so I'm happy. Future plans for the forks are slide-on clamps that will add both uprights to keep stuff from rolling back on me and will have a lip that does clamp the bottom of the cutting edge, so that I can use the downforce of the loader.
Design advantages: Multi position, self-aligning, inherently laterally stable at the tips. Can't fall out of the bucket. Can fold up vertical for transport. Easily removable. Distrubute the load along the strongest part of the bucket rather than concentrating the force on the cutting edge of the bucket. Brackets lend themselves to other attachments; pin-on toothbar, bucket extension for loose material, 2" receiver hitch, etc. Adds little weight to bucket. Doesn't compromise bucket watertight integrity. Used stuff I had mostly laying around (total cost: a couple bucks for the pins)
Now for the pics, the pic names tell the story.
That rock was too heavy for the loader to lift by itself (the loader's only rated for 730lbs, that rock has to weigh as much as the tractor) but once I slid the forks under it and popped it out of the ground, it could curl the tips of the forks up a bit. Once they did, I drove over to a nearby stump and slid the forks up the stump, curling and lifting as I went. Once I got it off the ground, the tractor could keep it there, but couldn't get it any higher. Look at the front tire!
Edit: My bucket lip is bent slightly, which is why the right fork looks like it rests on the bucket lip. It doesn't, but it does bend down onto it with load, as does the left fork. The difference is, it uses the lip as an overload helper, and as a fulcrum; weight applied to the tip of the fork pushes down against the cutting edge, which becomes a fulcrum and pushes up against the mounting brackets, putting my welds either in compression or shear rather than tension. If I need to, I can add a strap from the upper mounting point to the fork above the cutting edge to transfer all the force, but for now I prefer to have the ability to fold the forks up.
Attachments
-
 forksfoldedfront.JPG108.6 KB · Views: 2,548
 -
 forksfolded2.JPG84.8 KB · Views: 1,722
 -
 mountbracketsright.JPG72.5 KB · Views: 1,507
 -
 mountbracketsright2.JPG71.3 KB · Views: 1,062
 -
 mountbracketsleft.JPG71.3 KB · Views: 1,015
 -
 viewfromseat.JPG65.4 KB · Views: 1,304
 -
 rockfront.JPG97.7 KB · Views: 1,525
 -
 rockside.JPG115.7 KB · Views: 1,348