Building a cab for my SC 2400

   / Building a cab for my SC 2400 #1  

gordyy

Gold Member
Joined
Feb 2, 2009
Messages
373
Location
North Dakota
Tractor
cub cadet yanmar sc2400 Kubota F2560
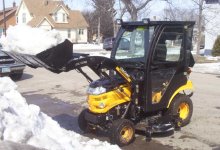
I have decided its time to build a cab for my SC 2400.
I had a factory Curtis Cab on my first one, but after the accident that totaled it I just was not ready to buy another like the first cab for a couple of reasons
1 it was too flimsy, it shook moved side to side racked sideways all the time when traveling either driving or trailering.
2 the factory heater in the cab was only good for about 0 f.
3 LED lighting its time for these companies to join this century
4 the ridiculous rear panel both the soft tarp one and the bubble replacement for another $900.

here is a picture of it almost brand new.
 

Attachments

  • Loader moving snow.JPG
    Loader moving snow.JPG
    289.1 KB · Views: 316
   / Building a cab for my SC 2400
  • Thread Starter
#2  
I am removing the roll bar when doing this and building a new one as part of the cab build. the outside frame is being made from 2" square tube 3/16 thick. I am using 3/16 as I plan on attaching all the sheet metal with bolts. thought about using nut inserts like Curtis did on the first but after 1 winter trying to remove a bolt the insert would spin causing a real pain in the rear. So will be drilling holes on the outside surface's and threading them not sure yet but I believe I will use 5/16 bolts on the outside for the skin attachment procedures. On the inside around the window frame area on the front and rear surface my plan is to drill and tap 1/4 bolt holes every 4" or so, to attach things like back up camera mirrors (have yet to find one I can mount outside and not take off scraping a tree or a pole or a building trying to get close) glasses holder etc. I believe I will only put a door on the left side as it is next to impossible for me to get onto or off of the tractor with my bad leg, with all the levers and pedals its hard to get on or off for a healthy able bodied person.
I am mounting it with the bolts into the frame on the rear of the loader mounting brackets, this is also where the bottom skid bracket mounts, I did as one of the pics show take the bottom skid plate off under the tank good thing the bolts only have a red ch of clearance between them and the tank (usually one of those things I find out by screwing too long of a bolt in and poking a hole in the tank) so using a 3/16 plate I added used a 18X2.00X55 bolt in instead of the factory 18x2.00x50 worked just right.
If you notice the cutout on the backet it is to allow the rear mower mount arms the cut isn't square my initial measurement was didn't allow for arm movement so I had to notch more as it went, will be squared before its painted.
These are pic of the bracket made to mount loader, the mounting location, clearance to the tank, and the raw bracket mounted. The bracket will allow me to take about 6 or 8 bolts off and lift the whole cab off.
 

Attachments

  • bolt and tank.jpg
    bolt and tank.jpg
    512.5 KB · Views: 268
  • bracket location 1.jpg
    bracket location 1.jpg
    460 KB · Views: 232
  • bracket location 2.jpg
    bracket location 2.jpg
    414.8 KB · Views: 201
  • bracket mounted.jpg
    bracket mounted.jpg
    478 KB · Views: 260
  • loader bracket.jpg
    loader bracket.jpg
    397.1 KB · Views: 217

Tractor & Equipment Auctions

JLG 1932R 19FT Scissor Lift (A50322)
JLG 1932R 19FT...
2010 Ford Edge SE SUV (A51694)
2010 Ford Edge SE...
2013 Ford F-250 Animal Control Truck (A50323)
2013 Ford F-250...
2020 Freightliner M2 106 S/A Dump Truck (A50323)
2020 Freightliner...
43017 (A51691)
43017 (A51691)
2011 Chevrolet Impala Sedan (A51694)
2011 Chevrolet...
 
Top