You are using an out of date browser. It may not display this or other websites correctly.
You should upgrade or use an alternative browser.
You should upgrade or use an alternative browser.
BX-24 Engine Heater
- Thread starter whatever1
- Start date
- Views: 3008
-
- Tags
- kubota x-24
/ BX-24 Engine Heater
#1
LouNY
Super Star Member
- Joined
- Jul 4, 2015
- Messages
- 12,270
- Location
- Greenwich, NY
- Tractor
- Branson 8050, IH 574, Oliver 1550 Diesel Utility (traded in on Branson) NH 8160. Kioti CK2620SECH
They both are a better choice then a lower radiator hose heater, I prefer a block heat but the inline circulating type will also get some heat into the cab.
I don't know what your BX 24 uses for starting glow plugs or an intake manifold heater, on several of the tractors that I start in the winter the ones that have automated the intake or glow plugs require a few key cycles to warm them up. In really cold weather I have had engines that were preheated start and have the cold air snuff them right out.
I don't know what your BX 24 uses for starting glow plugs or an intake manifold heater, on several of the tractors that I start in the winter the ones that have automated the intake or glow plugs require a few key cycles to warm them up. In really cold weather I have had engines that were preheated start and have the cold air snuff them right out.
Thanks for the response.... I had a lower radiator hose heater and it worked great. When I had a cab installed the dealer put in a block heater that did not last long.
would this one work ? How would you tell what direction to put it in ? ?
https://www.amazon.com/Kats-13150-A...=2025&creative=165953&creativeASIN=B000BQUUR6
would this one work ? How would you tell what direction to put it in ? ?
https://www.amazon.com/Kats-13150-A...=2025&creative=165953&creativeASIN=B000BQUUR6
LouNY
Super Star Member
- Joined
- Jul 4, 2015
- Messages
- 12,270
- Location
- Greenwich, NY
- Tractor
- Branson 8050, IH 574, Oliver 1550 Diesel Utility (traded in on Branson) NH 8160. Kioti CK2620SECH
A 1500 watt heater is a good sized heater, you might want to consider a smaller one;
from the installation PDF.
TANK HEATER INSTALLATION PRODEDURES
Note: Do NOT begin installation until you have reviewed and understand the preceding warnings and cautions.
Do not drain engine coolant or cut any hoses until:
1) Check the application guide for proper use.
2) Read the installation instructions fully and contact Five Star should you have any questions about the instructions.
3) You must then determine where to best locate the tank heater and what mounting options you are going to use.
4) The tank heater requires two connections to the engine coolant system. The heater must be mounted in a vertical position with the coolant flow arrow pointing up.
5) Locate the coolant drain plug in the block. If there is no drain plug, use the lower radiator hose connector (this is a separate item and must be purchased to match the size of your lower
radiator hose) to supply the coolant to the inlet of the heater. (See figure 1)
6) Depending on whether you use the lower drain plug in the block or the lower radiator hose connector, the outlet side of the heater will change. If you use the preferred lower drain plug in
the block the furnished “Y” will be spliced into the heater hose going to the engine or water pump, make sure there are no restrictions. If you use the lower radiator hose heater
connector, splice the “Y” to the heater hose that goes to the engine or the manifold.
7) Now that you are ready to begin your installation drain and clean the engine cooling system. Mount the heater in a vertical position. Using the mounting bracket supplied, position the
heater as low as possible to achieve the best gravity drain of coolant possible. Remember to position the heater so that the outlet side does not have more than 12” to 18” to pump the
coolant back into the engine. It is ideal to use the frame rail, the fender or fire wall to attach the mounting bracket. This will minimize vibration and add life to the heater. Leave
sufficient clearance around the heater so that the hot surface of the heater does not come in contact with any moving or heat sensitive parts or material.
8) If you are using the lower drain plug in the block, be sure to clean the hole using a small probe. Use the adapter furnished to screw into the hole, the use of pipe dope or tape is
recommended. You may have to use an adapter if the hole is not a 1/8” NPT. Use a 5/8” diameter heater hose for connecting the inlet line to the heater. Use 2 of the #12 hose clamps
furnished to secure the hose to the adapter and the heater. Make sure that the coolant hose is secure by placing the clamp behind the barb and tighten the clamp to 30 inch pounds.
9) Install the outlet side by first attaching the heater hose to the heater. Next determine which heater hose that you are going to “Y” into. Cut the heater hose in half and use 2 #12 hose
clamps to reconnect the hose. Direction the “Y” so that the coolant will flow towards the engine not back to the fire wall. The “Y” is stepped so that you can reconnect a 5/8” or 3/4”
hose.
10) Refill the engine with the heater outlet line disconnected at the engine until outlet line is full of coolant. This eliminates airlocks in the heater and hoses. Now connect the bottom of the
“Y” to the top of the heater and finish filling engine. Do not use more than 60% concentration of anti-freeze. Check all connections for leaks.
11) Route the cord to any convenient point and tie cord down to prevent any damage or strain. CAUTION: Be sure to keep cord away from hot surfaces and moving parts.
12) Run the engine for 30 minutes to open engine thermostat.
13) Check for coolant leaks and fill to the proper level.
14) Shut off engine and let it cool.
15) Once the engine is cool plug the heater into a grounded outlet.
jiggseob
Member
I came to this forum today to seek advice on adding an electric tank type circulating coolant heater to my B6200 HST with D850 engine.
I am looking for information about where to connect to the cooling system for the inlet and outlet of the heater; where the threaded pugs are, what size of hose to use, etc.
Someone must have completed this task, with some varying degree of effectiveness of the result.
With a circulating heater like this, theres no physical "pump" per se, the coolant circulates by convection and/or by boiling. There is a check ball-spring or spring-flapper check valve on the inlet and/or outlet to the heater tank. The heater tank/element has a thermal cut-out that turns the element off when the temp exceeds something like 230F and re-connects after the element cools down. So the tank is full of coolant, and the element heats the coolant and when it boils it gurgles out of the top of the heater into the engine. When the tank boils almost dry, and the element gets hot the thermo-switch cuts out. The cool-down of the boiled coolant vapour sucks cold coolant in the bottom past the check valve, and the heat/boil/suck cycle repeats.
Its easy for me, a Canadian, to draw inferences between heat/boil/suck cycle and the impeachment inquiry....
So today, I will undertake draining the coolant out of my B6200, fit the hoses to the block, and connect my 750 watt circ-heater. With an installation like this, getting the heater to mount "vertical", minimize the distance of the hot-hose to the block, and finding places to tap in/out of the coolant are the challenge. The coolant coming out of the heater has to go into the block or head, and I have to find a way into the head or block and not go past the thermostat. Tee-ing into the top rad-hose will probably not work because the thermostat is in there, and its cold so it will be shut. If I put outlet in the top rad hose, I will end up heating the rad not the engine.
I'll post the results. Of my block heater install, not the other heat/boil/suck cycle.
jiggseob
Member
No Joy. I took all the panels off the outside of the engine, and looked all around and sized things up for coolant connections.
For the cold outlet from the engine to the heater, on my tractor there is a "drain line" that comes from the lower right front of the engine block, and goes to a petcock fitting on the bottom right of the lower radiator tank. Its a smaller line that a regular heater-hose. Yes, in might be a challenge finding a tee to fit that 3/8-ish size drain hose and a regular 5/8 heater hose. A 1/2 x 1/2 x 3/4 pex tee - made from brass - worked well; the 1/2" pex barbs on the straight-thru of the tee fit the 3/8 drain hose, and the 3/4" pex barb fits reasonably well on the 5/8 heater hose that will go to the heater. The drain hose runs to the drain petcock on the bottom of the radiator, and that petcock is made such that when the drain plug is in place, flow through the drain hose to the radiator is blocked, and cooling flow must follow the path pumped by the water pump.
For the hot inlet to the engine from the heater, on the right side of the water-pump housing just below the thermostat housing is a threaded plug facing to the left, canted a bit to the rear. Removing that plug, I find its some sort of quite large fine straight metric thread with a copper sealing washer. By some fluke of engineering, the thread on that plug is so close to 3/8 18tpi npt that a 3/8 fitting turns in reasonably well about 4 or 5 turns before starting to bind. So I ran a tap into the hole, and fitted a 3/8-18 npt barb fitting. Before running the tap in, I put grease in the chip-grooves of the tap to catch as much of the aluminum cuttings as possible. It was surprising how little the tap cut, just a tiny bit on the outside threads cutting the wider base of the taper. Before running the fitting in, I reached in and vacuumed, then rag-wiped with cleaner, and applied permatex to the the inside and outside threads. The fitting threaded in like a taper fitting should, about six or so turns, then suddenly tight as it bottoms to the taper. With the permatex on the threads, I'm pretty sure it won't leak.
So now to find a spot to mount the heater so the hose from the heater to the water-pump fitting is less than a foot, and up-hill or level. They call this a compact tractor for a reason, its quite well-compacted in the engine-bay. I tried to fit the heater tight to the fan-shroud ahead of the alternator, but no go. Just no room and no flexibility to move anything to make room.
And for this heater to work best, it should be mounted vertical, and the outlet hose from the heater to the engine should be no more than a foot, and be level or up-sloping from the heater to the engine. Some re-thinking and re-working necessary.
Then I ran out of time, daylight, etc.
Tomorrow I will look at sectioning out a piece of the fan-shroud to make room for the cylindrical shape of the heater, and then sheet metal patching-over the carved fan shroud so cooling air flow is not too badly compromised. In this B6200 implementation of some 13hp, it has the same radiator as a B7200, so slightly diminished cooling shouldn't be a problem.
We shall see how it goes. Heat/boil/suck.
jiggseob
Member
So I looked at putting the heater aft of the rad and fore of the alternator, just no room there.
Plan C, theres lots of room ahead of the main radiator, but the downside is the hose from the heater to the engine is about 17inches, longer than we like, too much heat loss between heater and engine. After I get it together, I will wrap the hot side of the hose with fiberglass+foil and see how it goes.
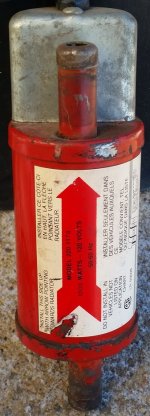
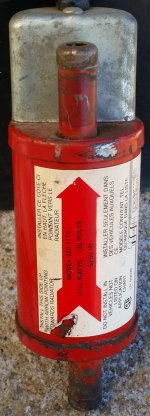
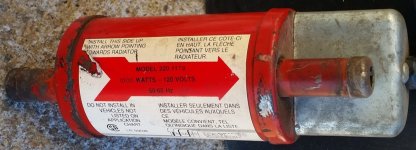
This is the heater I'm putting in, I see its 1000 watts not the 750 I thought. Not a bad thing, since the install situation is not ideal and there will be more heat loss than usual due to the extra-length of hose from heater to engine.
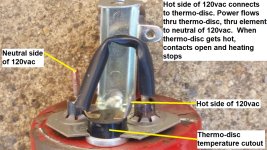
I took the cover off the heater to make sure nothing was burnt, corroded or leaking or otherwise degraded from its previous install. This is whats in there. I mention thermodisc, for me thats a generic description of a bimetal disconnect device:
49T High Temperature Bimetal Control | Emerson
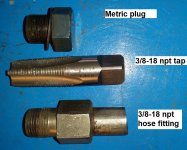
This is the large metric fine thread plug, the 3/8 18tpi npt tap, and the 3/8 npt barb fitting
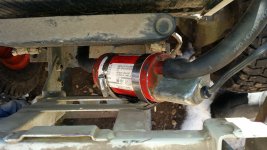
This is the mount of the heater in front of the rad and oil cooler, from the top
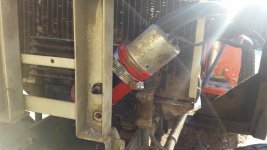
This is the mount of the heater in front of the rad and oil cooler, from the front - sorry about the sun flare
This is the hose from the heater, past the left edge of the rad, and over the alternator and into that fitting above the thermostat
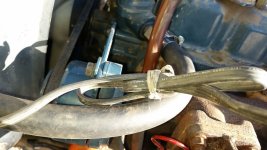
The pictures show no clamps on the heater, I was just trial-fitting at that point, I still had to take it all apart and put some shrouding back in place, at which time I put the clamps on.
I pressure tested it all, and it held 15psi for 15 minutes with no perceptible drop on the needle
I put the coolant back in, had to add a pint because I spilled and piddled while draining.
Plugged it in and waited. A few minutes, and the hose going into the top of the engine was hot. By the time I got all the tin back on and all the stuff put away it was an hour, the back of the head was warm to the touch and it started without glowing.
Albeit it was 5C outside, I think thats about 40F. Forecast says -15C in a couple days, we shall see.
Plan C, theres lots of room ahead of the main radiator, but the downside is the hose from the heater to the engine is about 17inches, longer than we like, too much heat loss between heater and engine. After I get it together, I will wrap the hot side of the hose with fiberglass+foil and see how it goes.
This is the heater I'm putting in, I see its 1000 watts not the 750 I thought. Not a bad thing, since the install situation is not ideal and there will be more heat loss than usual due to the extra-length of hose from heater to engine.

I took the cover off the heater to make sure nothing was burnt, corroded or leaking or otherwise degraded from its previous install. This is whats in there. I mention thermodisc, for me thats a generic description of a bimetal disconnect device:
49T High Temperature Bimetal Control | Emerson

This is the large metric fine thread plug, the 3/8 18tpi npt tap, and the 3/8 npt barb fitting

This is the mount of the heater in front of the rad and oil cooler, from the top

This is the mount of the heater in front of the rad and oil cooler, from the front - sorry about the sun flare

This is the hose from the heater, past the left edge of the rad, and over the alternator and into that fitting above the thermostat

The pictures show no clamps on the heater, I was just trial-fitting at that point, I still had to take it all apart and put some shrouding back in place, at which time I put the clamps on.
I pressure tested it all, and it held 15psi for 15 minutes with no perceptible drop on the needle
I put the coolant back in, had to add a pint because I spilled and piddled while draining.
Plugged it in and waited. A few minutes, and the hose going into the top of the engine was hot. By the time I got all the tin back on and all the stuff put away it was an hour, the back of the head was warm to the touch and it started without glowing.
Albeit it was 5C outside, I think thats about 40F. Forecast says -15C in a couple days, we shall see.
Attachments
Last edited:
jiggseob
Member
I was re-reading my write-ups, found a mistake 2 posts back, I describe a place to connect the inlet to the engine from the heater:
"For the hot inlet to the engine from the heater, on the right side of the water-pump housing just below the thermostat housing is a threaded plug facing to the left, canted a bit to the rear."
In fact, that threaded plug is on the left side of the water pump / thermostat housing, facing out to the left, canted a bit to the rear. Sorry for the confusion. That plug is removed and the hose connector threaded in, shown in the sixth/last picture.
check
Elite Member
- Joined
- Sep 26, 2008
- Messages
- 4,012
- Tractor
- 2009 Kubota BX25
I just use an OEM block heater. What is the advantage of your system?
jiggseob
Member
I used to have the frost-plug heater, actually still have it, but one of the pins off the element burnt right off inside where the cord plugs in. When its really cold, below 0F, it would not start, and I would have to tarp over the engine area and put a heat-gun under there for an hour. That, and even when it was between freezing and 0F, the engine wasn't really warm, it was just a bit less-cold.
If a circ-heater is working properly, the engine will be actually warm, even if its ugly cold out. We use 1500watt circ-heaters on 15litre Cummins engines in equipment around the farm; Versatile 4wd, a Peterbilt, etc, and even though those installations are optimal with a heat-blanket and short hose run, the engines are warm to the touch after 4~6 hours of plug-in. Makes starting equipment to haul grain or plow snow in January much easier. If one is forward-thinking enough to park within cord-range, otherwise its a gen-set and some babysitting.
Yes, the way I'm set-up on my acreage near Edmonton, my Kubota is parked outside in a metal-building, which some days feels colder than outside.
Are you actually Toronto, or one of the GTA-suburbs? I have have cousin northeast of To, about halfway between Oshawa and Peterborough. I've been there during his maple syrup run, quite fascinating.
